Microsoft SharePoint Connectors#
Squirro provides two 1-click connectors for Microsoft SharePoint. Both connectors allow Project Creators to connect to a Microsoft Azure account and index Microsoft SharePoint data into Squirro, but they use different authentication methods:
Microsoft SharePoint Connector
Uses OAuth authentication (standard method).
Microsoft SharePoint Azure VM Connector
Uses Managed Identity authentication (requires Azure VM deployment).
In the Squirro web interface, these appear as two separate connectors in the Enterprise section. Choose the appropriate connector based on your authentication requirements and deployment environment.
Set Up the Connector#
Choose the appropriate setup method based on your connector type. Both authentication methods share the same Advanced Options for customizing data indexing behavior.
OAuth Authentication for Microsoft SharePoint#
Usage assumes that you have already configured the OAuth setup for the 1-click connectors on the server. It is by default available on all of the cloud instances deployed and managed using start.squirro.com. For any other Squirro installation, please ask your Squirro server admin to follow the steps presented in the OAuth Configuration section.
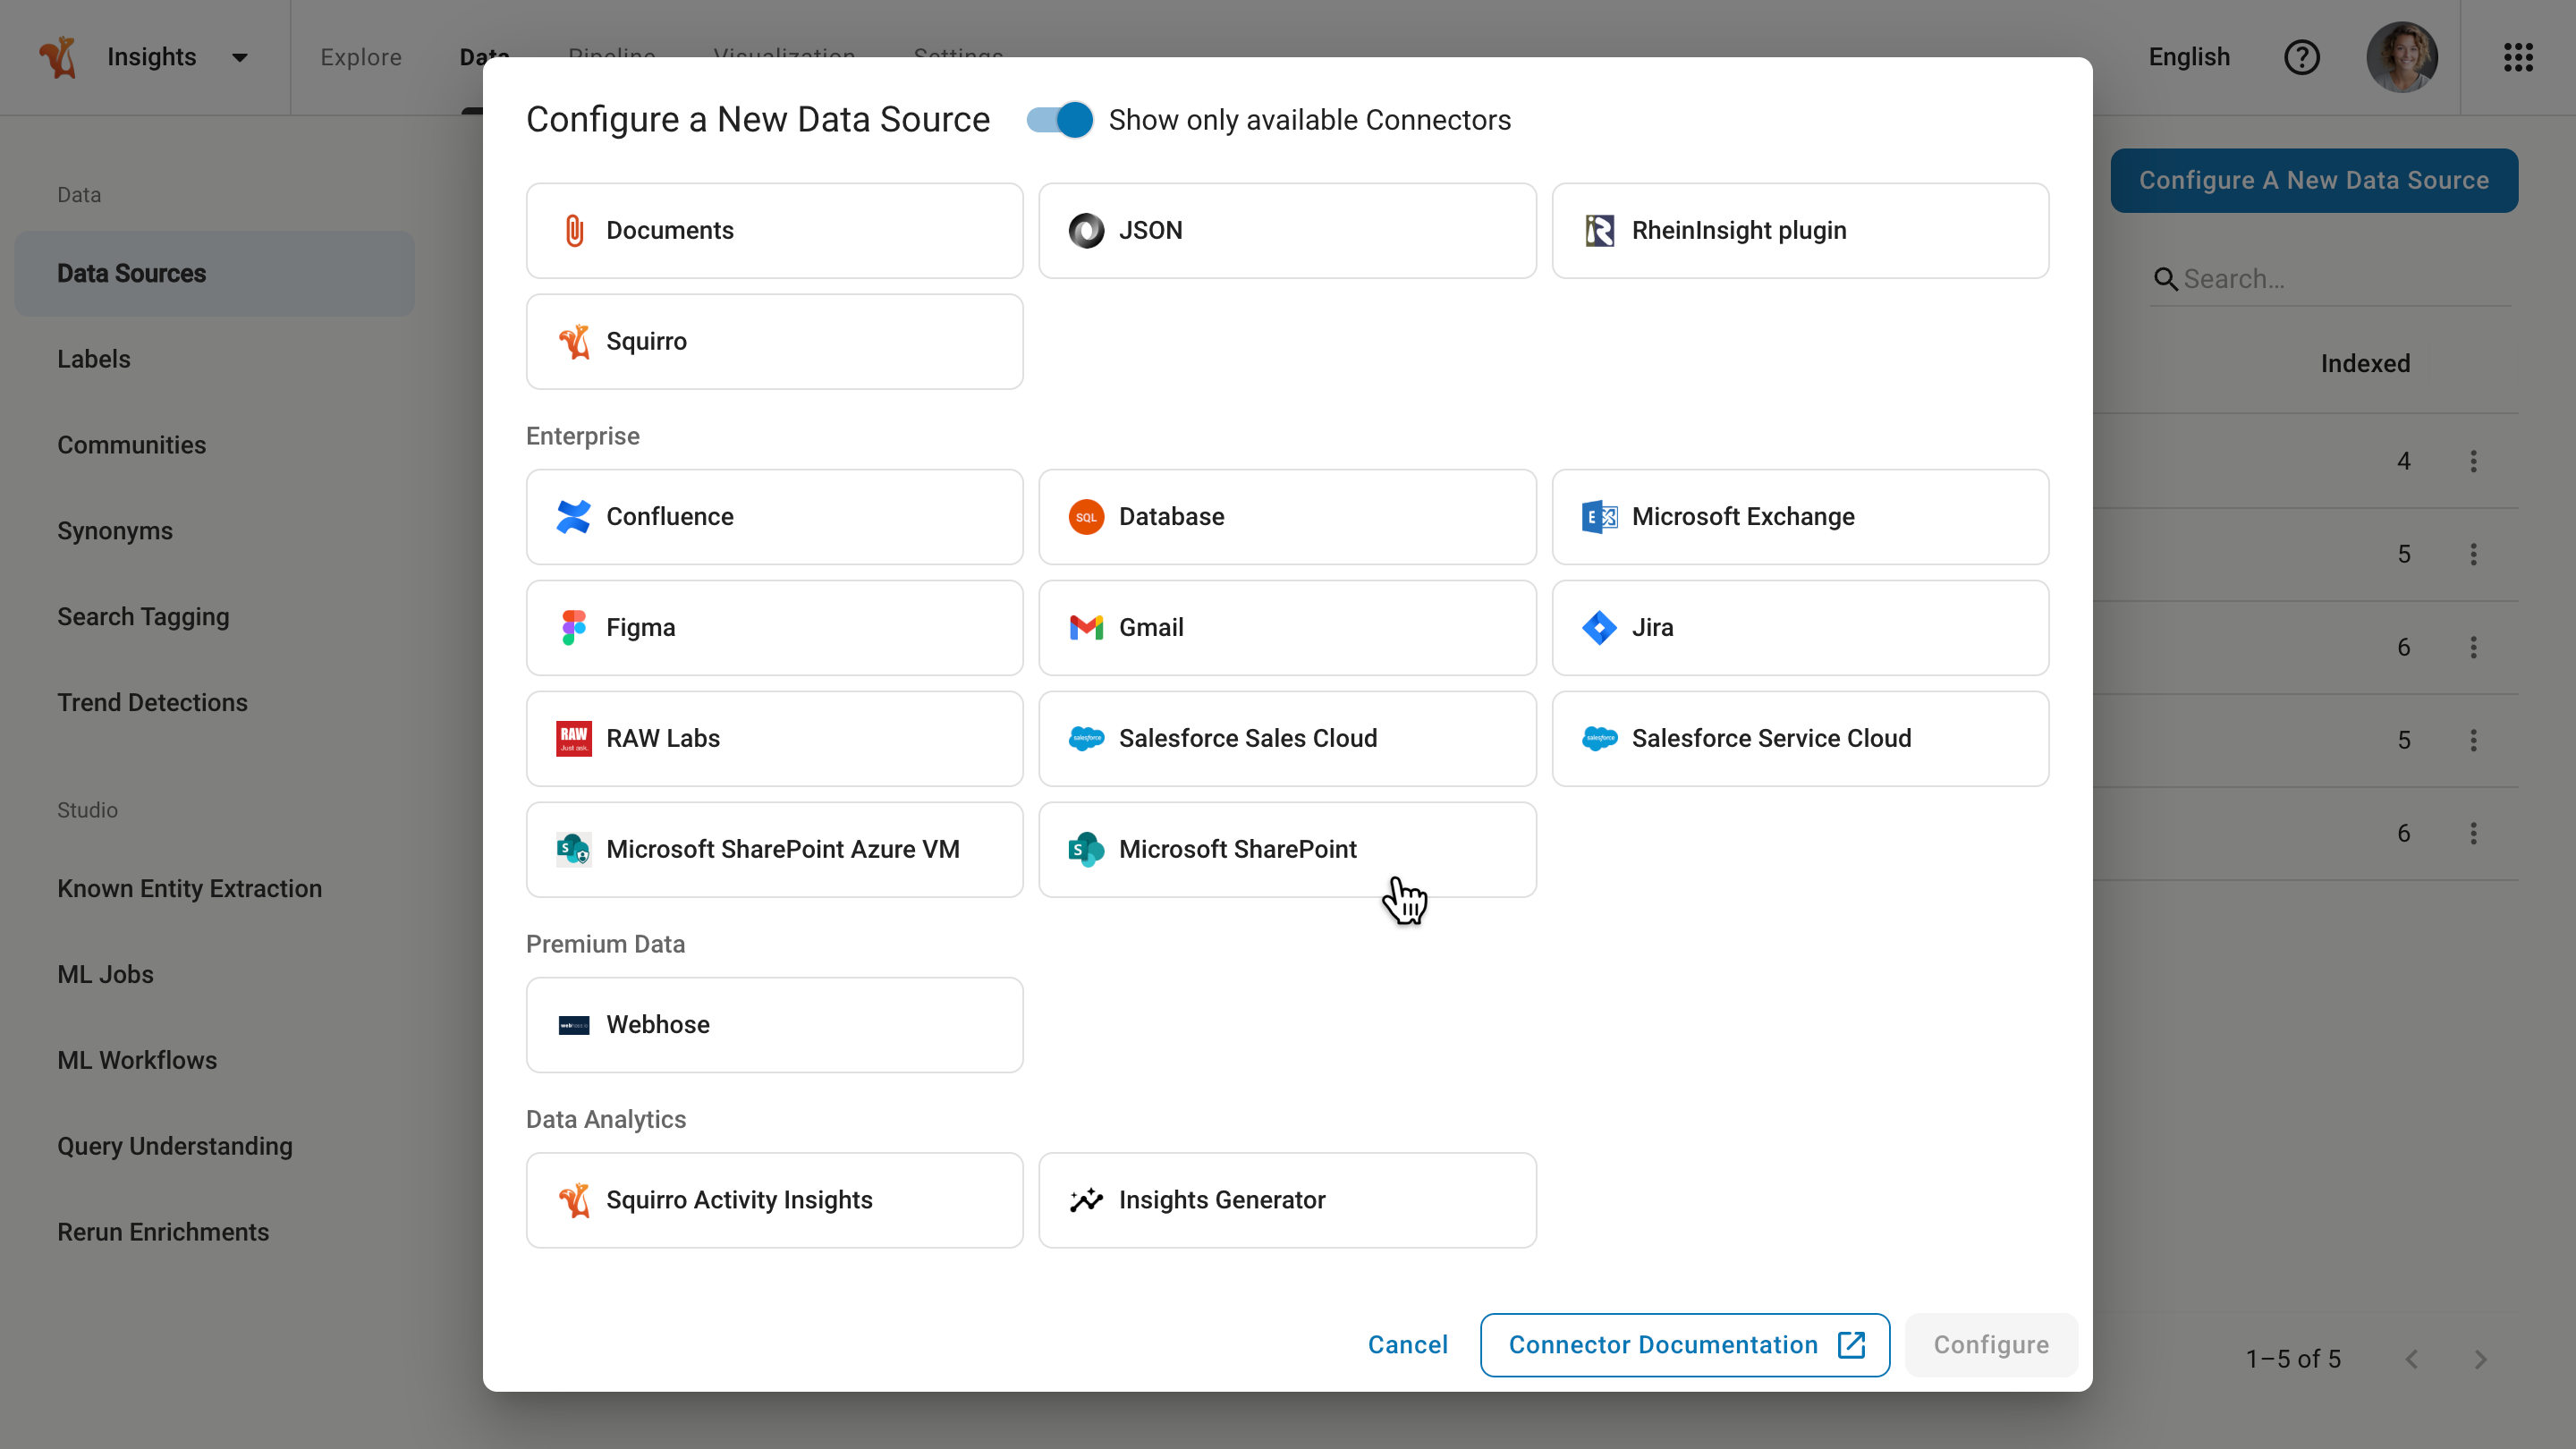
Click on Configure A New Data Source then navigate to the Enterprise section of the Data Sources dashboard.
Click on Microsoft SharePoint, then Configure to get a prompt asking you to authenticate your Microsoft Azure account. Click on the Authenticate button.

Once you click on the Authenticate button, you are redirected to the Sign-in screen hosted by Microsoft.
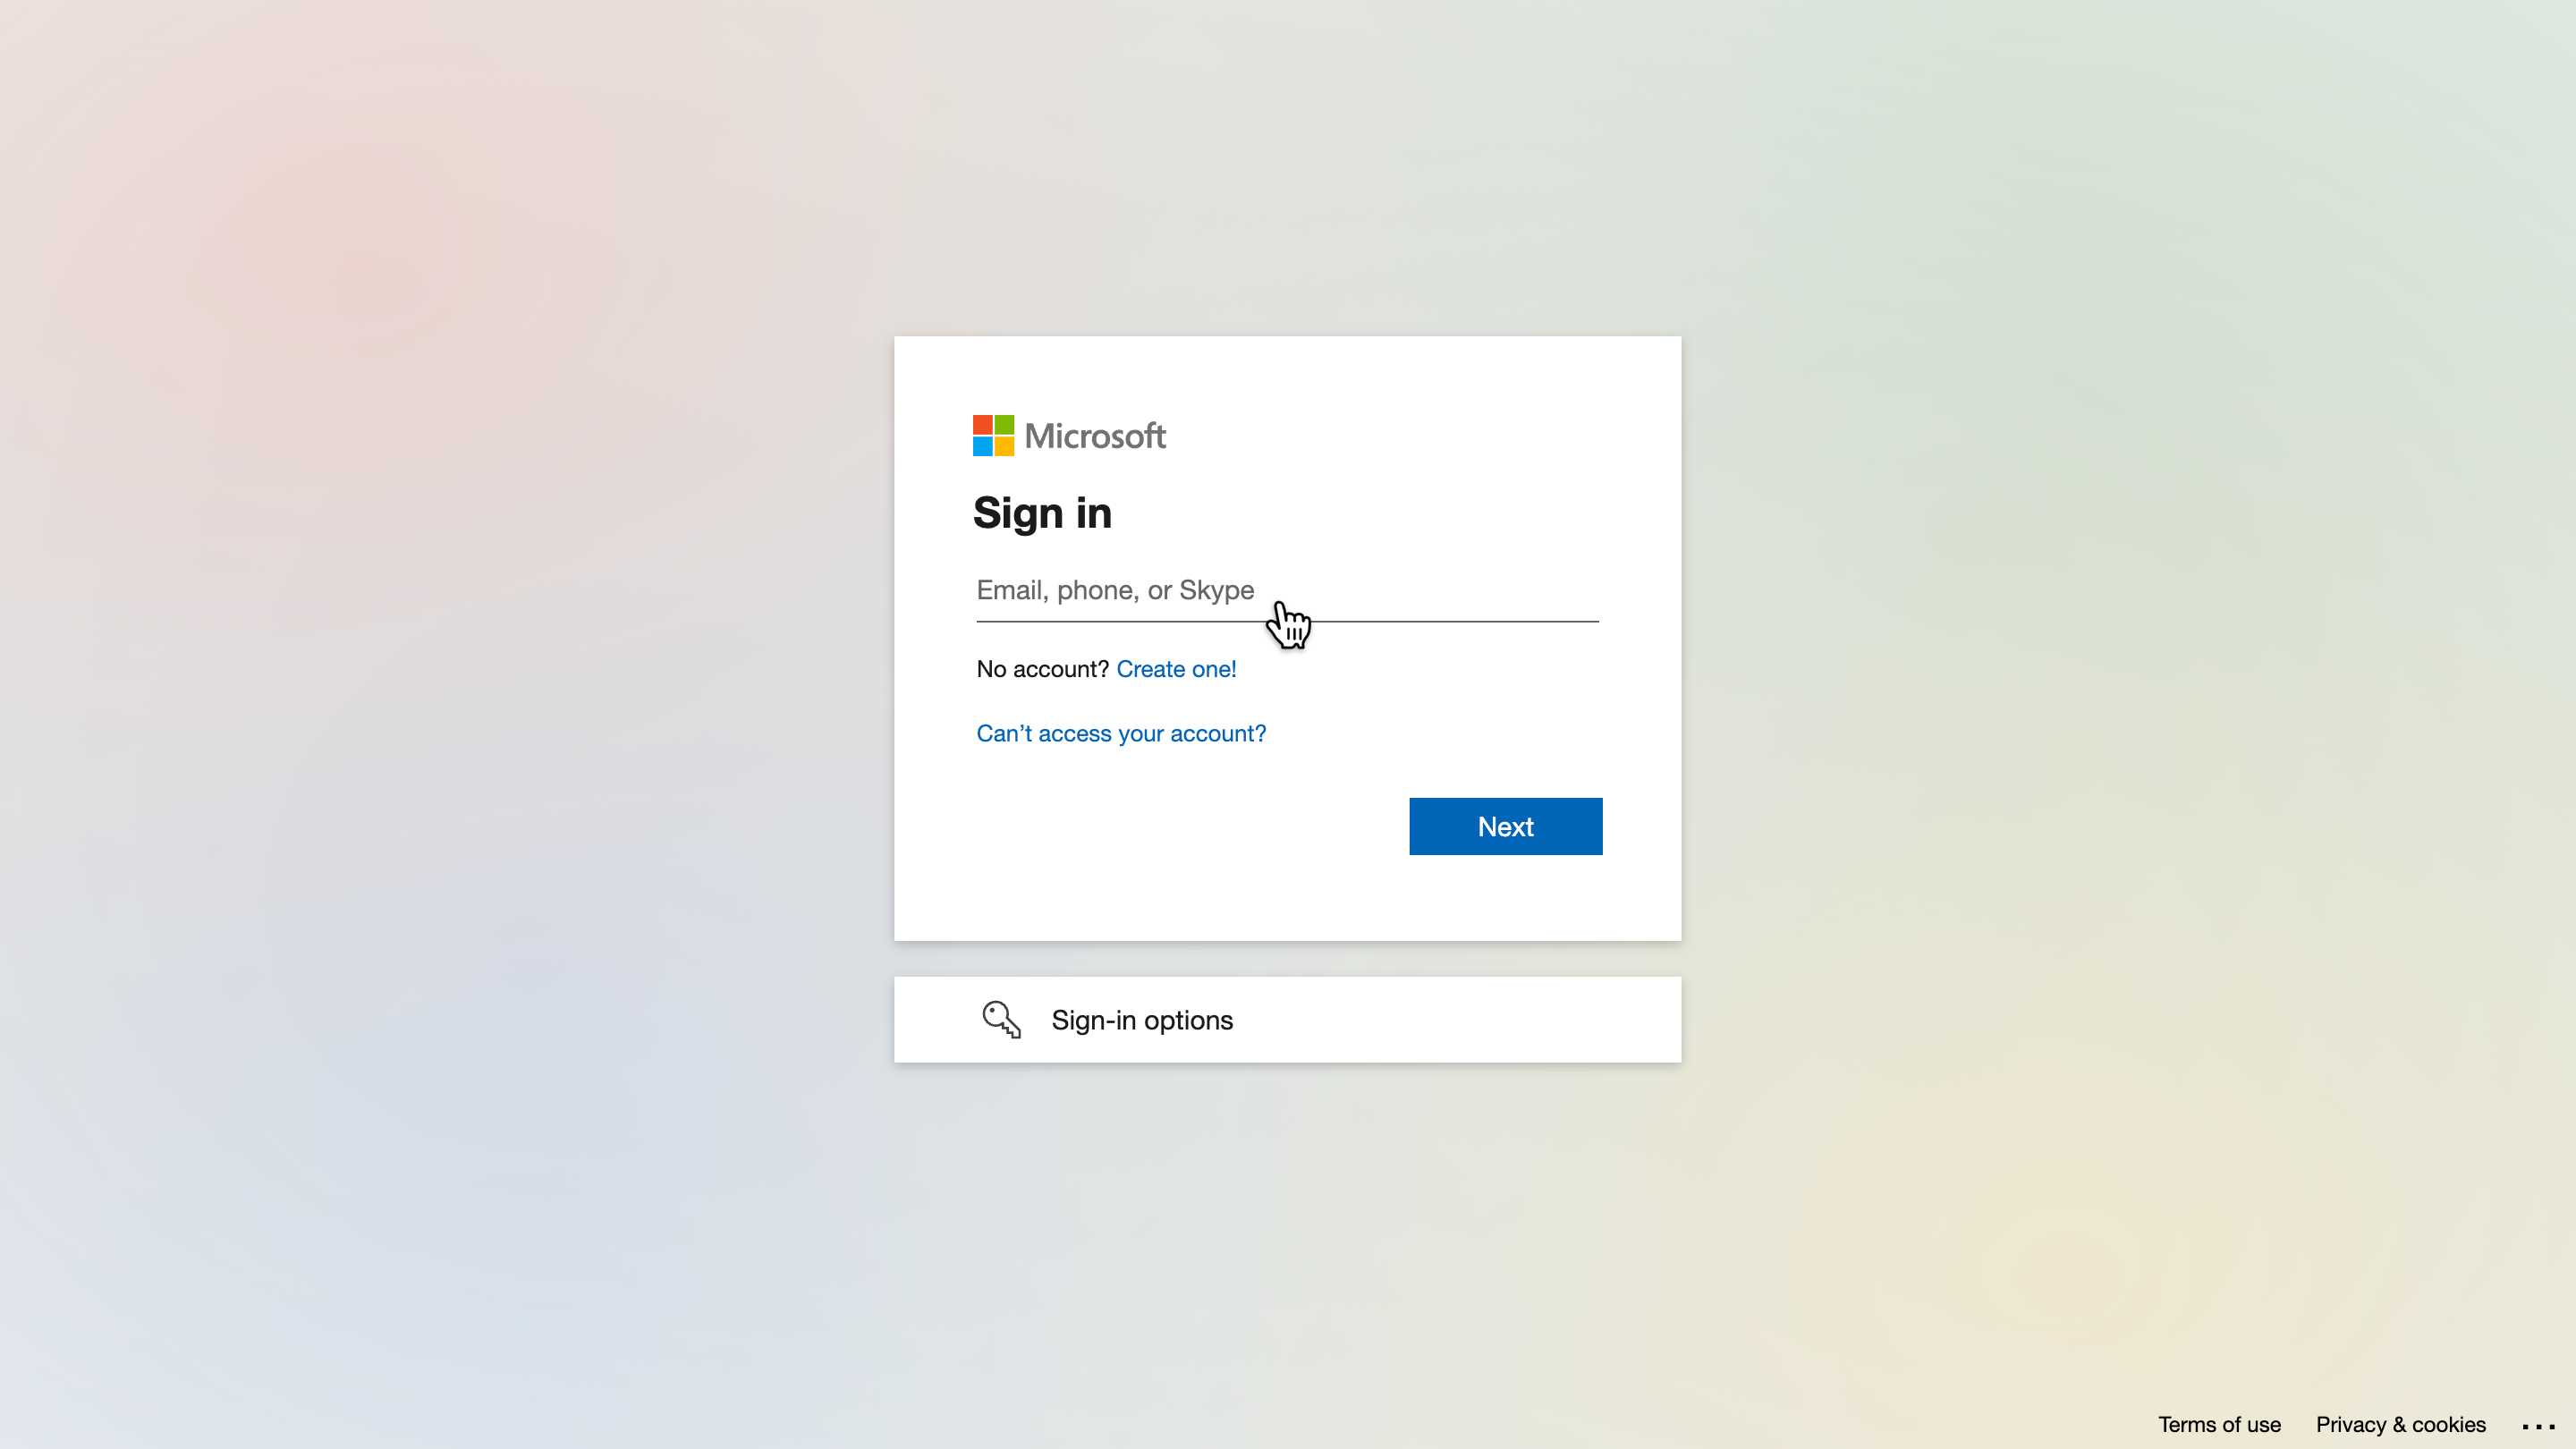
Squirro never asks for your Microsoft password. This request comes only from Microsoft itself.
Once you sign in you are prompted to approve Microsoft SharePoint scopes. This screen is presented to you by Microsoft, asking you to provide consent for your Microsoft SharePoint data to Squirro.
After approving the scopes, you are brought back to the Configure source screen. That screen shows which Microsoft account Squirro uses.

Now, you can click Save & Exit for Squirro to automatically configure the mapping of item fields and labels, as well as any other required source configuration.
Tip
Media files content (image, video, audio) is not fetched by default. To change that behaviour, expand the Advanced Options section and check the option to fetch media files content.
Alternatively, you can define those settings manually by clicking Next and going through the whole source setup process. It allows you the full flexibility of how the Microsoft SharePoint data should be mapped to Squirro items.
After clicking on Save & Exit the system starts indexing your Microsoft SharePoint data into Squirro.

Managed Identity Authentication for Microsoft SharePoint Azure VM#
The Microsoft SharePoint Azure VM connector provides seamless integration for Squirro instances deployed on Azure virtual machines using Managed Identity authentication. This approach eliminates the need for OAuth configuration while leveraging Azure’s native identity management capabilities. Follow the setup instructions below to configure your Azure VM environment.
Click on Configure A New Data Source then navigate to the Enterprise section of the Data Sources dashboard.
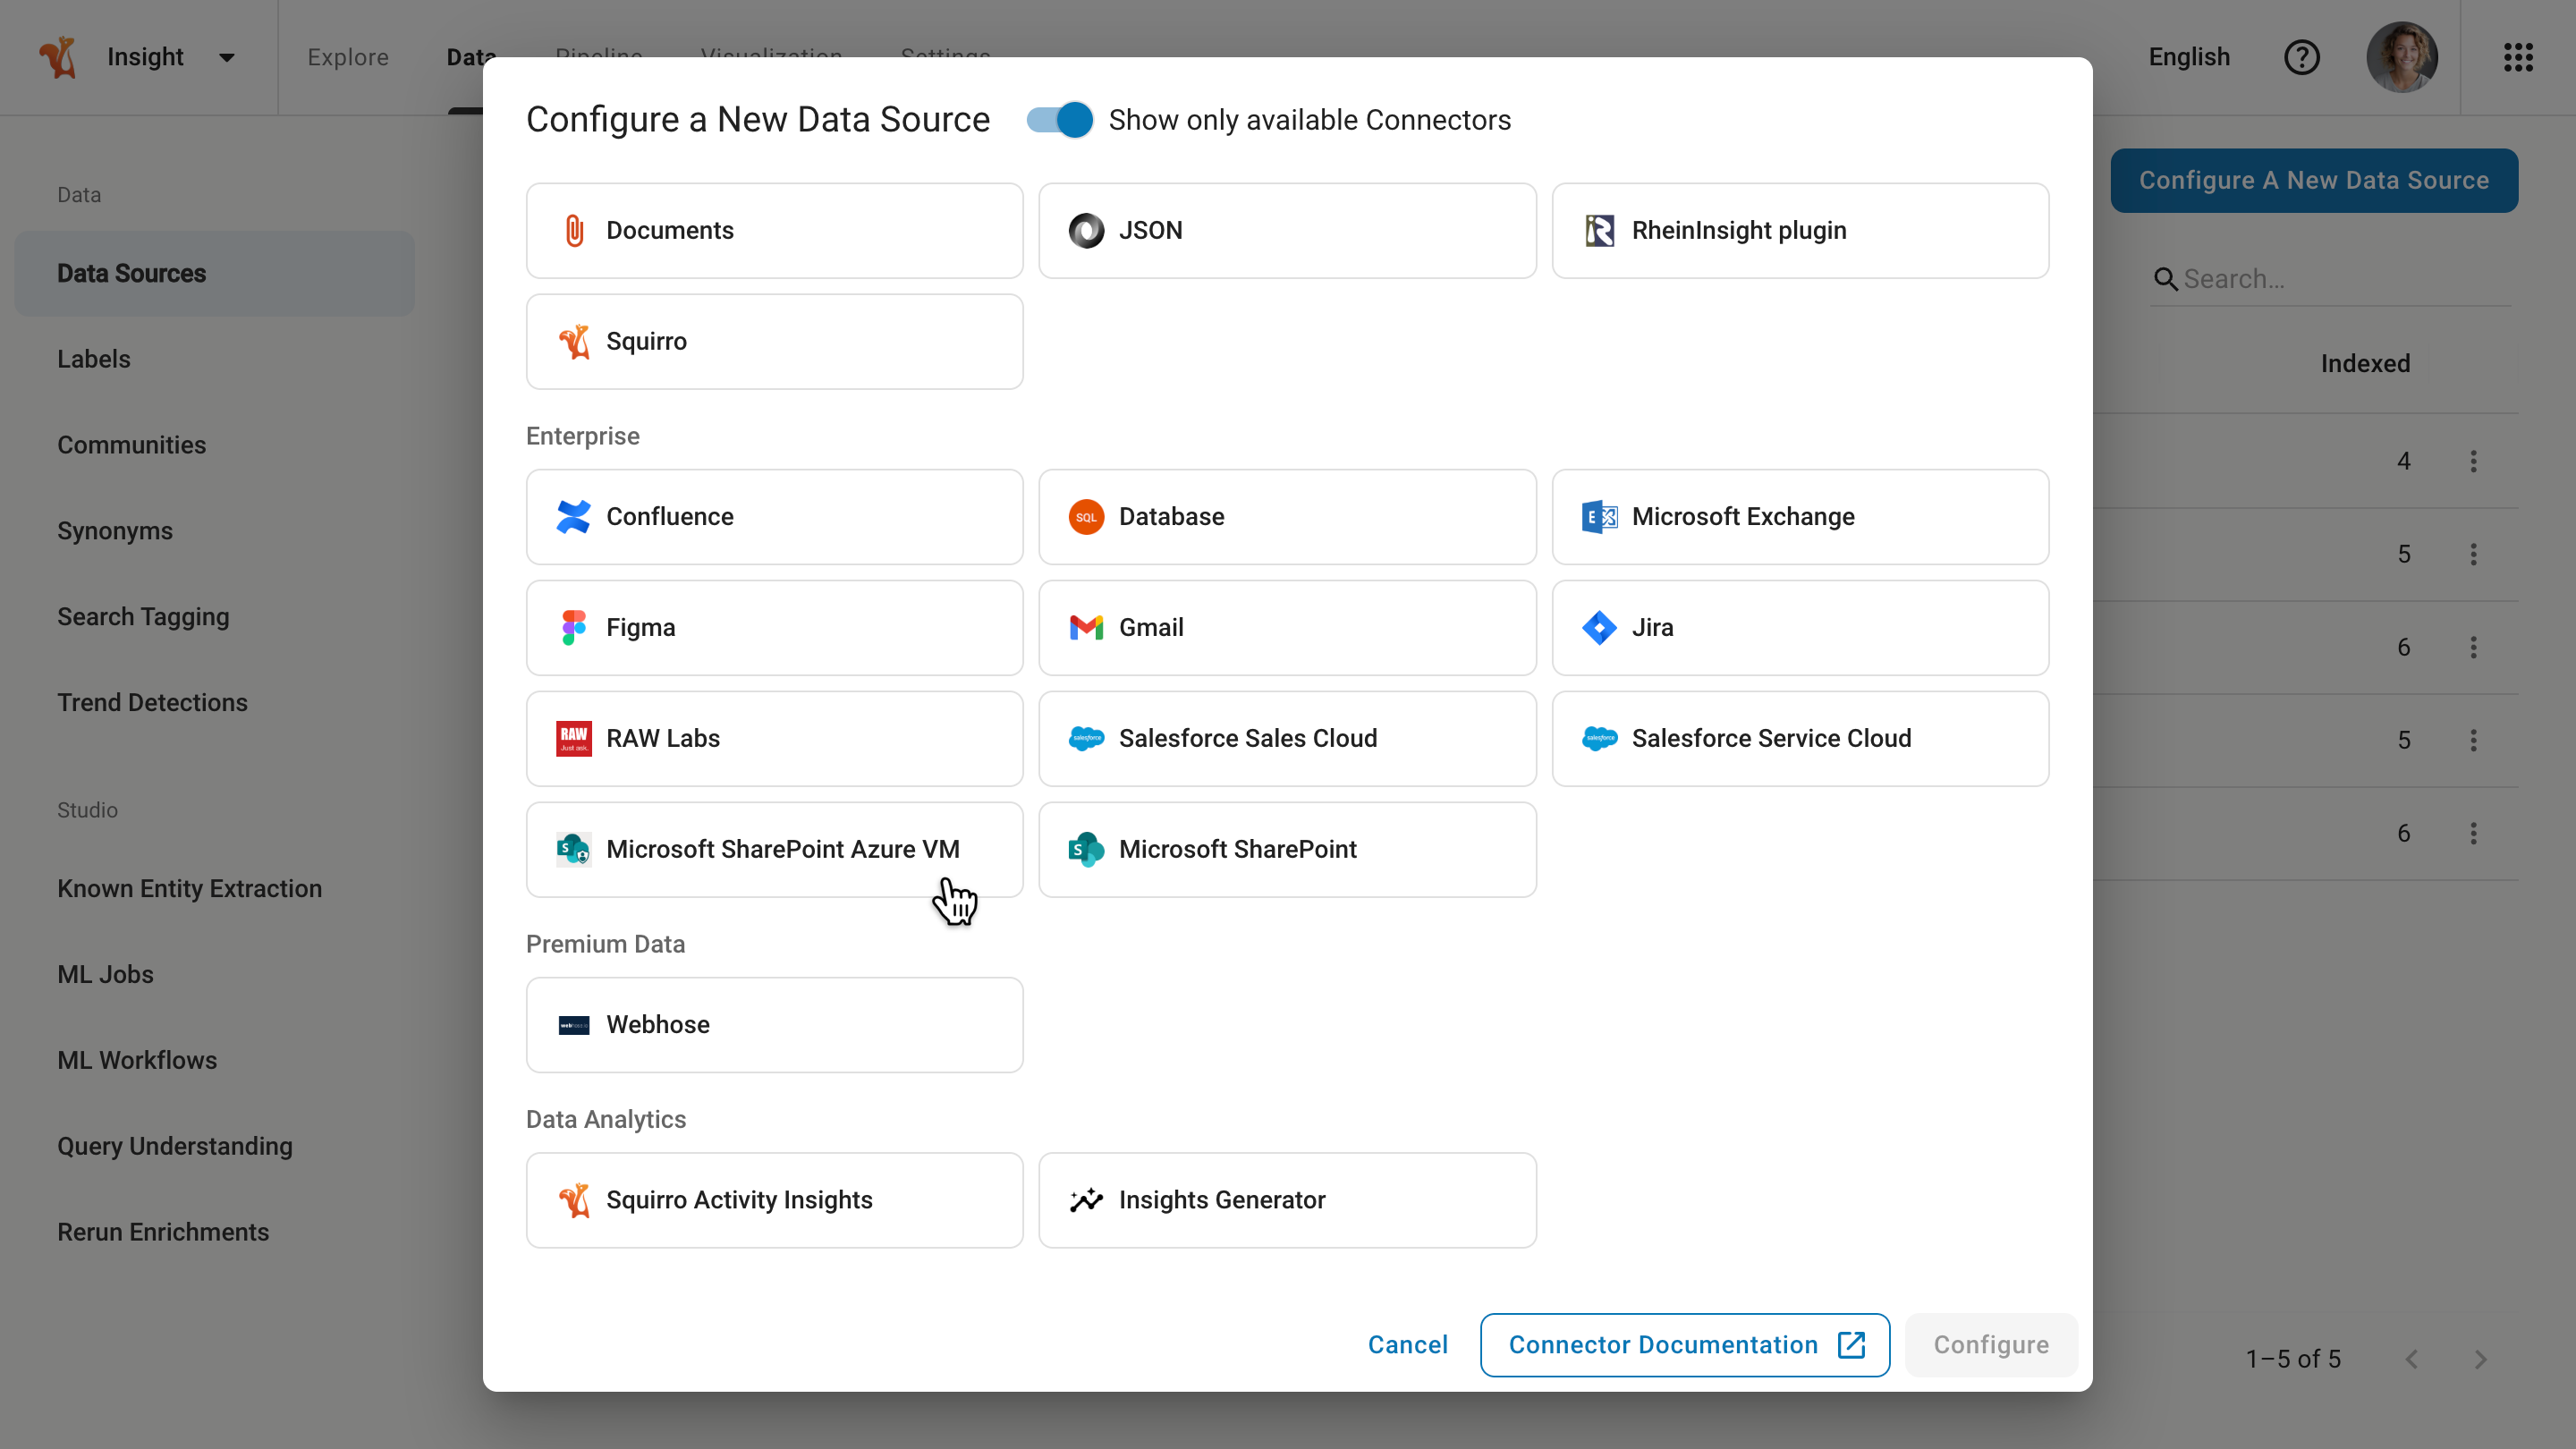
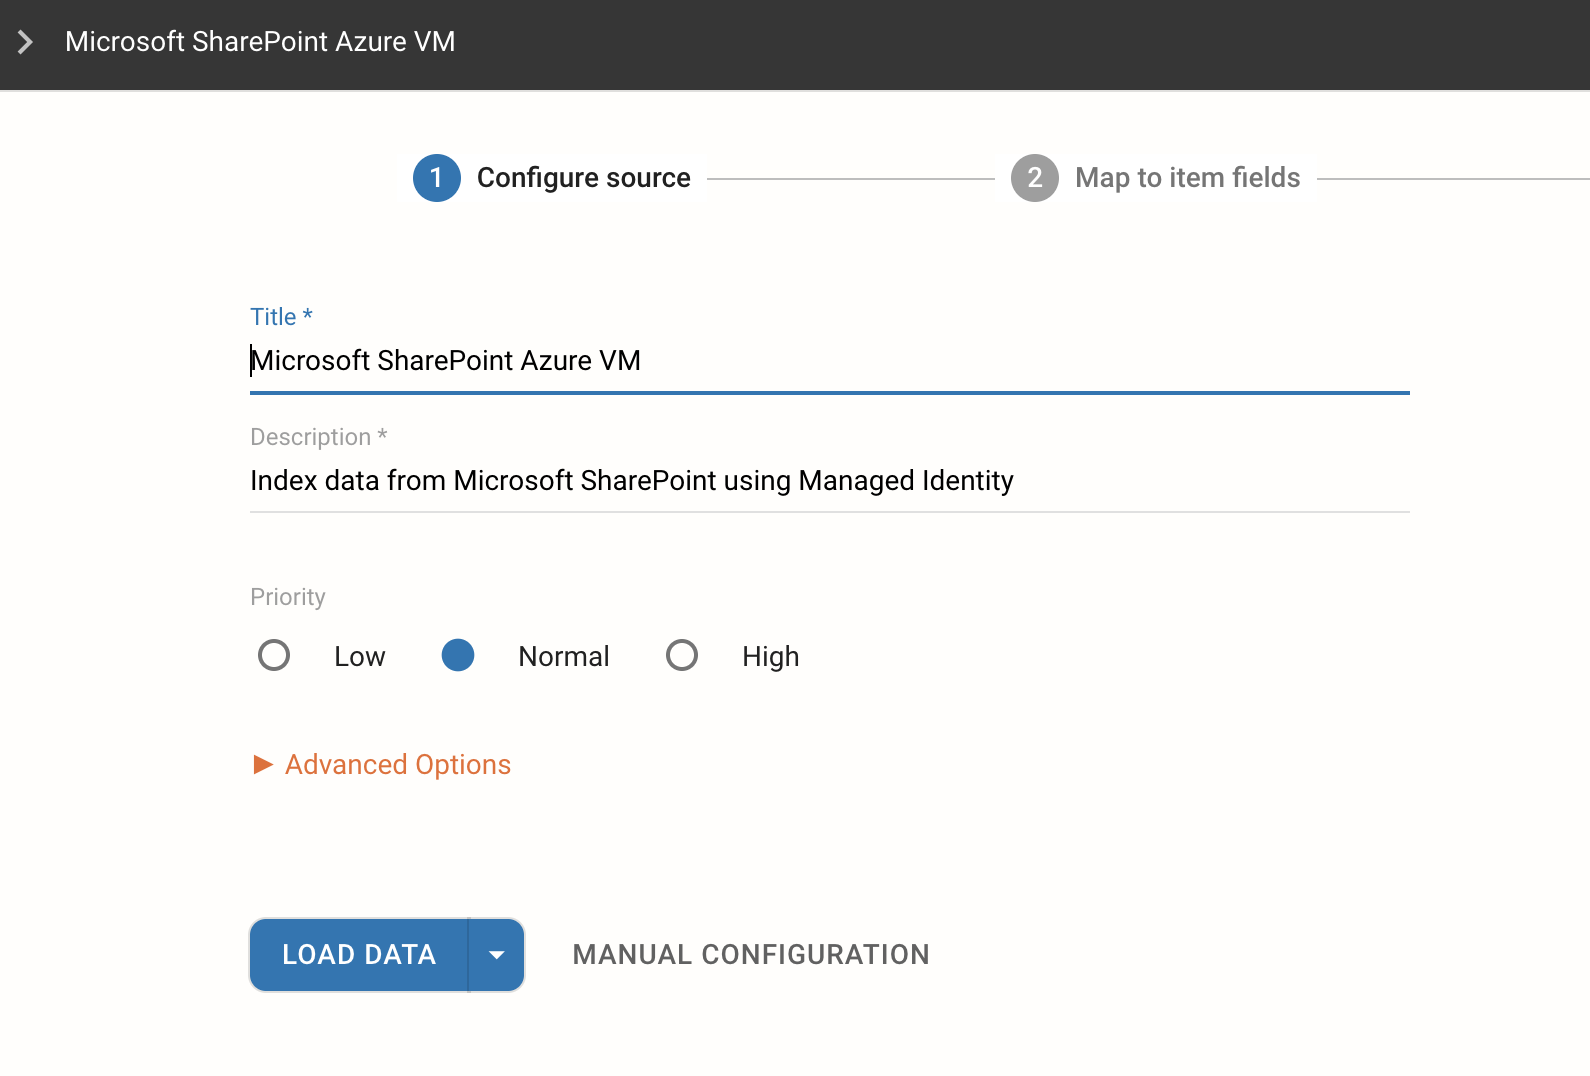
Click on Microsoft SharePoint Azure VM, then Configure, no authentication is required, and the system automatically redirects you to the connector configuration page.
Tip
Media files content (image, video, audio) is not fetched by default. To change that behaviour, expand the Advanced Options section and check the option to fetch media files content.
Alternatively, you can define those settings manually by clicking Next and going through the whole source setup process. It allows you the full flexibility of how the Microsoft SharePoint data should be mapped to Squirro items.
After clicking on Load Data, the system starts indexing your Microsoft SharePoint data into Squirro.
Advanced Options#
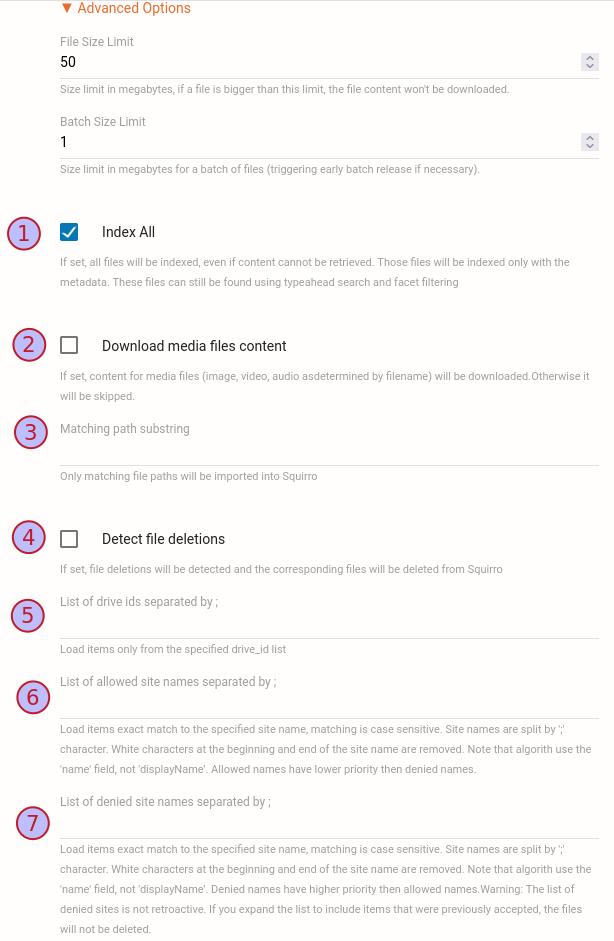
in. The field value is case-sensitive and does not rely on regular expressions. The strings using * are not interpreted correctly.; to load items only from the selected drives. Note that exact matches are required, and the list must be formatted without spaces or additional characters;. The matching is case-sensitive, and names are stripped of white characters at the beginning and end. The algorithm uses the name field rather than displayName. Allowed names have a lower priority than denied names.
;. The matching is case-sensitive, and names are stripped of white characters at the beginning and end. The algorithm uses the name field rather than displayName. Denied names have a higher priority than allowed names. If the list is expanded to include previously accepted items, those items are not deleted retroactively.False.False.False.500.50 MB.1 MB.1000.3h, 24h, 7d). Default: 3h.microsoft_users.OAuth Configuration#
App Config#
You will need to register an OAuth2 app on the Microsoft Azure portal to allow Squirro to connect to the Microsoft accounts of end users.
Note
The exact process for registering an OAuth2 app on the Microsoft platform may change. If you notice big discrepancies between the current Microsoft website and the documentation page here, contact Squirro Support for assistance.
Register an Application#
Note
If you are working off the Squirro cloud, the application will already be registered, and you can skip this section. If you are working off a Squirro on-premise or private cloud installation, you will need to register the application.
To register an OAuth2 app on the Microsoft Azure portal, follow the steps below:
Go to the Microsoft Azure Portal at https://portal.azure.com/#blade/Microsoft_AAD_RegisteredApps/ApplicationsListBlade.
Click Register an application.

On the next screen, choose the following options as shown in the screenshot below and then click Register.

Name: Name of the app.
Supported Account Types: “Accounts in any organizational directory (Any Entra ID directory - Multitenant) and personal Microsoft accounts (for example, Skype, Xbox).
Redirect URI: This is the URL Microsoft redirects the user to after successful authorization. Set this to the following format on your server:
https://<your-server-url>/dataloader/sharepoint_plugin/pl/azure/authorized
Replace
<your-server-url>with your actual Squirro server URL. For example:https://squirro.example.com/dataloader/sharepoint_plugin/pl/azure/authorized
Add Scopes#
Navigate to the API permissions tab and click Add a Permission.

Click Microsoft Graph.

Navigate to the Delegated permissions section.

On the next screen, add the following scopes:
emailoffline_accessFiles.Read.AllGroup.Read.AllDirectory.Read.AllGroupMember.Read.AllSites.Read.AllUser.ReadBasic.AllUser.Read.
Note
The
GroupMember.Read.Allpermission enables access to group membership information and files stored in Microsoft 365 Group Drives. This application permission provides tenant-wide access to group data and requires administrator consent from a Global Administrator or Privileged Role Administrator before it can be granted.For information on how to grant tenant-wide admin consent, see Grant Admin Consent.
After adding scopes, confirm your choices by clicking Add Permissions.

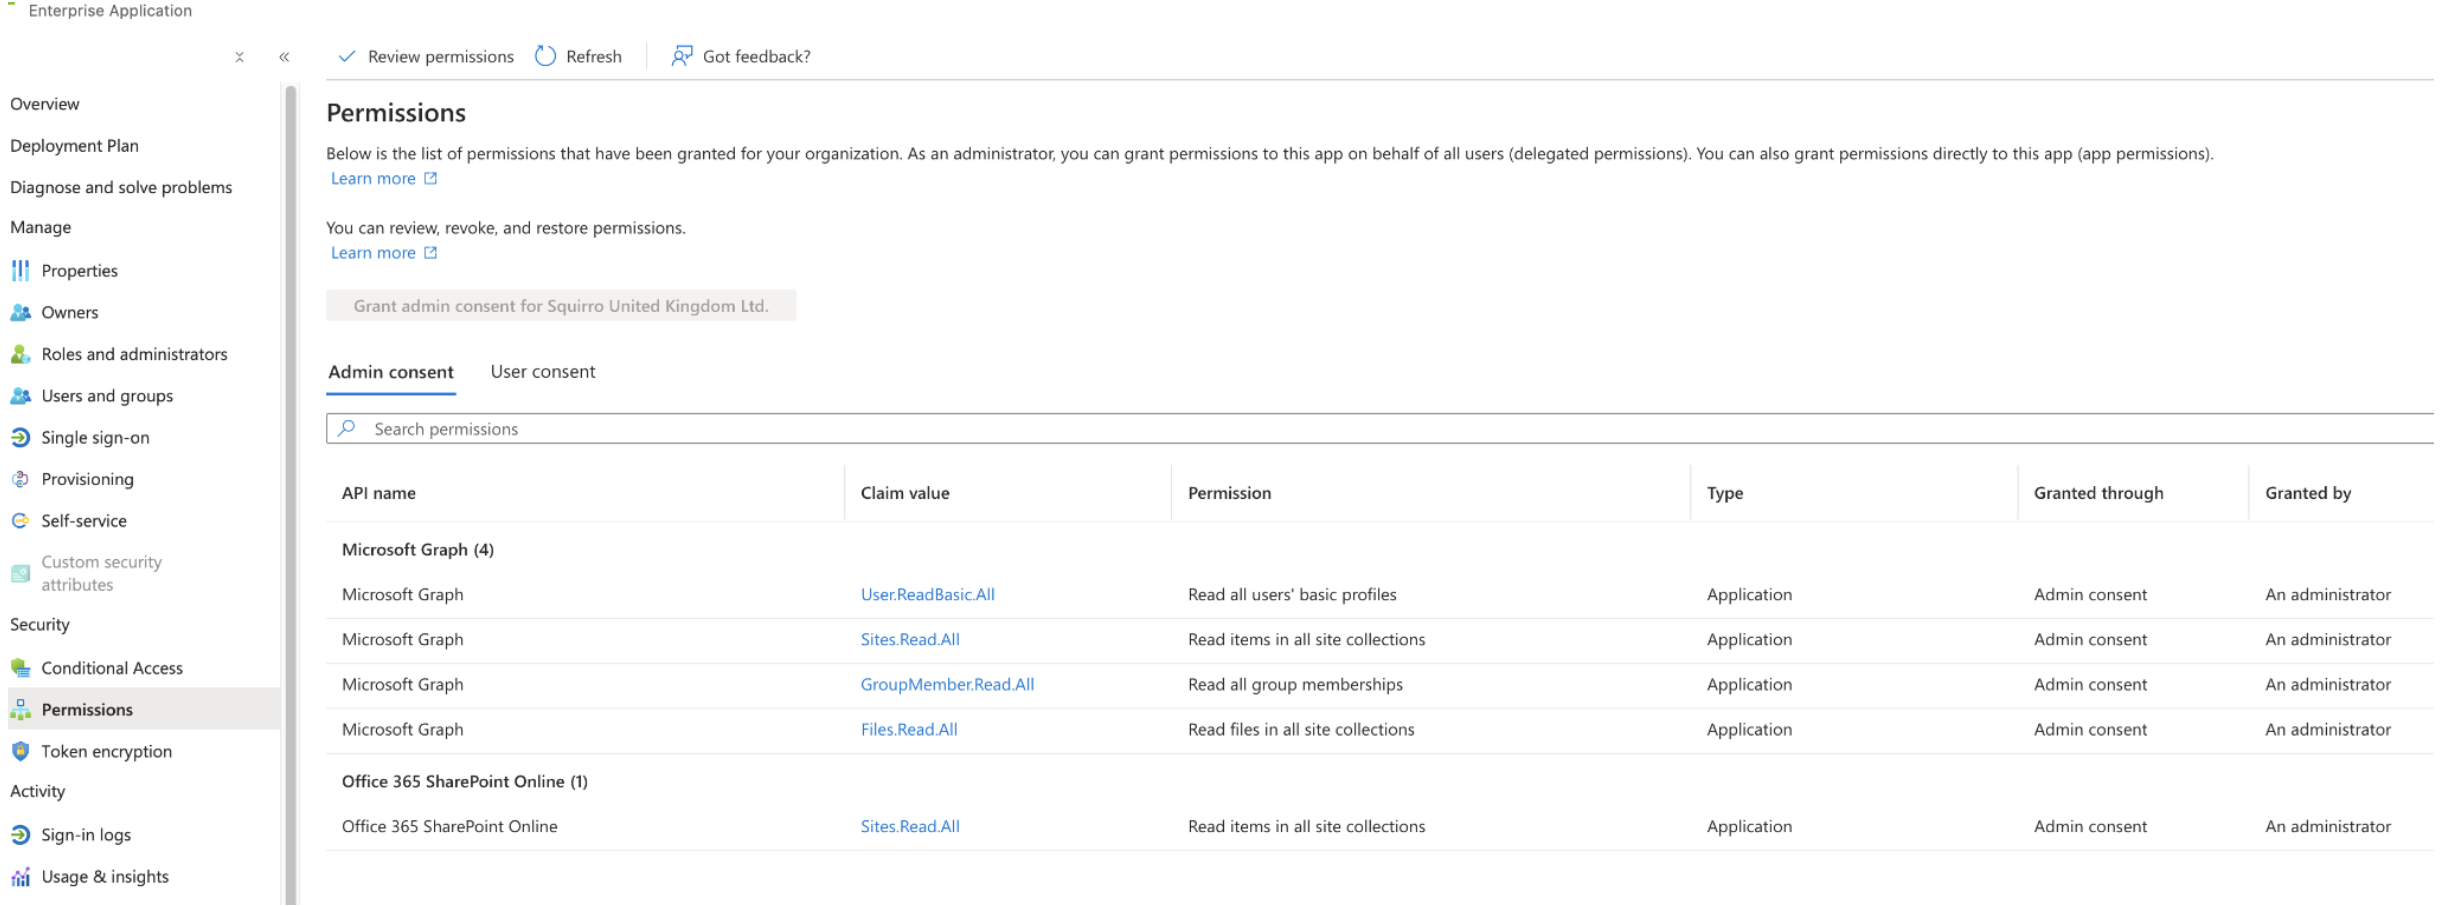
Granting Permissions#
Navigate to the Enterprise Applications section, find the app that was registered, and select Permissions in the left navigation menu.
Click Grant admin consent for <your-app>, as shown in the example screenshot below.
A user must have admin rights to grant permissions. Also, asking an admin to give users rights to grant permissions is possible. See Configure how users consent to applications.

Navigate to the Token configuration tab, click Add optional claim and add a new claim as follows:
Token type:
IDClaim:
email

Create a Client Secret Key#
The final step is to create a Client secret key for your app.
Navigate back to the App registration section and click on your App.
Navigate to the Certificates & secrets tab.
Click New client secret.
Create a new secret key with the following settings:
Description: Enter a descriptive name for your client secret (for example,
Squirro SharePoint Connector Key).Expires: Period after your secret key expires (max period of time is 24 months).

Apply for Production#
Unverified applications display a security warning during the user authorization process when users connect their Squirro instance to their Microsoft account. To avoid that warning, apply for Production status for your Microsoft SharePoint application.
The production verification process requires configuring the application branding with the following elements:
Application logo icon
Homepage URL
Terms of service URL
Privacy policy URL
For detailed instructions on publisher domain configuration and verification requirements, see the Microsoft documentation.
Squirro Configuration#
After creating the OAuth2 app on the Microsoft Azure portal, you need to configure the Client ID and the Client Secret on your Squirro instance.
Go to the Overview tab of the app and copy Application (client) ID.

Next, switch to the Certificates & secrets tab and copy the value of your Client Secret key.

Edit
/etc/squirro/common.inion your Squirro cluster and add the following lines:[dataloader] sharepoint_client_id = YOUR_ID sharepoint_client_secret = YOUR_SECRET
To enable org-wide access scopes used by your app also add the following line to the
[dataloader]header:sharepoint_org_scopes_enabled=true
Note that it requires the tenant-wide admin consent.
If the
[dataloader]header is already present in this file, add the lines to the existing section. The section header can not appear more than once in the configuration file.Restart the Squirro services to apply the configuration changes:
sudo systemctl restart sqfrontendd sqdatasourced
VM Azure Configuration#
This section applies only to the Microsoft SharePoint Azure VM Connector using Managed Identity authentication.
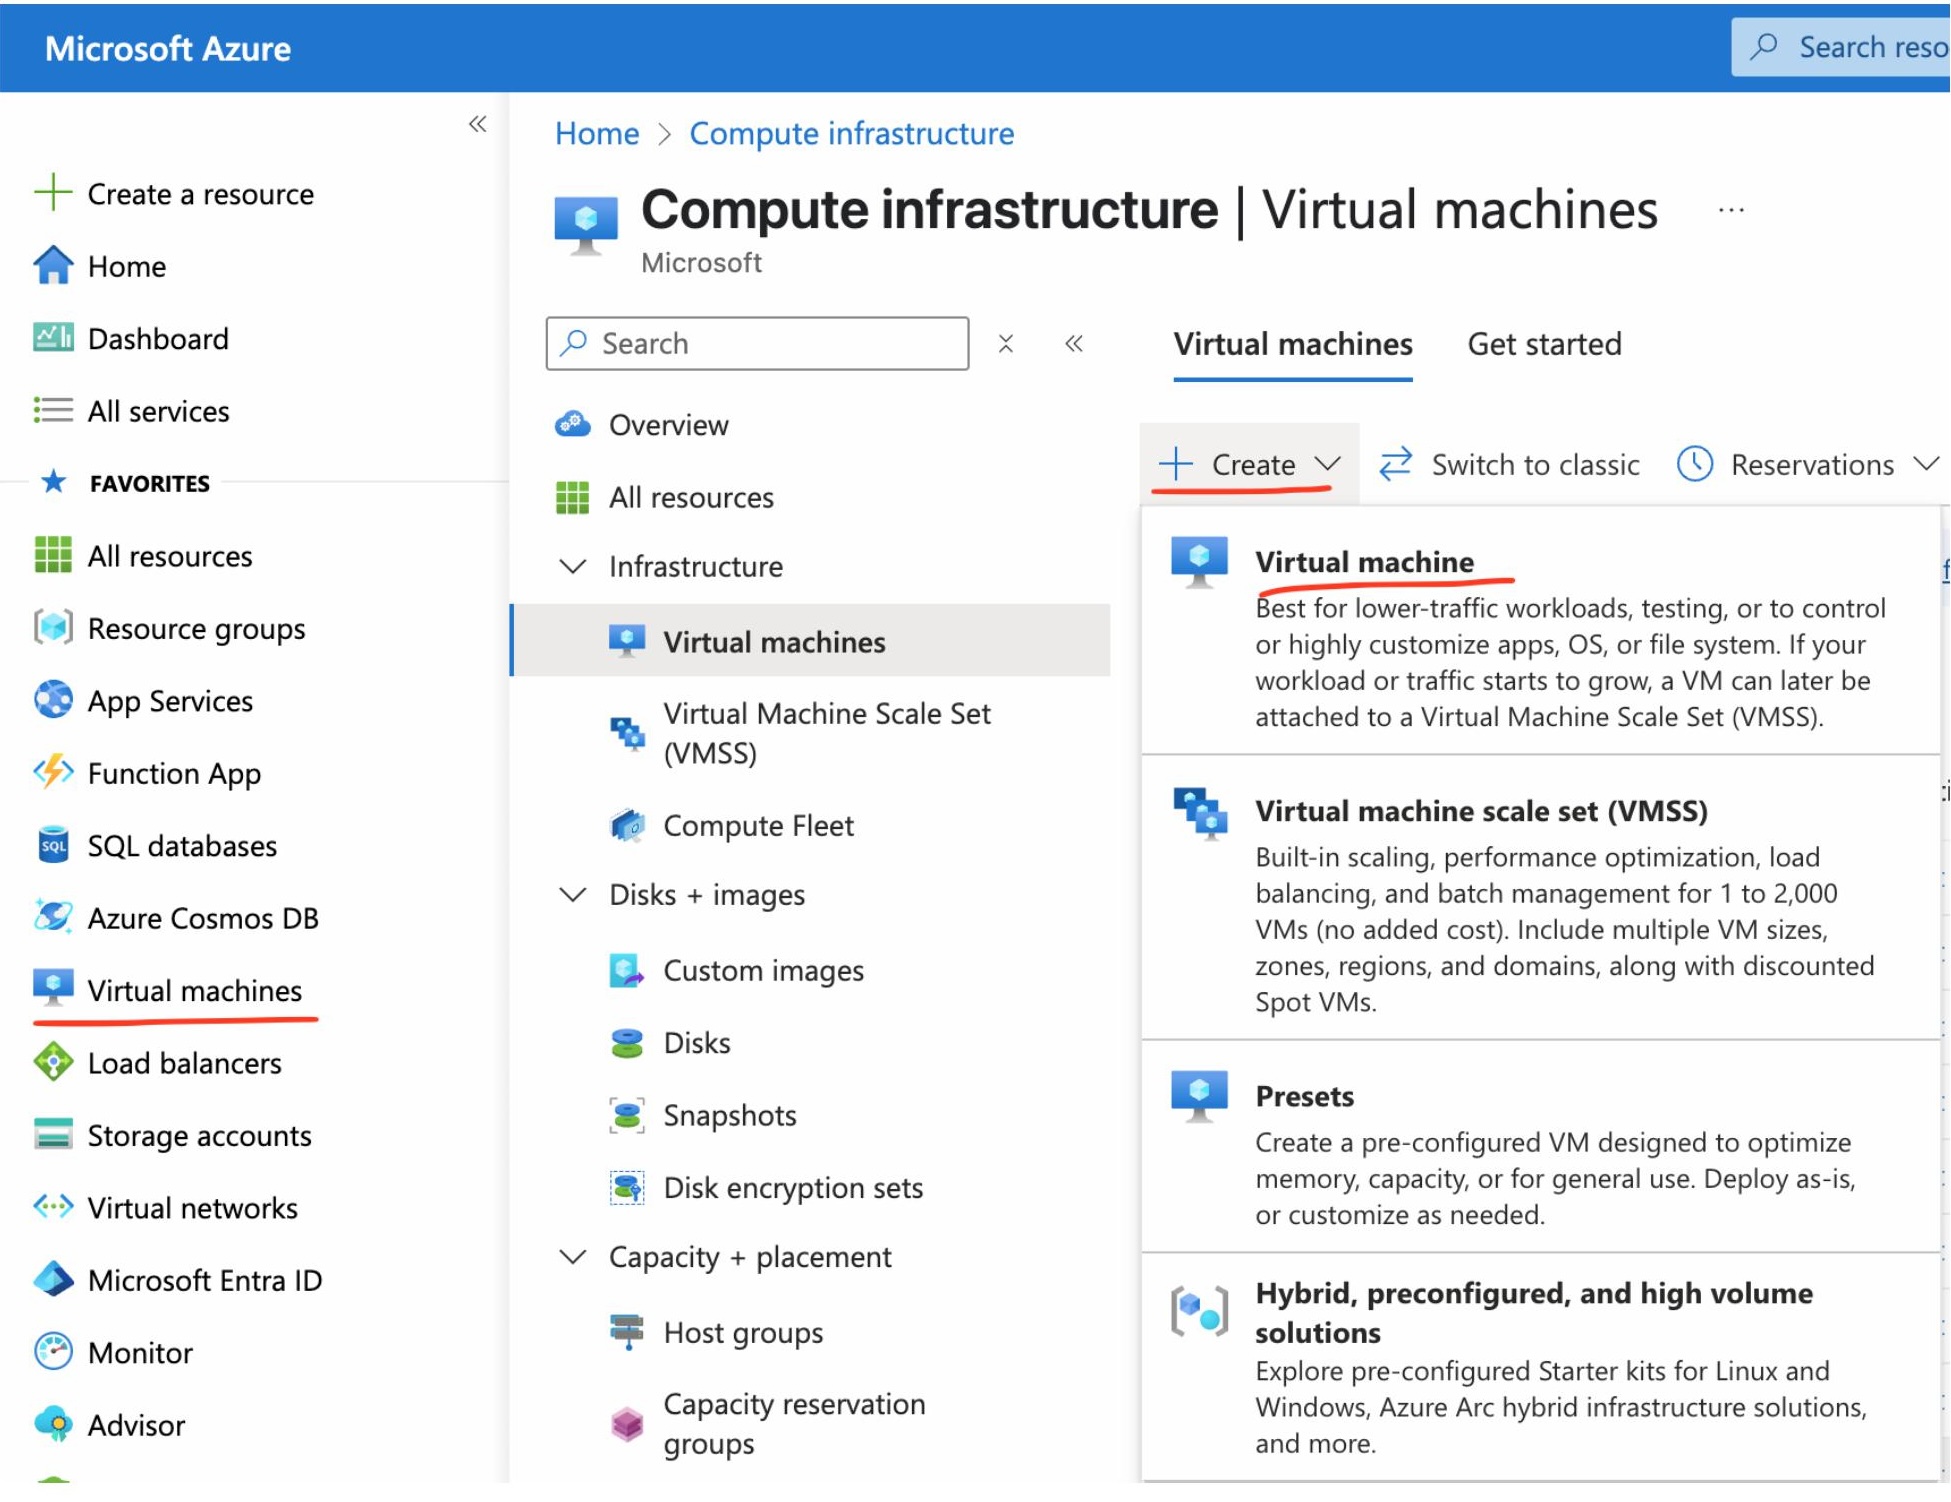
Create an Azure VM#
To begin, create a virtual machine (VM) in Azure.
Sign in to the Azure Portal at https://portal.azure.com.
Select the Virtual Machines resource.
Go to the Virtual Machines tab and click Create.
Settings#
Basics Tab#
Subscription: Choose your Azure subscription.
Resource group: Select an existing resource group or create a new one.
Virtual machine name: Assign a name to your VM (e.g., squirro-vm).
Region: Select a region that is geographically close to your users.
Image: It is preferred to use a Rocky Linux or RHEL 8/9 operating system.
Size: Click “See all sizes” and select according to Squirro’s requirements https://docs.squirro.com/en/latest/getting/install/system-requirements.html.
Authentication type: You can choose between an SSH public key or a password.
Username: Specify a username, for example, azureuser.

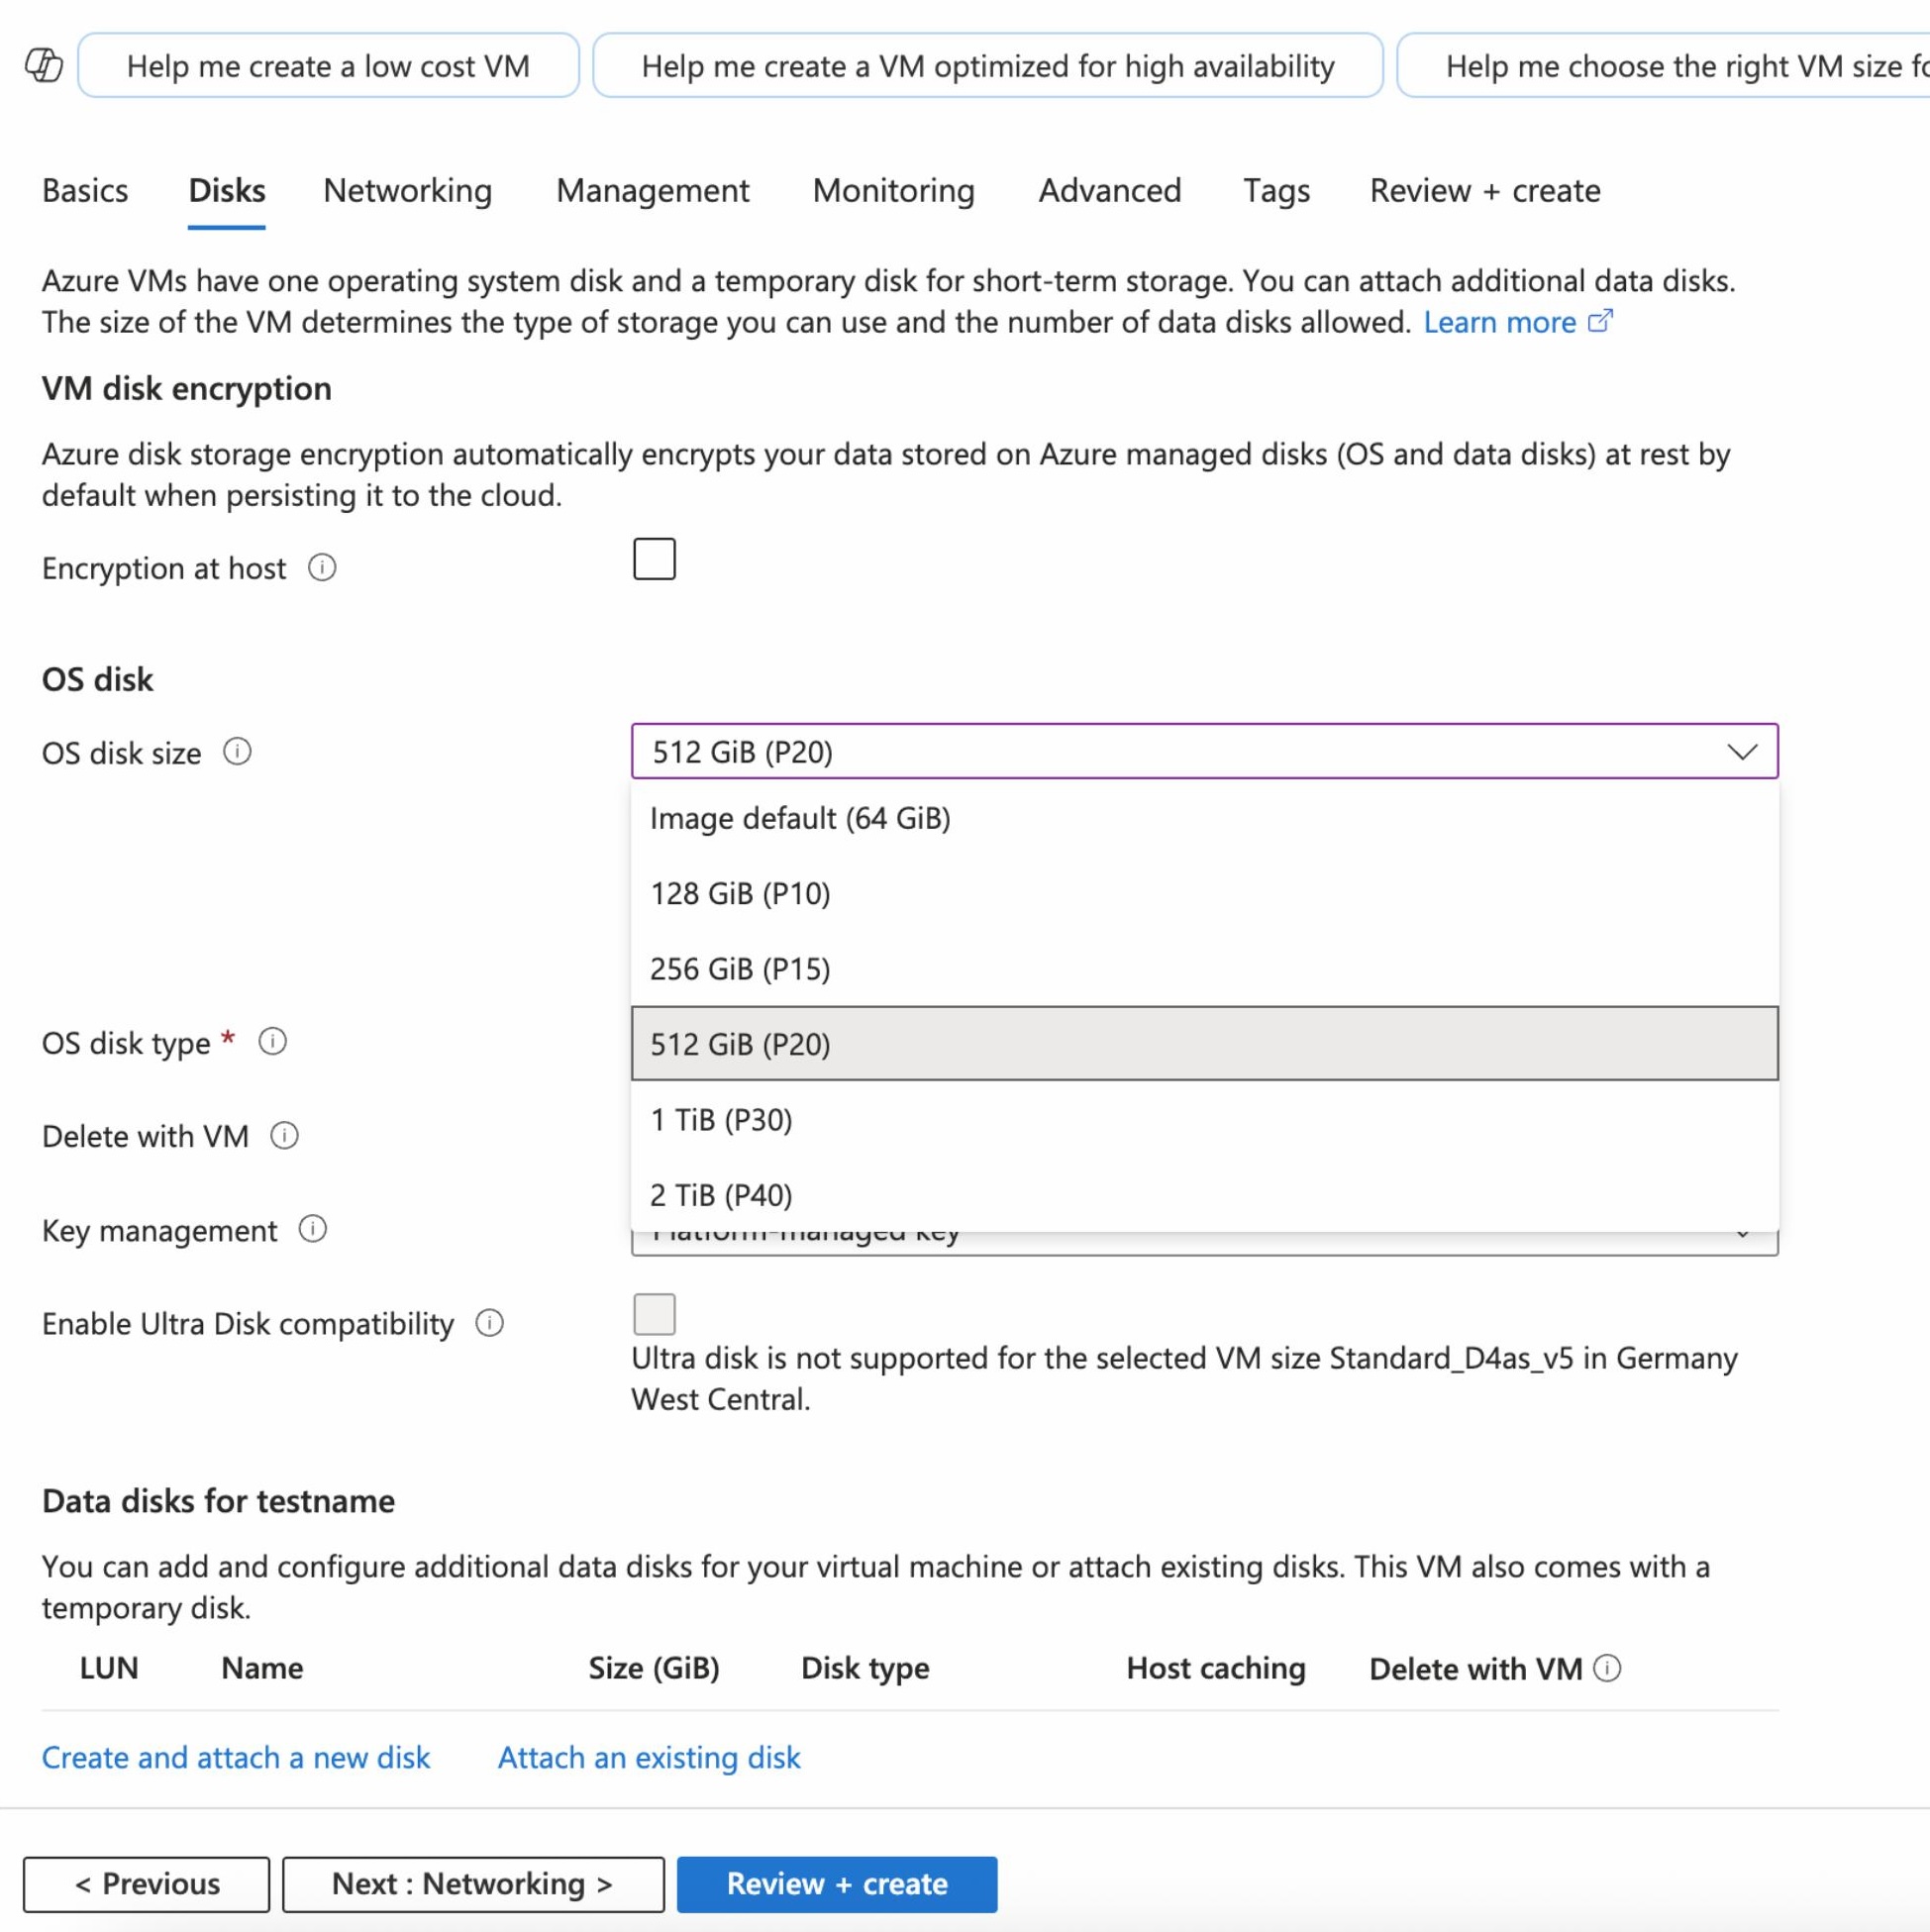
Disks Tab#
For improved performance, it is recommended to use Premium SSD (P20 preferred).
Networking Tab#
Virtual network: You can either use an existing virtual network or create a new one.
Subnet: User default or create a new one.
Public IP: Keep the Public IP enabled to allow SSH connections.
NIC network security group: Set to
Basicand permit SSH traffic.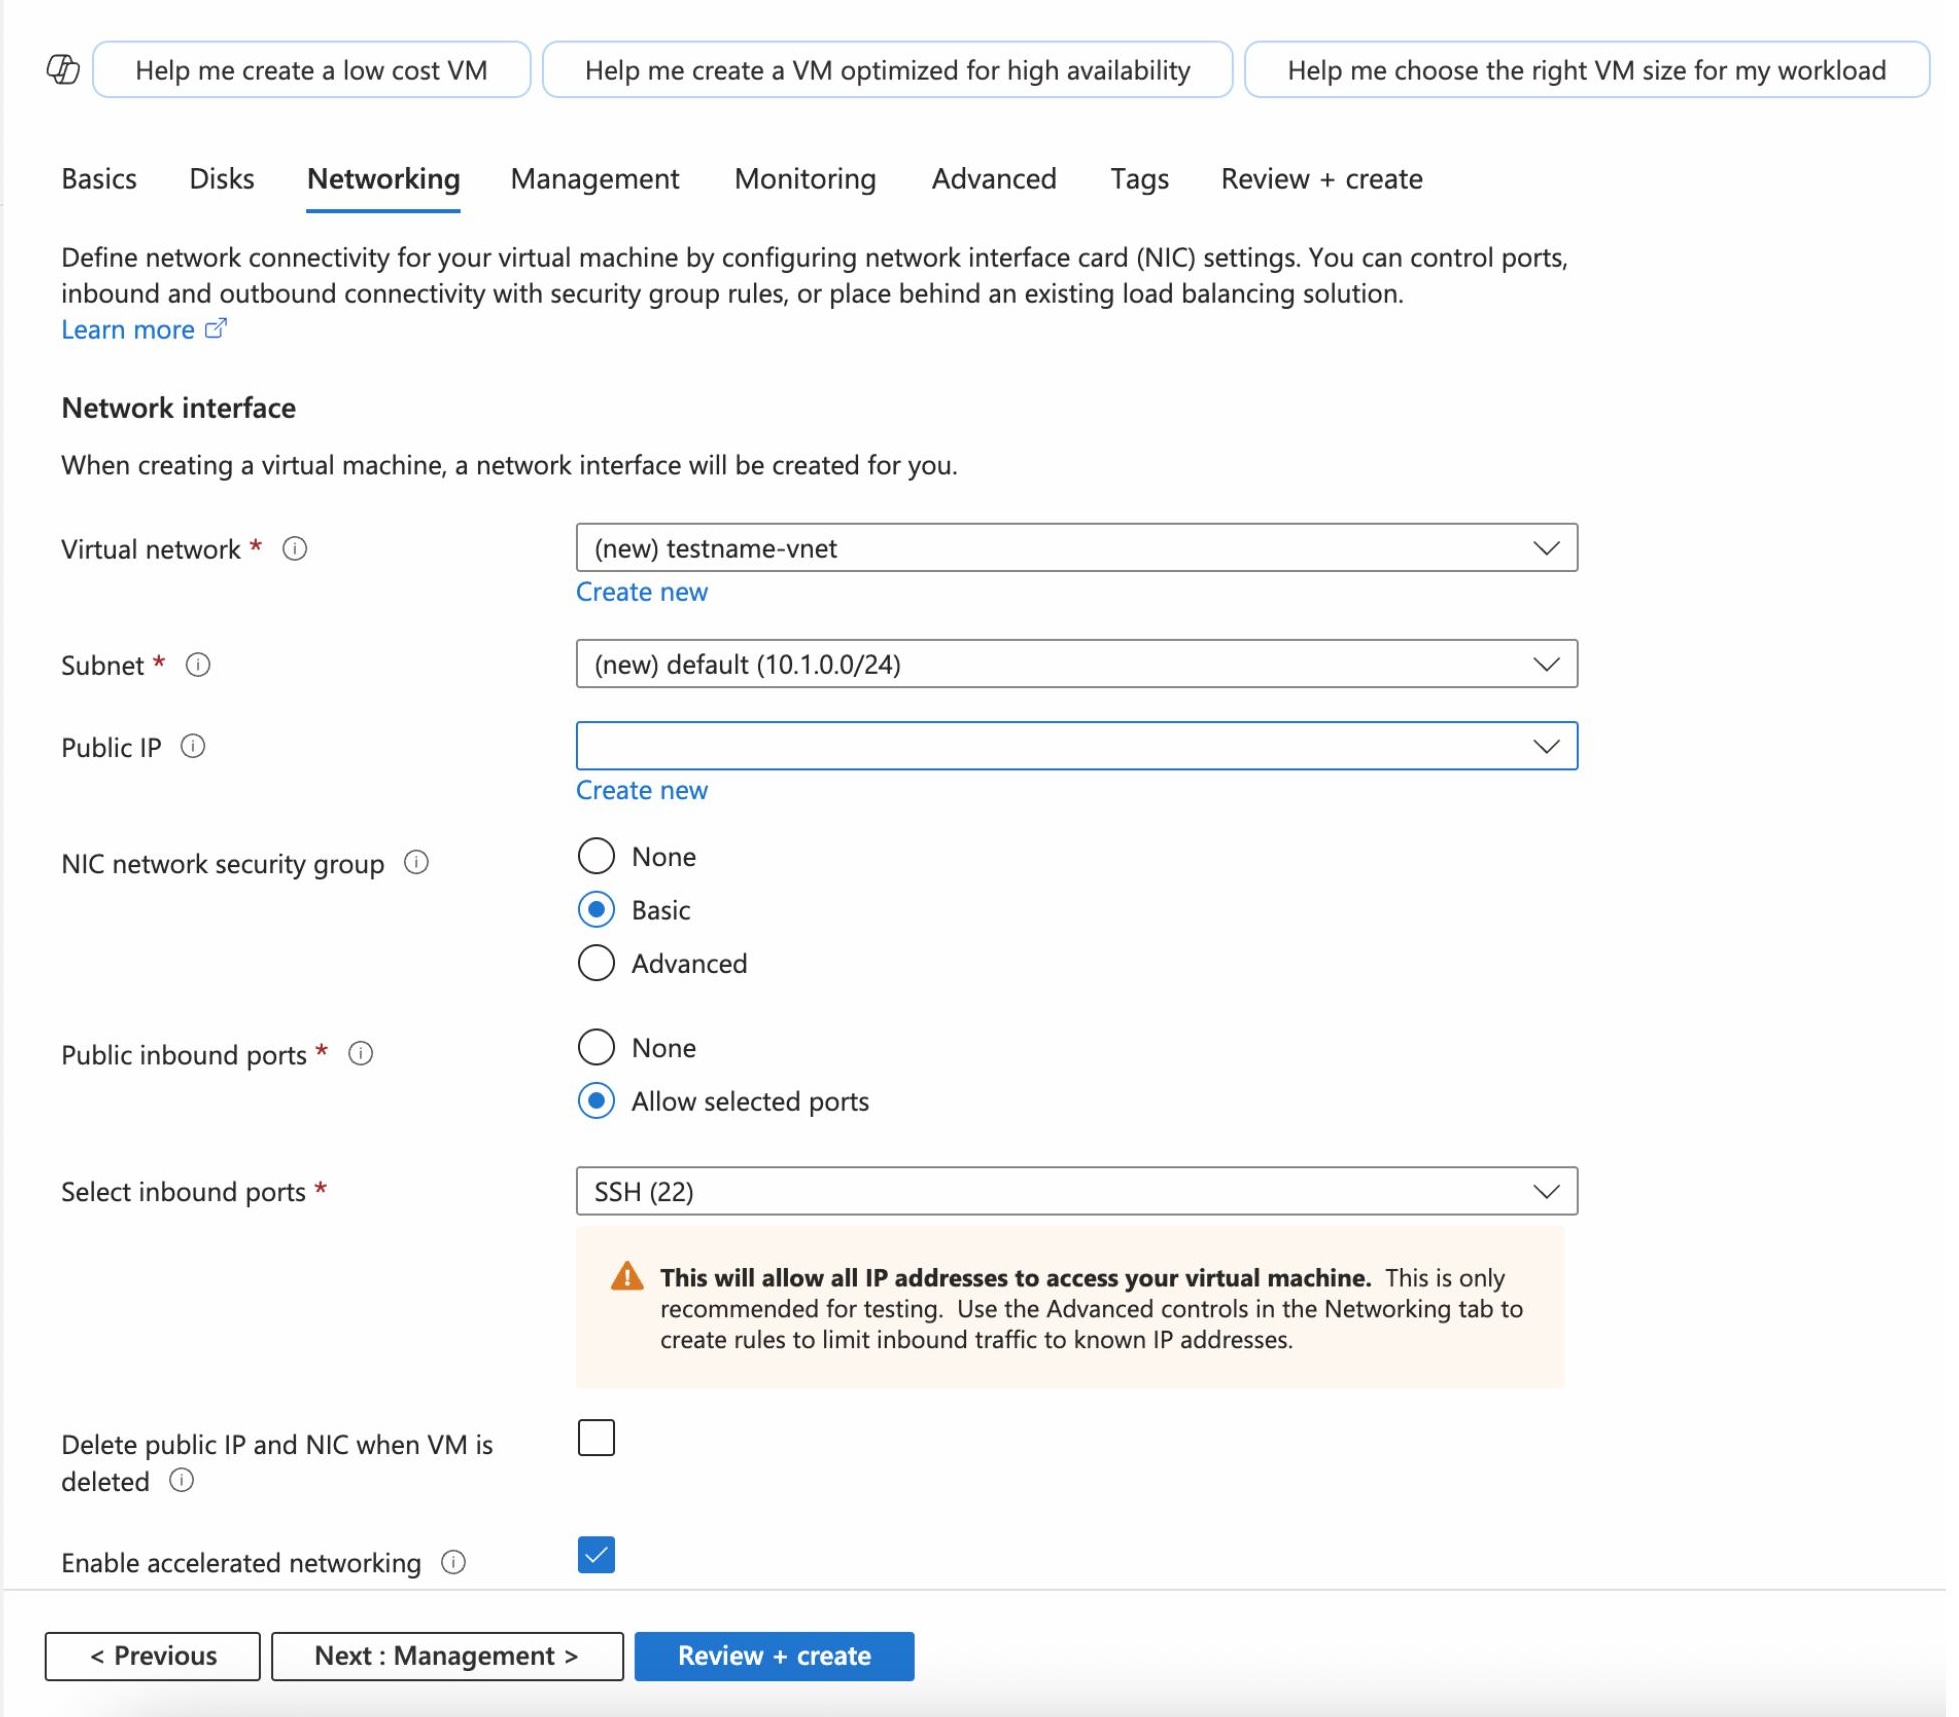
Management Tab#
Enable System Assigned Managed Identity. It can also be configured later from the ‘Identity’ tab of the VM.
Click Review+Create to review your configurations to ensure they are correct.
Click Create to deploy the virtual machine.
Once the virtual machine is created, navigate to the VM overview page and click Connect to access connection options.
To connect via SSH from your local terminal, use the following command:
ssh azureuser@<your-public-ip-or-fqdn>Replace
<your-public-ip-or-fqdn>with either your VM’s public IP address or its fully qualified domain name (FQDN), both of which you can find on the VM overview page.
Enable Managed Identity and Assign Permissions#
You can enable the managed identity either during the virtual machine creation or on an existing VM.
During VM Creation#
On the Management tab, you can enable the System Assigned Managed Identity.
On an Existing VM#
Navigate to your created Virtual Machine in the Azure Portal.
In the VM’s settings menu on the left, select Identity.
Select the System assigned tab.
Change the Status to On.
Click Save.

Assign Permissions via PowerShell#
Assigning API permissions directly through the portal is not possible for this type of identity, as the option is greyed out. Therefore, you must use PowerShell scripts to grant the necessary permissions.
Before running the scripts:
Ensure you connect to Mg-Graph in PowerShell.
In the following scripts, replace the placeholder
test-miwith the name of your Virtual Machine.
Script 1 to assign the ``Sites.Read.All`` permission
$graphSp = Get-MgServicePrincipal -Filter "Appid eq '00000003-0000-0ff1-ce00-000000000000'"
$permissionsToAssign = @(
    "Sites.Read.All"
)
# Replace 'test-mi' with your VM name
$miSp = Get-MgServicePrincipal -Filter "DisplayName eq 'test-mi'"
foreach ($permName in $permissionsToAssign) {
    $appRole = $graphSp.AppRoles | Where-Object { $_.Value -eq $permName -and $_.AllowedMemberTypes -contains "Application" }
    if ($appRole) {
        New-MgServicePrincipalAppRoleAssignment -ServicePrincipalId $miSp.Id -PrincipalId $miSp.Id -ResourceId $graphSp.Id -AppRoleId $appRole.Id
        Write-Host "Assigned $permName"
    }
    else {
        Write-Warning "Permission $permName not found as an application permission."
    }
}
Script 2 to assign additional permissions
$graphSp = Get-MgServicePrincipal -Filter "Appid eq '00000003-0000-0000-0000-000000000000'"
$permissionsToAssign = @(
    "Files.Read.All",
    "GroupMember.Read.All",
    "Sites.Read.All",
    "User.ReadBasic.All",
    "Group.Read.All",
    "Directory.Read.All"
)
# Replace 'test-mi' with your VM name
$miSp = Get-MgServicePrincipal -Filter "DisplayName eq 'test-mi'"
foreach ($permName in $permissionsToAssign) {
    $appRole = $graphSp.AppRoles | Where-Object { $_.Value -eq $permName -and $_.AllowedMemberTypes -contains "Application"}
    if ($appRole) {
        New-MgServicePrincipalAppRoleAssignment -ServicePrincipalId $miSp.Id -PrincipalId $miSp.Id -ResourceId $graphSp.Id -AppRoleId $appRole.Id
        Write-Host "Assigned $permName"
    }
    else {
        Write-Warning "Permission $permName not found as an application permission."
    }
}
After running these scripts, your VM Managed Identity has the necessary permissions to access SharePoint.
Install Squirro on Azure VM#
The next step is to install Squirro on the Azure VM you have created. Installation instructions can be found in the Install and Manage Squirro with Ansible page.
ACL Configuration via Microsoft Entra ID#
Using query templates, you can configure the ACLs for your Microsoft SharePoint data.
It allows you to configure permissions within your projects so that users can only see the data that they have access to in Microsoft SharePoint.
Prerequisites#
To configure permissions, three things are required:
Users must be logged into Squirro with the same Microsoft account that is used to access the Microsoft SharePoint data. In other words, the SSO used by Squirro must be the same organizational Microsoft Azure account as the SSO used by Microsoft SharePoint.
Users using for the SharePoint connector must have the Contribute permission level and above permissions level in SharePoint. The best practice is when the user is a Site Collection Administrator.
You must have administrative access for Squirro.
Note
This feature does not work with Squirro cloud instances unless those instances have been configured to use Microsoft for SSO rather than Squirro ID.
How to Set Up#
To configure permissions, follow the following steps:
Part 1 - Use SAML-SSO Authentication#
Configure Azure SSO by following the steps in Microsoft Entra ID (ME-ID).
Provide the following configuration in the SAML-SSO authentication Fields to map in as user’s session field:
msAzureUserId = http://schemas.microsoft.com/identity/claims/objectidentifier
Note
If JWT authentication is involved, use the following configuration instead. For more information, see the Microsoft Entra JWT authentication page.
msAzureUserId = oid
Part 2 - Create and Configure a Query Template#
Create a query template by following the steps in Query Templates.
In the query template body, add the following search profile filter:
profile:{ microsoft_acl }
That filter activates the Microsoft ACL plugin, which automatically restricts SharePoint search results to documents the current user can access, based on their Azure AD groups and Azure user ID. Non-SharePoint documents are not affected.
Warning
Do not override the source_type:Microsoft SharePoint filter in your data loading configuration. The ACL flow depends on that filter to correctly identify SharePoint documents. Removing or changing it causes all SharePoint documents to be returned regardless of user permissions.
For more information, see the Microsoft Graph v1.0 - List Group Owners page.