Squirro AWS Installation Manual#
Introduction#
This document walks you through a step-by-step installation of the latest Squirro LTS release on Amazon Web Services.
This manual covers a straightforward, easy-to-maintain, single EC2 instance deployment of Squirro.
For system requirements, see System Requirements.
Note
This guide covers installation procedures for current Squirro releases. Always refer to the latest release notes at Release Notes for version-specific information and requirements.
Core assumptions#
You can administer your AWS Org as an IAM user (see below)
You can reach and download the necessary packages.
You can install and run the latest version of Terraform to manage the AWS infrastructure.
The VPC/EC2 instance can access the internet, either freely or using an approved list of sites.
You can add a DNS record to your public or internal DNS zone.
You can create or request a SAML2 client to enable SSO for the Squirro site.
You can leverage the following Services:
EC2 - Instance to host Squirro
EBS - Storage
You have access to a supported LLM API endpoint (if applicable).
This deployment is suitable for uptime SLAs up to 99.9%. For higher SLAs more advanced techniques, such as Auto Scaling Groups and managed services need to be introduced.
The resulting deployment yields no critical findings when scanned using AWS Inspector or Trivy.
Squirro plans to publish public/marketplace AMI which will greatly simplify the deployment.
Planning#
Access to the target AWS org
As an IAM Administrator of the Org.
Ensure the instance has internet access and can reach all required domains. For the complete list, see the System Requirements page.
Select the right OS for you:
Rocky Linux 9
Red Hat Enterprise Linux 9
Identify the correct base image.
Select the correct Region of AWS for your deployment.
Select the right EC2 instance type for your deployment.
Understand the monthly cost of the planned deployment.
Define the target hostname:
Plan with your IT team to add a CNAME record that points at the ALB CNAME record.
Plan with your IT team how to create an SSL key and certificate for the above record. These instructions assume you can leverage ACM for this task.
Plan with the Squirro IT team the integration into your target Identity Provider to enable single sign-on.
Plan with the Squirro IT team the backup requirements. The daily DLM snapshot provides a good baseline protection, but more advanced backup requirements like using AWS Backup or other backup agents might be mandatory.
If you already have credentials for accessing the mirror, you may proceed. Should you need credentials, contact Squirro Support and submit a technical support request.
Install Terraform#
Use Terraform to manage the cloud infrastructure in a repeatable fashion.
The preferred way to install Terraform is to use the Terraform Version Manager (tfenv). Learn more
Use homebrew to install it:
brew install tfenv
Or, install on Debian/Ubuntu:
# Install dependencies
sudo apt update && sudo apt install -y git curl unzip

# Clone tfenv to /usr/local
sudo git clone https://github.com/tfutils/tfenv.git /usr/local/tfenv

# Add tfenv to PATH (permanently)
echo 'export PATH="/usr/local/tfenv/bin:$PATH"' >> ~/.bashrc
source ~/.bashrc

# Verify installation
tfenv --version
Install the latest version of Terraform:
tfenv install latest
Sample output:
❯ tfenv install latest
Installing Terraform v1.12.2
Downloading release tarball from https://releases.hashicorp.com/terraform/1.12.2/terraform_1.12.2_darwin_arm64.zip
#################################################################################################################################################################### 100.0%
Downloading SHA hash file from https://releases.hashicorp.com/terraform/1.12.2/terraform_1.12.2_SHA256SUMS
Not instructed to use Local PGP (/opt/homebrew/Cellar/tfenv/3.0.0/use-{gpgv,gnupg}) & No keybase install found, skipping OpenPGP signature verification
Archive:  /var/folders/g9/3qmqwhqd2d3d8x5dx5d1tkn40000gn/T/tfenv_download.XXXXXX.1837cVPPvV/terraform_1.12.2_darwin_arm64.zip
   inflating: /opt/homebrew/Cellar/tfenv/3.0.0/versions/1.12.2/LICENSE.txt
   inflating: /opt/homebrew/Cellar/tfenv/3.0.0/versions/1.12.2/terraform
Installation of terraform v1.12.2 successful. To make this your default version, run 'tfenv use 1.12.2'
Then enable it as shown in the output above:
tfenv use 1.12.2
That Terraform module may not always support the latest version. For the most up-to-date information, refer to the README.md file in the module, available at https://mirror.squirro.net/terraform/aws.
Alternatively, you can use Terraform Cloud instead of the CLI version of Terraform. While step-by-step instructions for Terraform Cloud are not currently provided, the underlying logic remains the same.
Install the 1Password Browser Extension#
To manage your AWS credentials securely, Squirro recommends using a password manager and suggests using the 1Password app and browser extensions. If you do not have a password manager or other credential management tool in place, please reach out to your IT department for guidance on how to securely handle your credentials.
Authenticate Terraform with AWS#
The recommended approach for authenticating Terraform with AWS is to use AWS SSO, which provides short-lived credentials instead of permanent API credentials.
Note that this manual does not currently cover the AWS SSO integration process. However, some IT departments may require this approach, and you may need to consult with them for guidance on implementation.
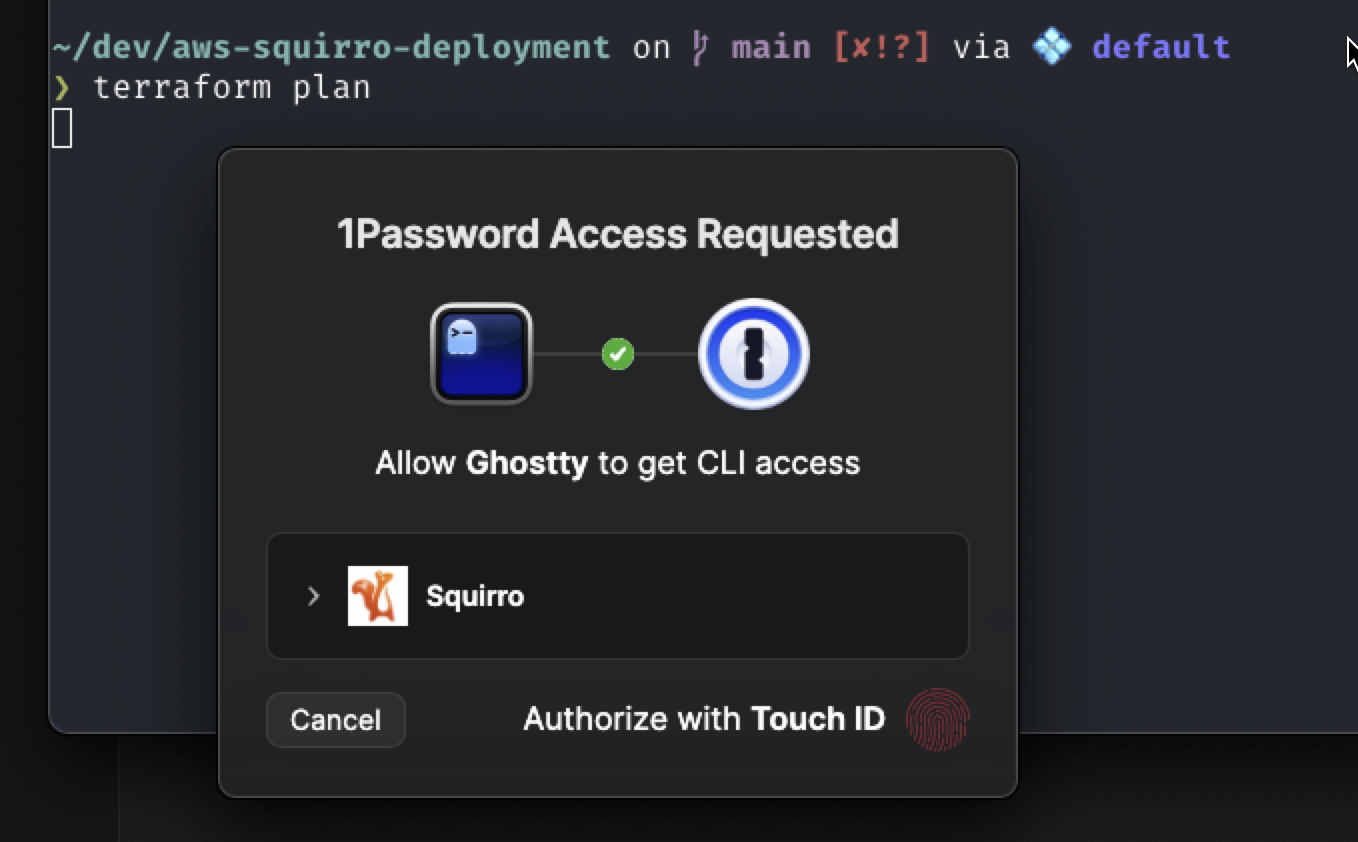
Use 1Password and its plugin to securely handle a traditional access key of AWS.
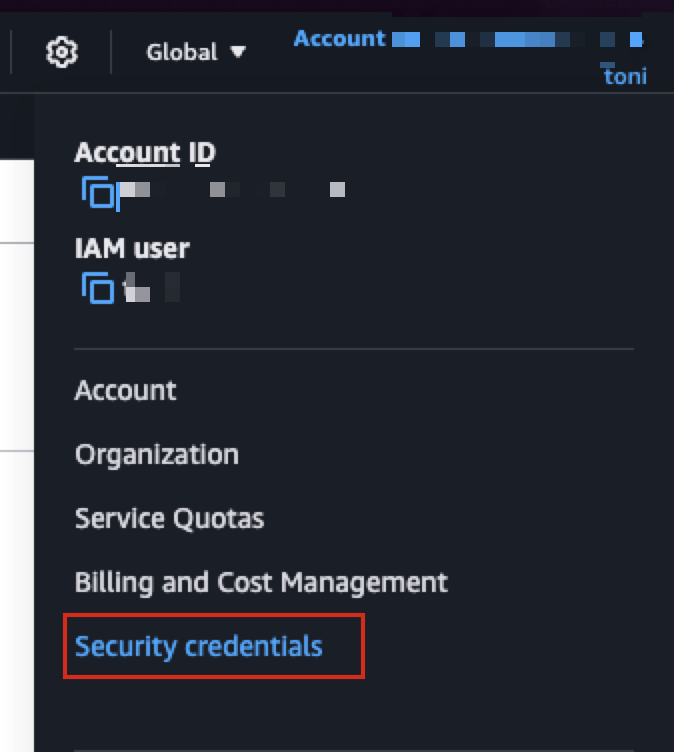
To use Terraform, you need an access key. If you do not have that yet, then log in to your AWS console and click Account in the top right corner, then navigate to security credentials.
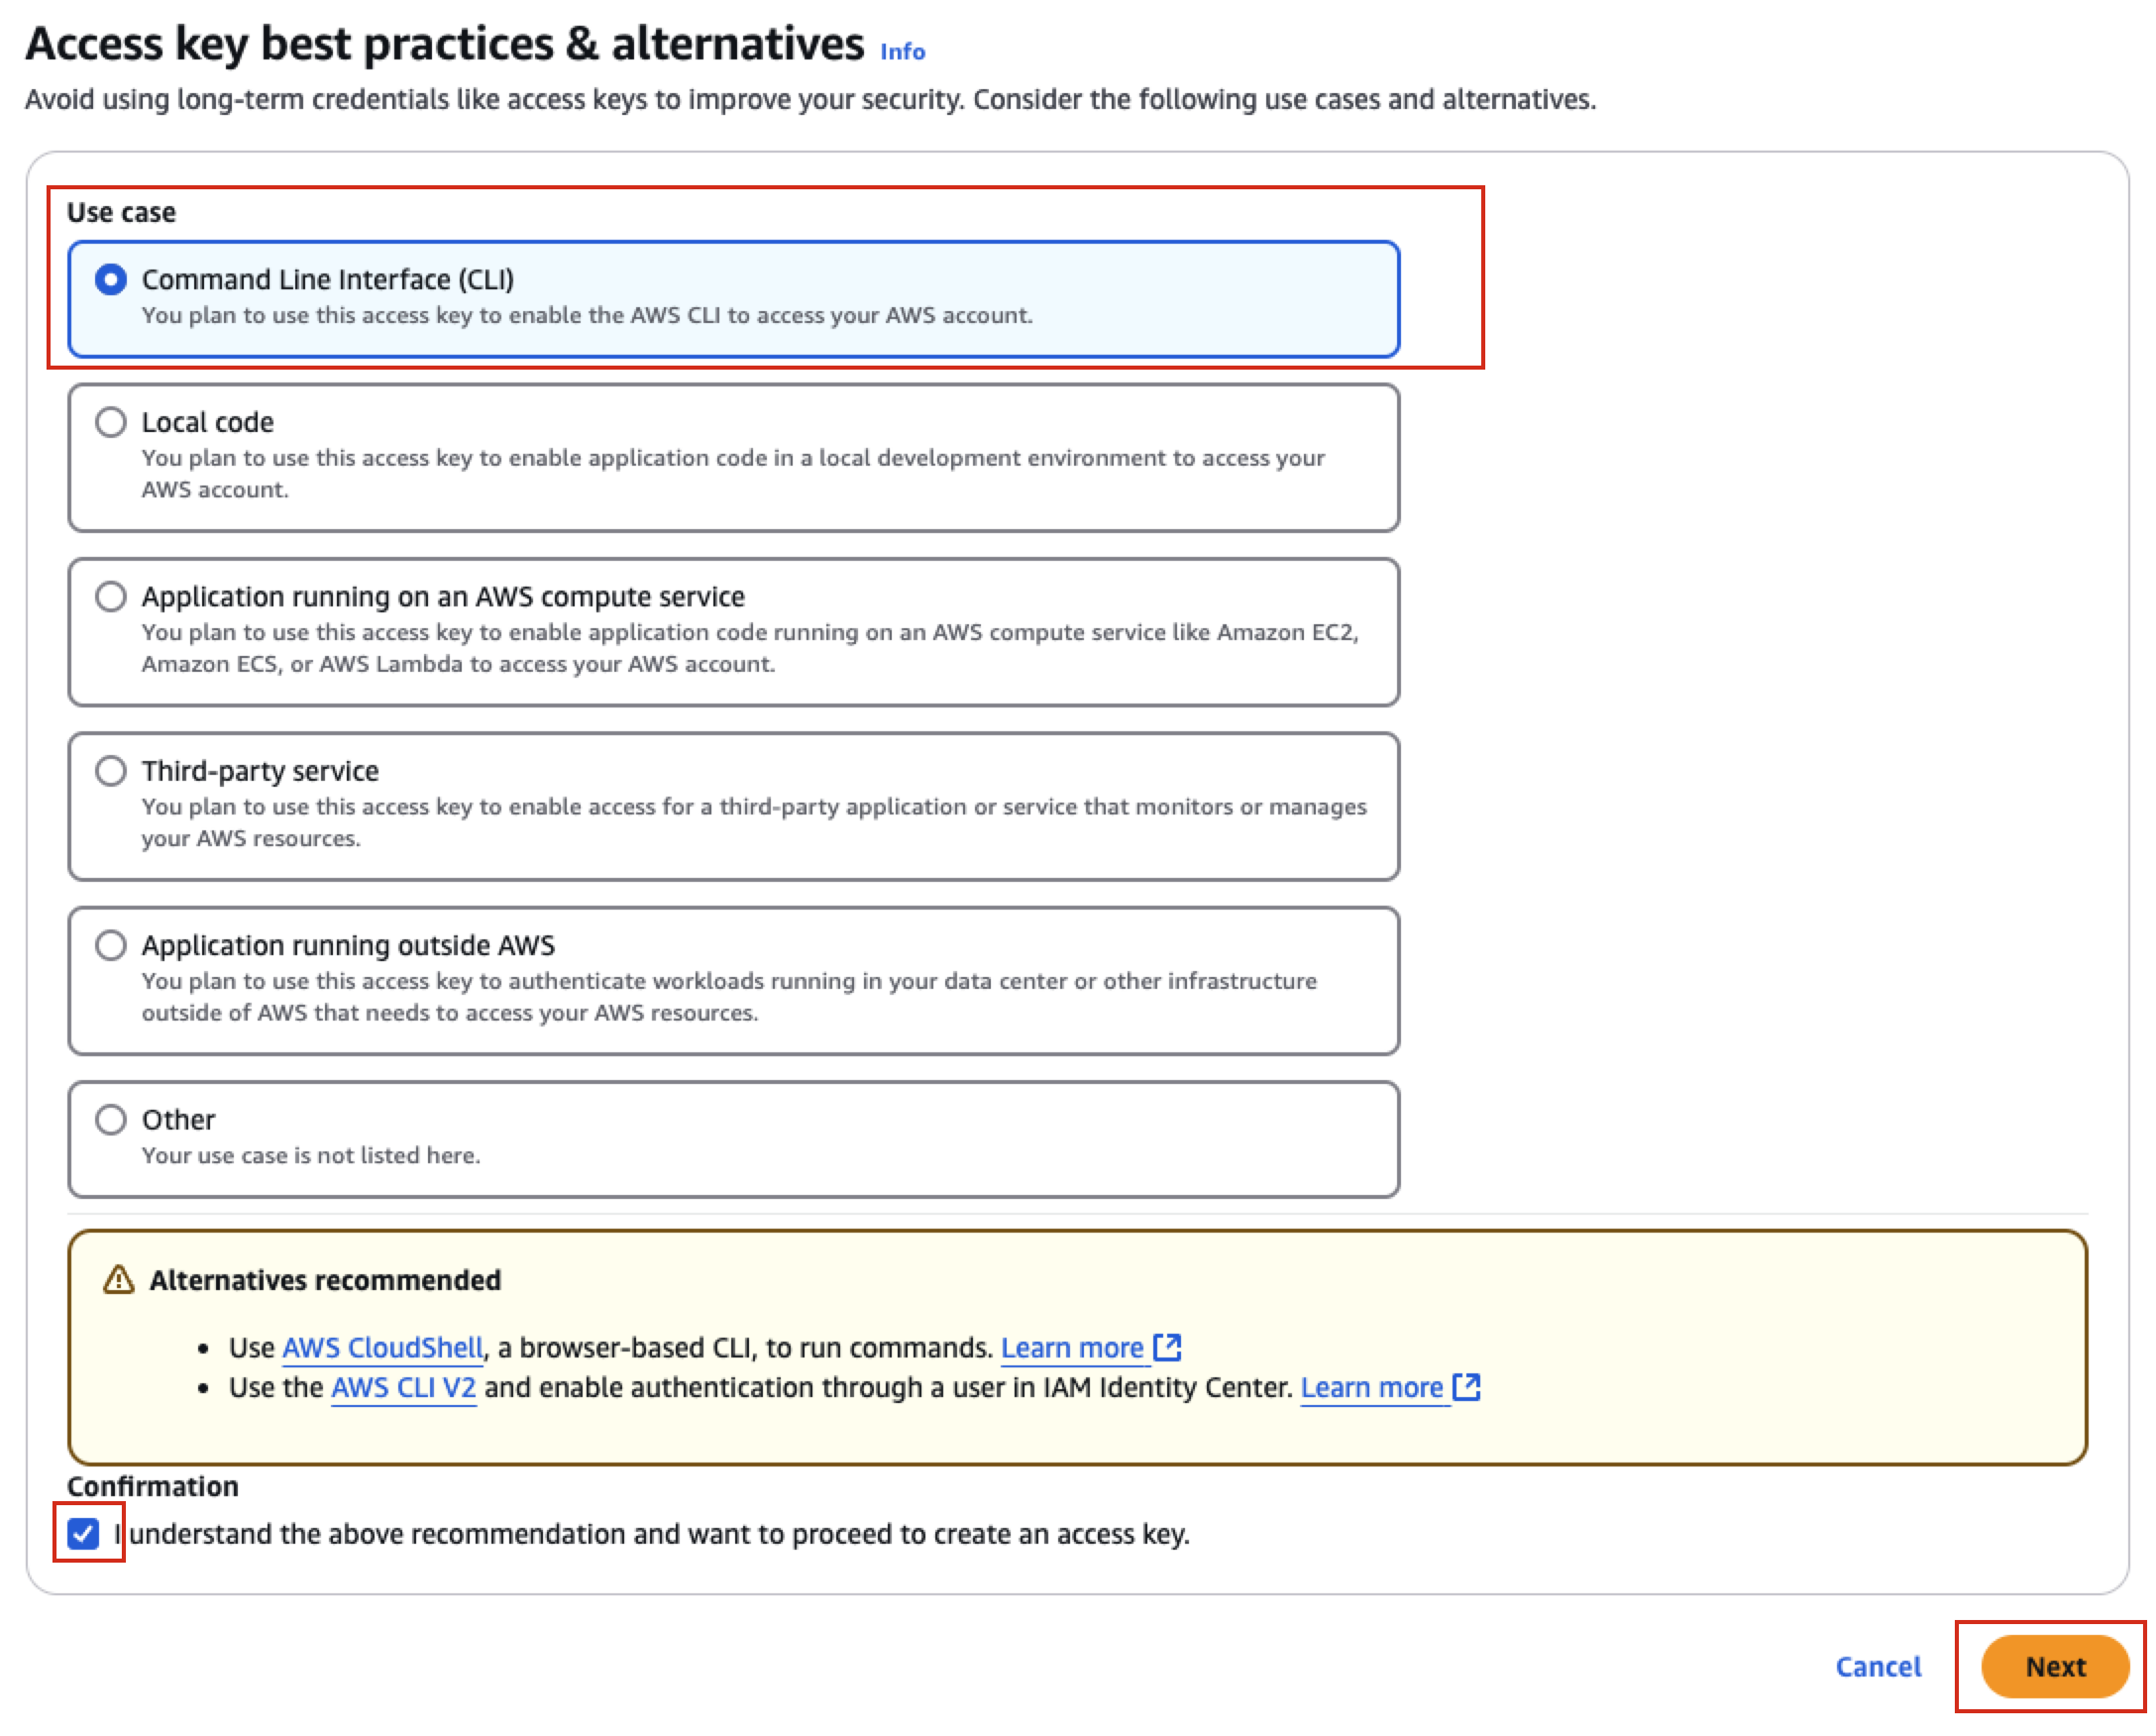
Locate the create access key button:

Select CLI as the use case and confirm, then press next:
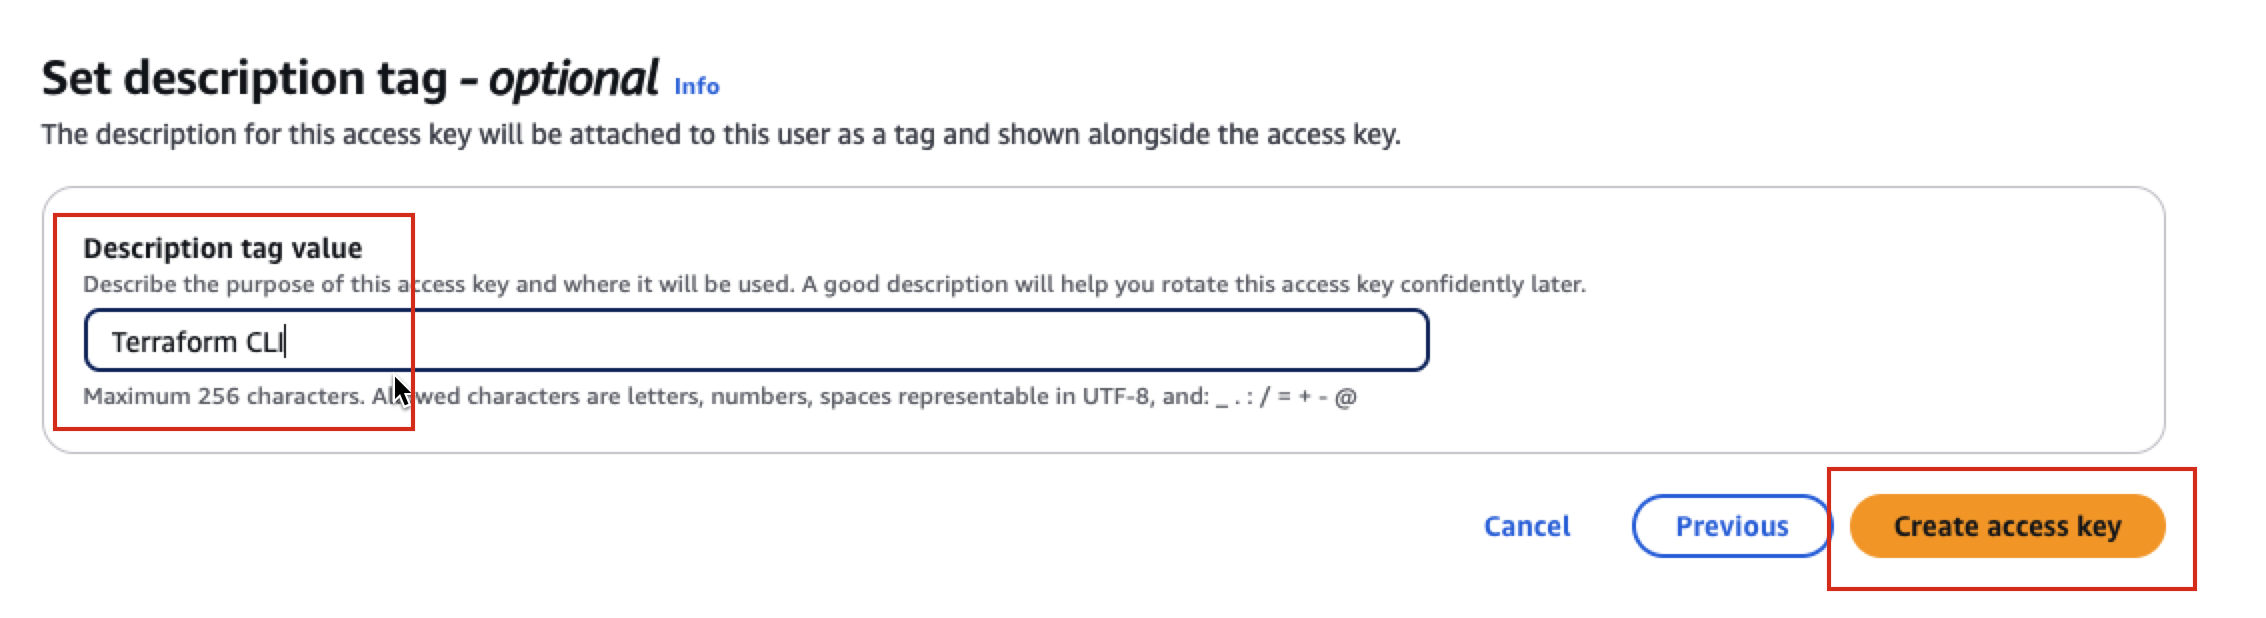
Add a description for the key:
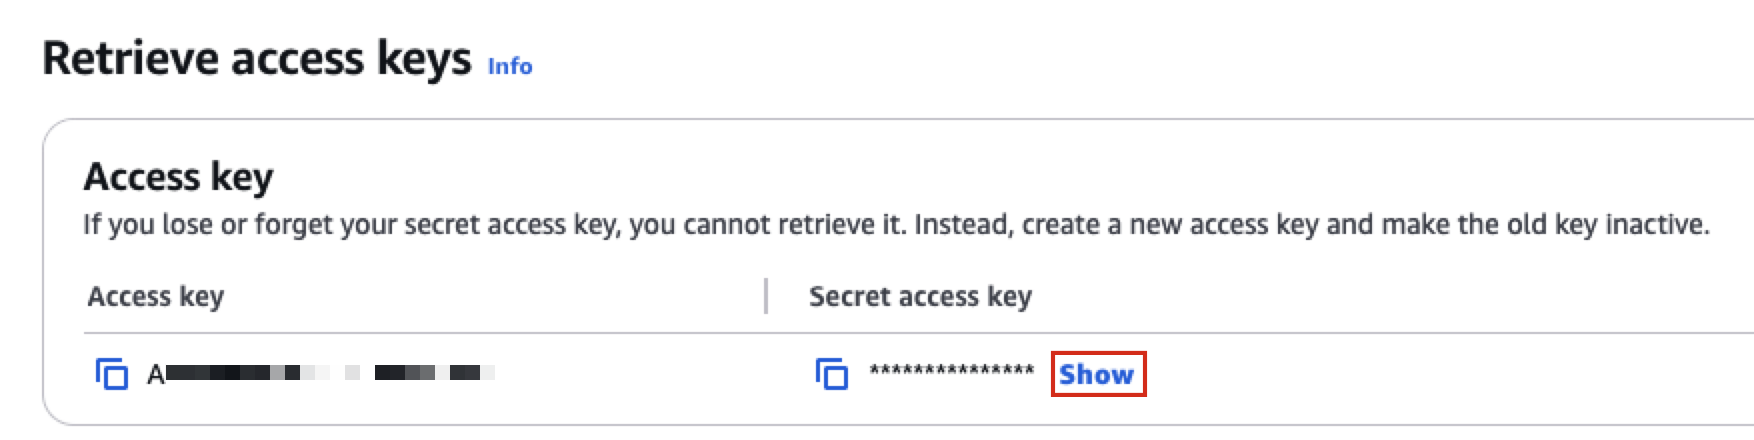
On that screen you can access your access key.
Warning
Never store access keys or secret access keys in plain text files. Use a credential manager like 1Password CLI to securely store and access credentials.
Click the show button:
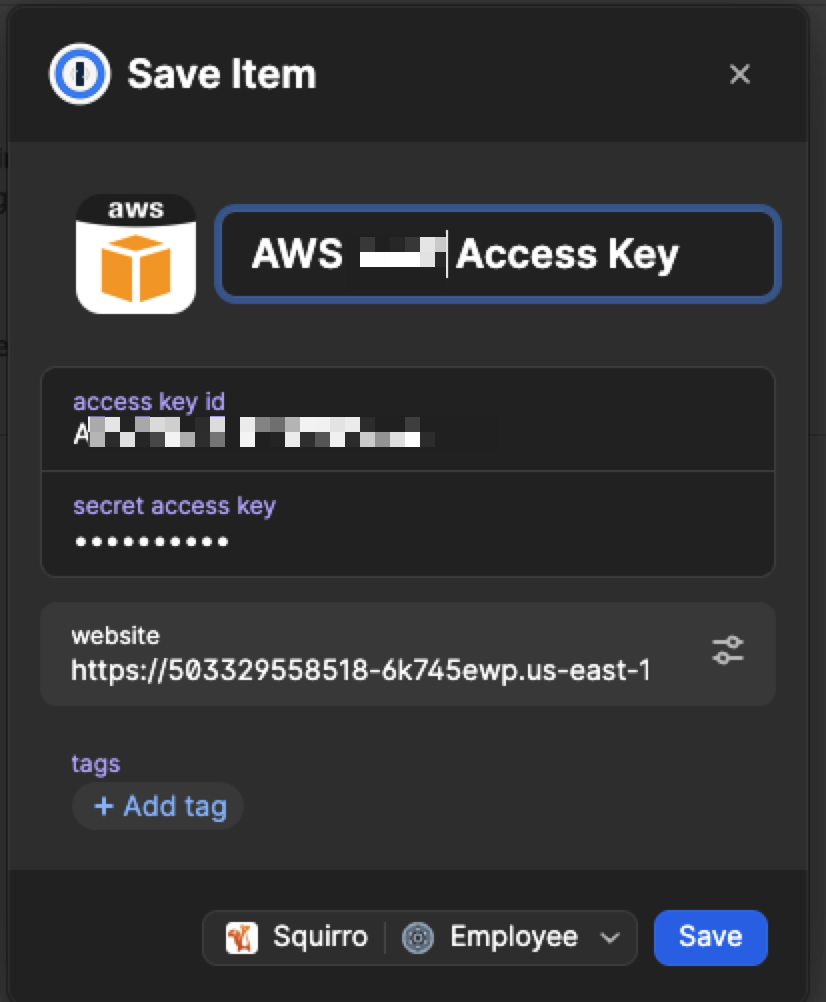
This should trigger the 1Password Browser extension and it offers to store the key for you:
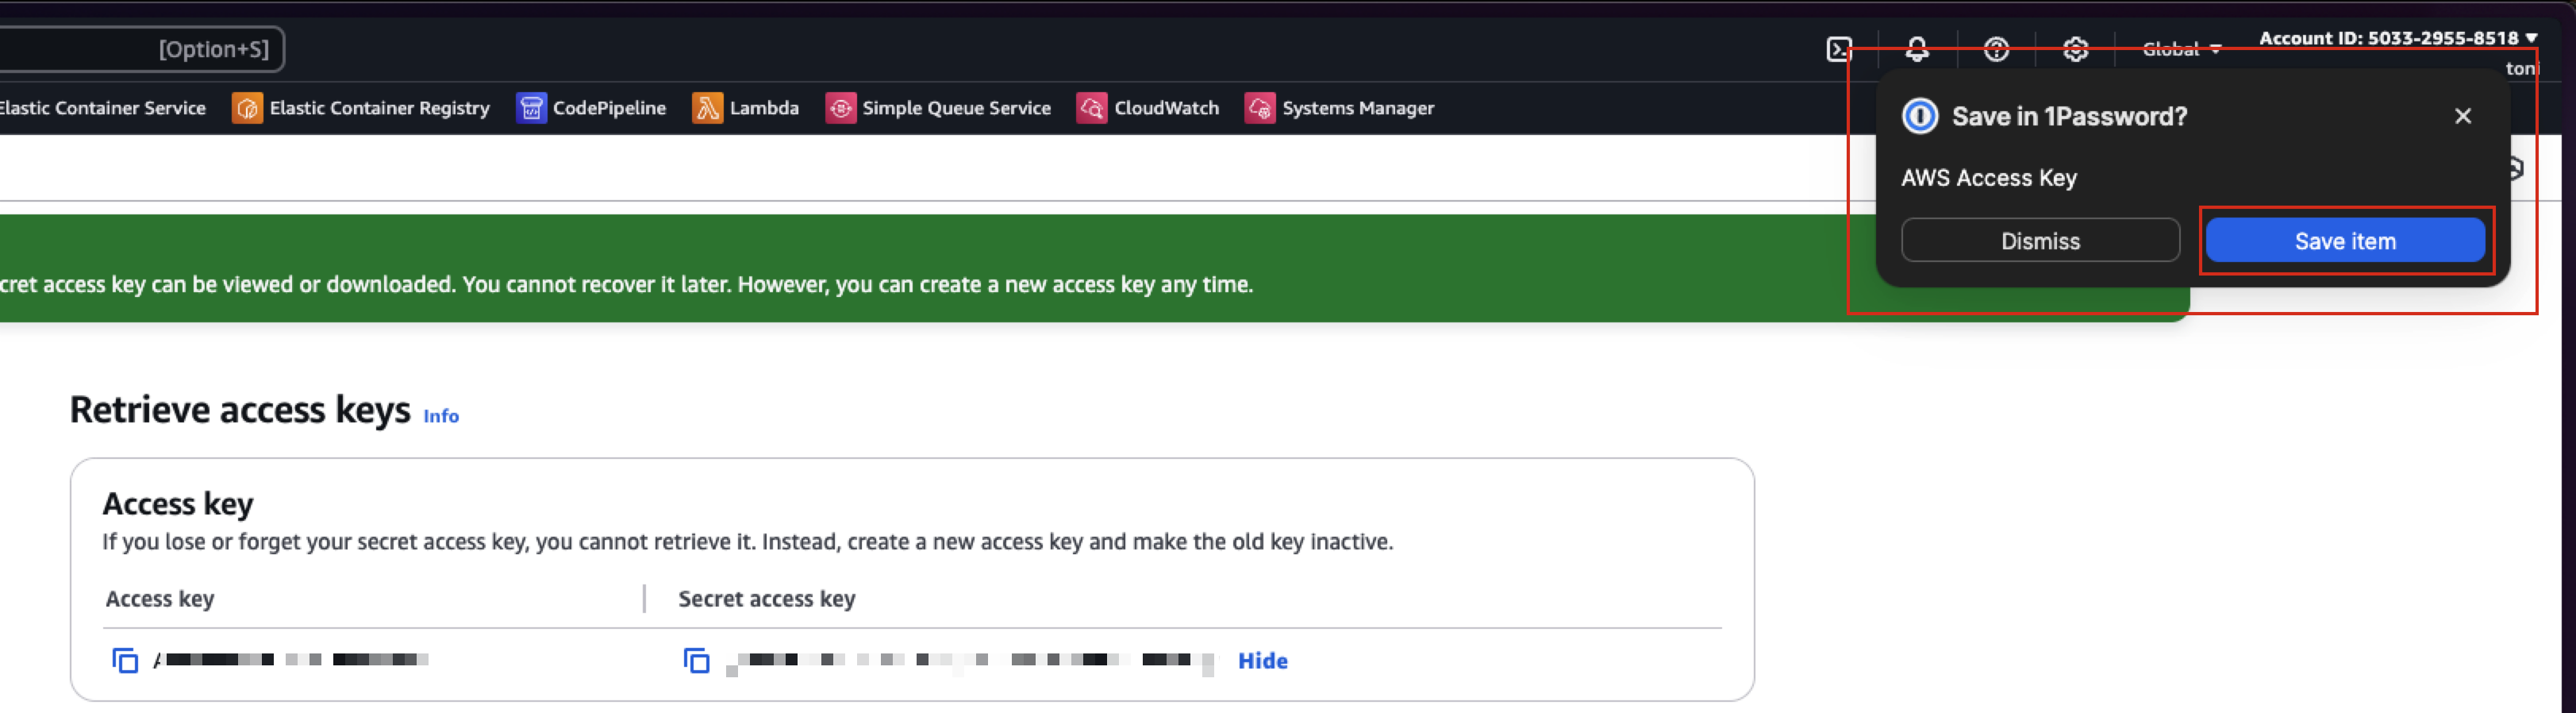
Click Save Item
Store it in a vault with a descriptive name.
If not yet done, enable the 1Password command-line interface:
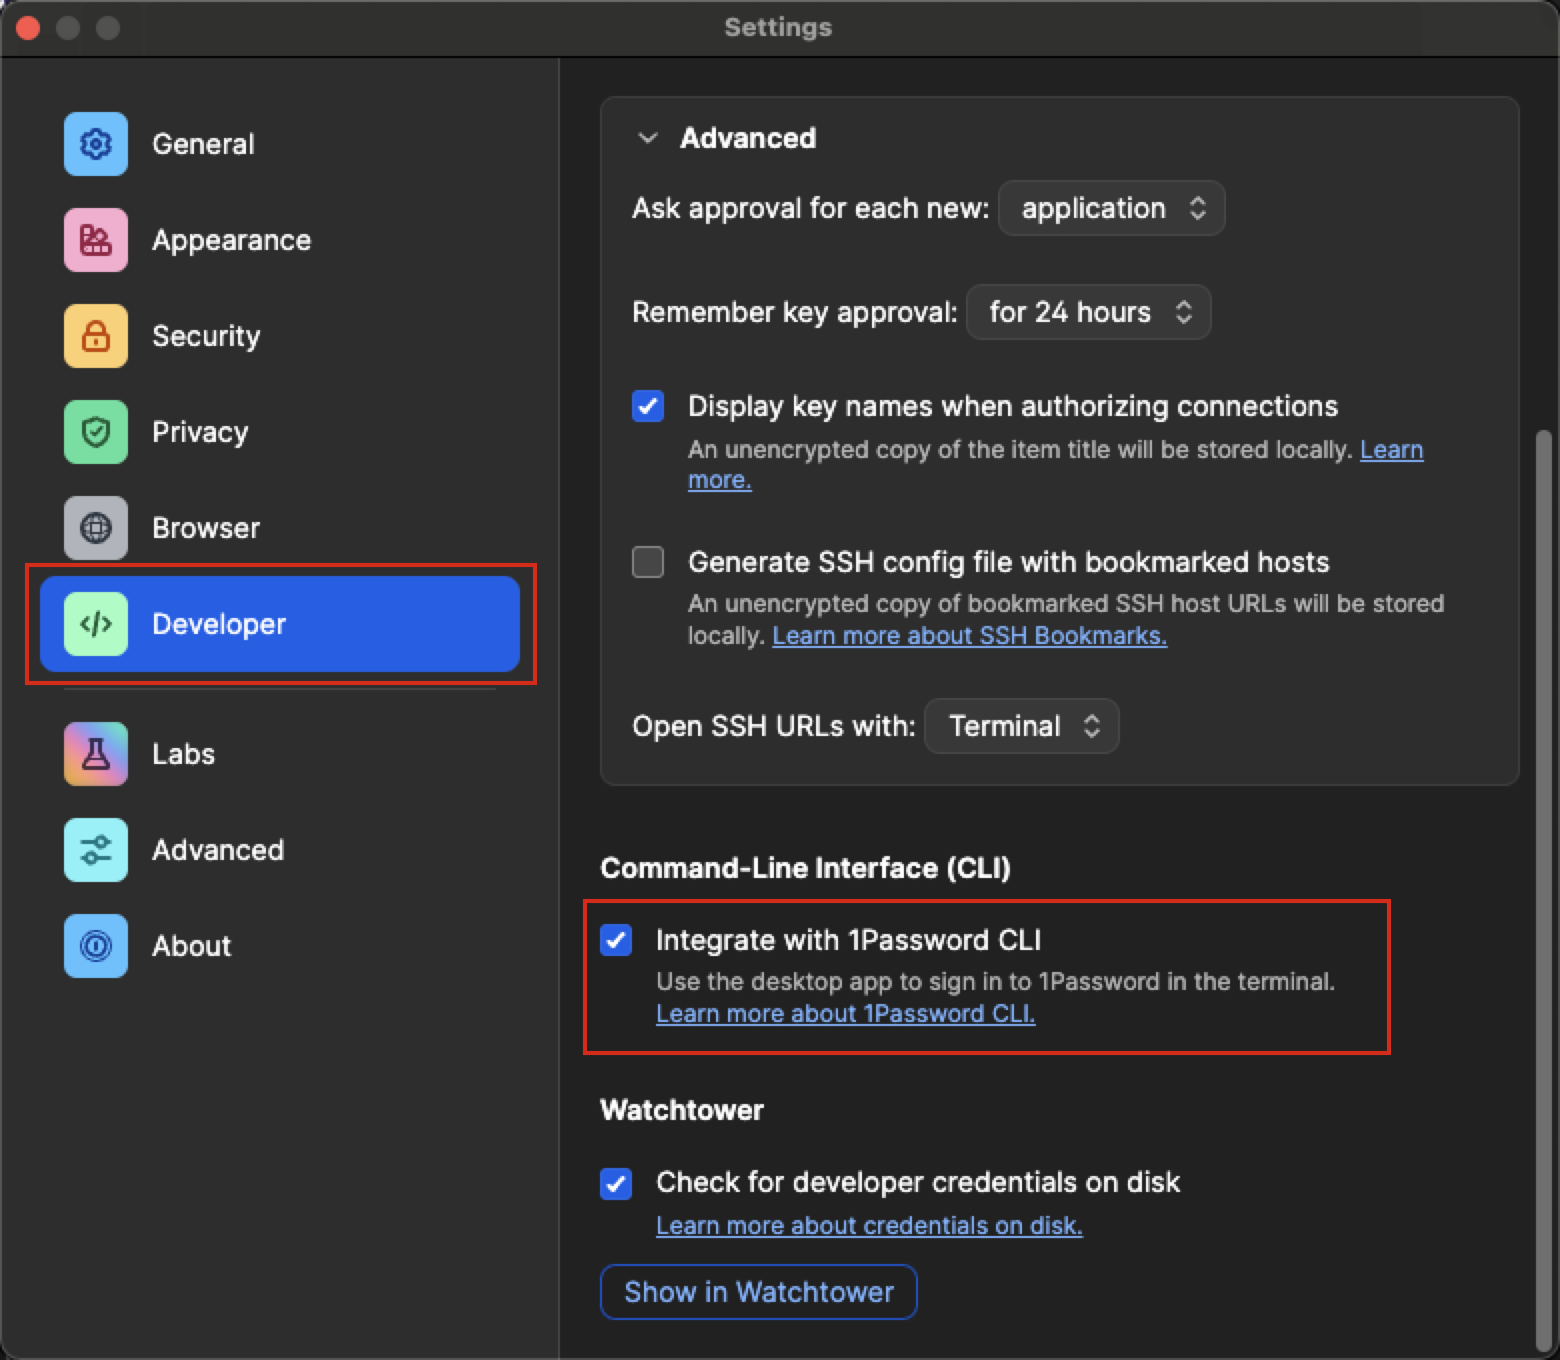
Follow the instructions to make the op command work
with your 1Password.
The recommended way to use 1Password CLI is to use its capability to tie credentials to a working directory. It means you can tie the above AWS credentials to only be used when you are inside your Terraform project folder.
Set up the project folder#
Set a new folder for the project:
~/dev/aws-squirro-deployment
Download#
Download and unzip the latest version from https://mirror.squirro.net/terraform/aws
Install 1password-cli (op)#
Install 1password-cli if you do not already have it.
brew install 1password-cli
Setup 1password-cli for Terraform#
.env.example file.cp .env.example .env
Modify this file so it has the correct 1Password secret references from the 1Password record that holds the AWS api key end secret.
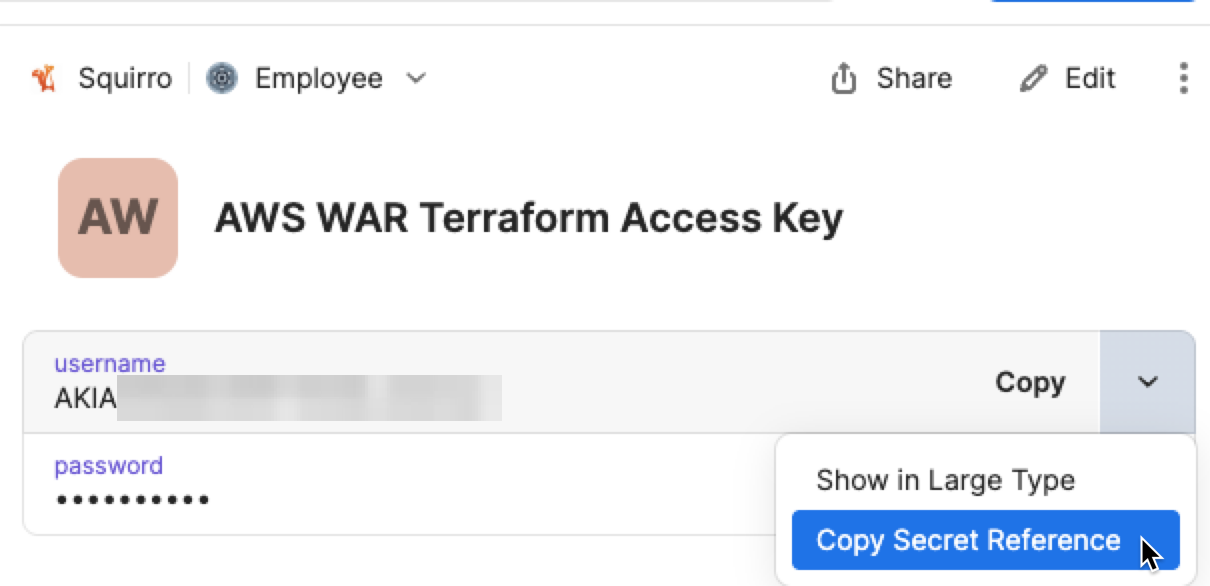
The resulting .env file should look like this:
# This tells 'op run' which secrets to expose as environment variables
AWS_ACCESS_KEY_ID="op://Employee/AWS WAR Terraform Access Key/username"
AWS_SECRET_ACCESS_KEY="op://Employee/AWS WAR Terraform Access Key/password"

# Add this line only if you use temporary credentials (IAM roles)
# AWS_SESSION_TOKEN="op://Your Vault Name/AWS Dev Account/session token"
That way you do not store the very sensitive api credentials but only references to 1Password.
Set up 1password-cli for AWS CLI#
To execute AWS CLI commands, you need to utilize the 1Password CLI. 1Password offers a user-friendly shell plugin for the AWS CLI, making it easy to integrate.
op plugin init aws
Follow the instructions to select the right 1Password vault and records.
Example:
❯ op plugin init aws

AWS CLI
Authenticate with AWS Access Key.

? Locate your AWS Access Key: AWS WAR Access Key (Employee)

? Configure when the chosen credential(s) will be used to authenticate: Use automatically when in this directory or subdirectories
The last step is to set up an alias for aws. You can do so by running the following command:
echo “source /Users/username/.config/op/plugins.sh” >> ~/.bashrc && source ~/.bashrc
This way, when you enter your project folder, you can use AWS CLI with the correct key.
With the setup completed, whenever you run a Terraform command, 1Password provides it the access key. The folder awareness gives it the correct key.
Set up S3 State Storage and Initialize Terraform#
Run the following AWS command to create an S3 bucket that holds the Terraform state, set a unique bucket name, and pick a region.
# Variables
BUCKET_NAME="aws-deployment20250812.example.com"  # Must be globally unique
REGION="eu-central-2"  # Change to your preferred AWS region

# 1. Create the S3 bucket
aws s3api create-bucket \
   --bucket "$BUCKET_NAME" \
   --region "$REGION" \
   $( [ "$REGION" != "us-east-1" ] && echo --create-bucket-configuration LocationConstraint=$REGION )

# 2. Enable bucket versioning
aws s3api put-bucket-versioning \
   --bucket "$BUCKET_NAME" \
   --versioning-configuration Status=Enabled

# 3. Enable server-side encryption (SSE-S3)
aws s3api put-bucket-encryption \
   --bucket "$BUCKET_NAME" \
   --server-side-encryption-configuration '{
      "Rules": [
      {
         "ApplyServerSideEncryptionByDefault": {
            "SSEAlgorithm": "AES256"
         }
      }
      ]
   }'
If successful, no error is printed, and output like this is shown:
{
      "Location": "http://aws-deployment20250812.example.com.s3.amazonaws.com/"
}
You can validate by running another aws command
❯ aws s3 ls | grep aws-deployment
2025-08-12 15:49:34 aws-deployment20250812.squirro.com
Finally, configure Terraform to use this bucket as its state storage.
Copy the example available into the main.tf file.
cp main.tf.s3 main.tf
Modify it to match the above choices, you need to set the regions (twice) and the S3 bucket name:
For example:
provider "aws" {
   region  = "eu-central-2"
}

      backend "s3" {
      bucket  = "aws-deployment20250812.squirro.com"
      key     = "terraform.tfstate"
      region  = "eu-central-2"
      encrypt = true
      }

terraform {
   required_providers {
      aws = {
      source  = "hashicorp/aws"
      version = "~> 5.0"
      }
   }
}
Initialize Terraform#
Run this command:
op run --env-file=.env -- terraform init
That command does not run any actions on AWS, but sets Terraform up to work. It also reaches into the S3 bucket to ensure it can manage its state there.
Note the op run op run --env-file=.env -- part. This is where the 1Password cli comes in.
It takes the contents of the .env files and resolves all the secrets for you.
This will prompt 1Password to show a confirmation the first time, to ensure its really you.
For the remaining Terraform commands, Squirro provides wrapper commands.
Example output:
❯ op run --env-file=.env -- terraform init
Initializing the backend...

Successfully configured the backend "s3"! Terraform will automatically
use this backend unless the backend configuration changes.
Initializing provider plugins...
- Finding hashicorp/aws versions matching "~> 5.0"...
- Installing hashicorp/aws v5.100.0...
- Installed hashicorp/aws v5.100.0 (signed by HashiCorp)
Terraform has created a lock file .terraform.lock.hcl to record the provider
selections it made above. Include this file in your version control repository
so that Terraform can guarantee to make the same selections by default when
you run "terraform init" in the future.

Terraform has been successfully initialized!

You may now begin working with Terraform. Try running "terraform plan" to see
any changes that are required for your infrastructure. All Terraform commands
should now work.

If you ever set or change modules or backend configuration for Terraform,
rerun this command to reinitialize your working directory. If you forget, other
commands will detect it and remind you to do so if necessary.
Configuring the Terraform Module#
The Squirro terraform module is controlled by a .tfvars file. Squirro provides an example file named terraform.tfvars.example.
Copy the file:
cp terraform.tfvars.example terraform.tfvars
The example has these variables:
env                      = "test"
machine_size             = "m6i.2xlarge"
base_ami_id              = "ami-012ca946ca60e62e0"
aws_region               = "eu-central-2"
username                 = "ansible_deploy"
machine_root_volume_size = "200"
subdomain                = "war-test"
vpc_id                   = "vpc-029f073427cb6bc8b"
public_subnets_list      = ["172.31.64.0/24"]
Go through each variable one at a time and assign values that are appropriate for your deployment.
aws_region#
The region where you want to deploy. Always check with your IT department where the data needs to reside.
You can use the following command to get a list of all available regions:
aws ec2 describe-regions
vpc_id#
Populate this with an existing VPC you want to use. If you want to create a new VPC, create it now.
Here is how you can list the existing vpcs.
aws ec2 describe-vpcs --query 'Vpcs[*].[VpcId, CidrBlock]' --region eu-central-2 --output table
Sample output:
--------------------------------------------
|               DescribeVpcs               |
+------------------------+-----------------+
|  vpc-029f073427cb6bc8b |  172.31.0.0/16  |
+------------------------+-----------------+
Note the CIDR for later use.
public_subnet_list#
Pick a /24 subnet inside the CIDR. This is an important decision and it should align with the IT department policies. Changing this later is complex and requires full rebuilds.
Based on the sample output above, you should use 172.31.0.0/24.
base_ami_id#
The ID of the desired Amazon Machine Image.
Select the latest Rocky Linux 9 or RHEL 9 image in the selected region.
aws ec2 describe-images \
      --region eu-central-2 \
      --owners aws-marketplace \
      --filters "Name=name,Values=Rocky-9-EC2-Base*" "Name=architecture,Values=x86_64" \
      --query "sort_by(Images, &CreationDate)[-5:] | reverse(@)[].{ImageId: ImageId, Name: Name, CreationDate: CreationDate}" \
      --output table
Sample output:
--------------------------------------------------------------------------------------------------------------------------------------
|                                                           DescribeImages                                                           |
+--------------------------+------------------------+--------------------------------------------------------------------------------+
|       CreationDate       |        ImageId         |                                     Name                                       |
+--------------------------+------------------------+--------------------------------------------------------------------------------+
|  2025-06-05T03:07:34.000Z|  ami-0bade0ccdcb3b5d42 |  Rocky-9-EC2-Base-9.6-20250531.0.x86_64-3f230a17-9877-4b16-aa5e-b1ff34ab206b   |
|  2024-11-25T16:40:06.000Z|  ami-012ca946ca60e62e0 |  Rocky-9-EC2-Base-9.5-20241118.0.x86_64-3f230a17-9877-4b16-aa5e-b1ff34ab206b   |
|  2024-06-03T21:35:15.000Z|  ami-007dbefeee6334ace |  Rocky-9-EC2-Base-9.4-20240523.0.x86_64-3f230a17-9877-4b16-aa5e-b1ff34ab206b   |
|  2023-11-28T21:49:30.000Z|  ami-0af35ce2f027b0dd7 |  Rocky-9-EC2-Base-9.3-20231113.0.x86_64-3f230a17-9877-4b16-aa5e-b1ff34ab206b   |
+--------------------------+------------------------+--------------------------------------------------------------------------------+
Take the latest version, in the sample output, it is the 9.6 version, so the ami-0bade0ccdcb3b5d42 image ID.
env#
Set this to one of the following options: development, testing, staging, or production. These string values do not carry inherent meaning but serve as prefixes or suffixes for all AWS resources. This helps distinguish which environment a resource belongs to.
machine_size#
The instance type to use:
For hardware sizing guidance, see the System Requirements page. The M instance family is a suitable starting point for AWS deployments. The available instance types may vary by region. To determine which types are available in your region, run the following command:
aws ec2 describe-instance-types \
      --filters "Name=memory-info.size-in-mib,Values=32768" "Name=vcpu-info.default-vcpus,Values=8,16" \
      --query "InstanceTypes[?ProcessorInfo.SupportedArchitectures[?contains(@,'x86_64')]].{Instance:InstanceType}" \
      --output text | grep -E "^m[6|7][i|a]\."
If available m6a.2xlarge or m7a.2xlarge are good choices, m6i.2xlarge or m7i.2xlarge are also good.
machine_root_volume_size#
This specifies the size, in gigabytes, for the primary EBS volume, which is the only volume in use. The volume must accommodate the operating system, the Squirro release, logs, and all your data. For storage sizing guidance, see the System Requirements page.
subdomain#
Hostname. It is currently used for the <value>.example.com hostname.
Plan the Infrastructure#
Run
./plan.sh
Note: this is the wrapper script that runs terraform plan with the op prefix.
Ensure the plan is not destroying or changing unexpected resources.
Sample output:
./plan.sh
data.aws_vpc.existing: Reading...
data.aws_availability_zones.available: Reading...
data.aws_availability_zones.available: Read complete after 0s [id=eu-central-2]
data.aws_vpc.existing: Read complete after 0s [id=vpc-029f073427cb6bc8b]
data.aws_internet_gateway.existing: Reading...
data.aws_internet_gateway.existing: Read complete after 0s [id=igw-0938265678e46c118]

Terraform used the selected providers to generate the following execution
plan. Resource actions are indicated with the following symbols:
   + create

Terraform will perform the following actions:

   # aws_eip.squirro will be created
   + resource "aws_eip" "squirro" {
      + allocation_id        = (known after apply)
      + arn                  = (known after apply)
      + association_id       = (known after apply)
      + carrier_ip           = (known after apply)
      + customer_owned_ip    = (known after apply)
      + domain               = "vpc"
...
...
...
Plan: 10 to add, 0 to change, 0 to destroy.
Note, it only adds, does not change or destroy, as it is the first time we run this.
Provision the Infrastructure#
Use the following command:
./apply.sh
Executing that command may take several minutes to complete.
Sample output:
Do you want to perform these actions?
   Terraform will perform the actions described above.
   Only 'yes' will be accepted to approve.

   Enter a value: yes

aws_eip.squirro: Creating...
aws_subnet.public[0]: Creating...
aws_iam_role.squirro: Creating...
aws_security_group.squirro: Creating...
aws_route_table.public: Creating...
aws_eip.squirro: Creation complete after 0s [id=eipalloc-0628da6e94cbde450]
aws_subnet.public[0]: Creation complete after 0s [id=subnet-037e0b4e7a377584c]
aws_route_table.public: Creation complete after 0s [id=rtb-0aaacd306256409a5]
aws_route_table_association.public[0]: Creating...
aws_iam_role.squirro: Creation complete after 0s [id=squirro-ec2-role]
aws_iam_instance_profile.squirro: Creating...
aws_route_table_association.public[0]: Creation complete after 1s [id=rtbassoc-02fff123f679a8329]
aws_security_group.squirro: Creation complete after 2s [id=sg-0450f40e21145ab8d]
aws_iam_instance_profile.squirro: Creation complete after 7s [id=squirro-ec2-role]
aws_instance.squirro: Creating...
aws_instance.squirro: Still creating... [10s elapsed]
aws_instance.squirro: Creation complete after 12s [id=i-0becab756a5b0c037]
aws_eip_association.squirro: Creating...
aws_eip_association.squirro: Creation complete after 1s [id=eipassoc-00700f403227ee7be]

Apply complete! Resources: 9 added, 0 changed, 0 destroyed.
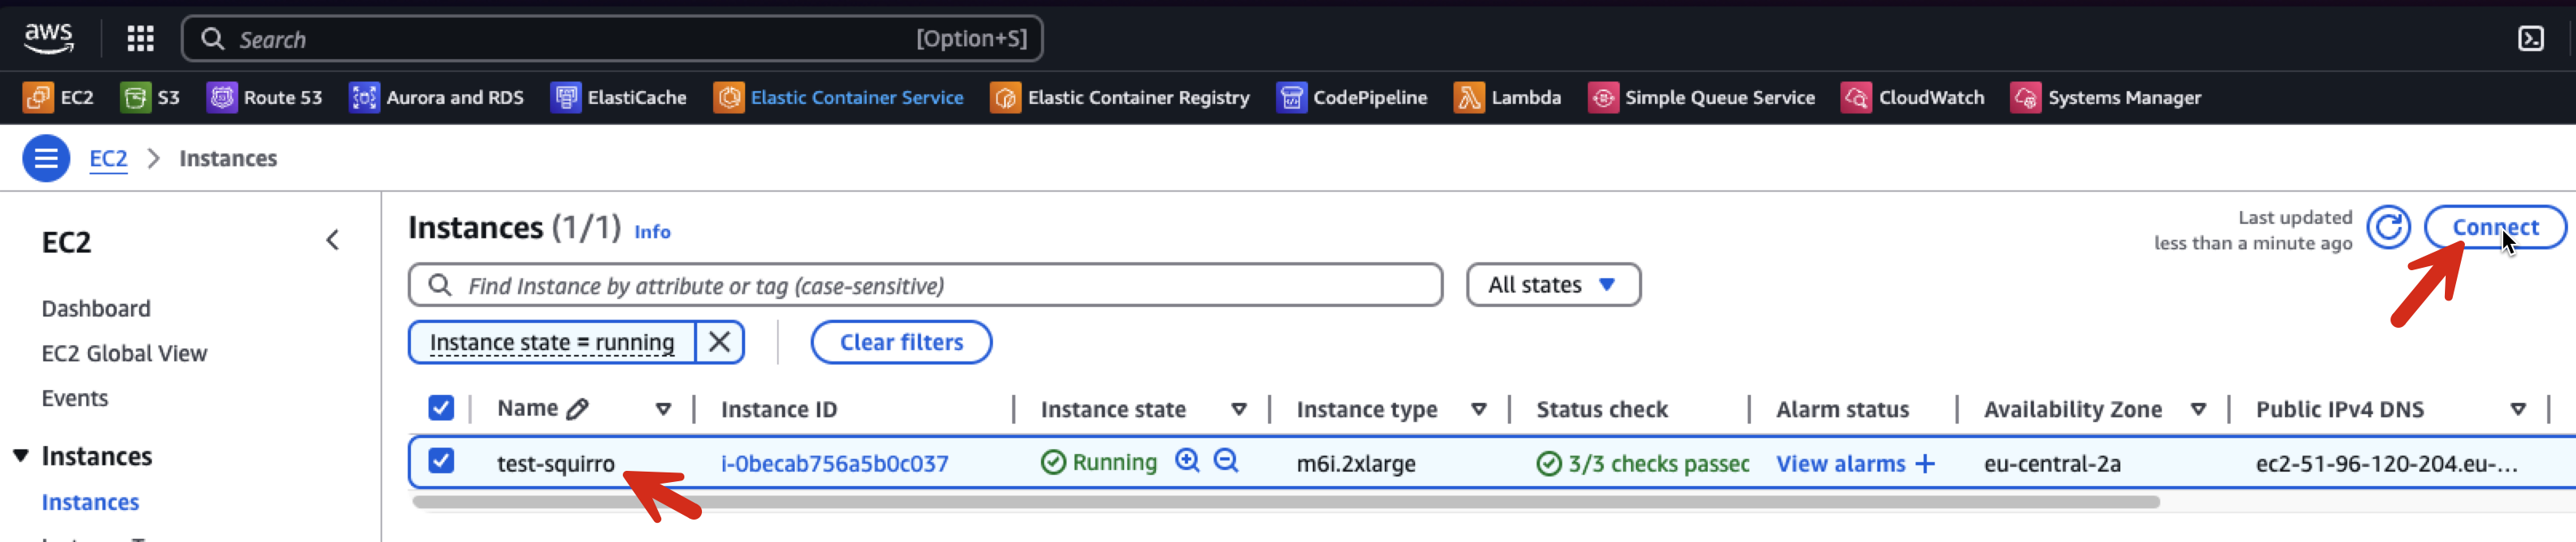
Log into the Instance#
Now that the instance is running, you can access the system. During the initial boot, the instance automatically updates itself with the latest packages. If a new kernel is installed as part of this update, the system requires a reboot.
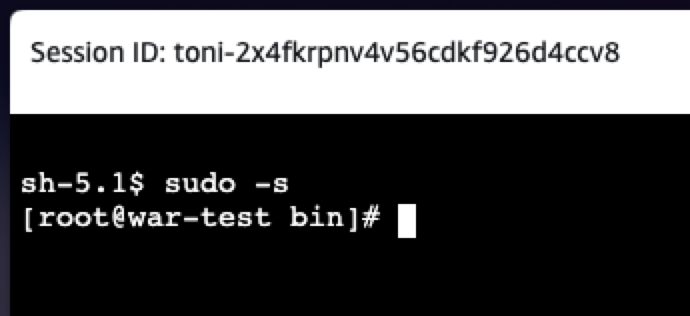
Session Manager#
The Terraform code enables Session Manager access. This is the recommended way to access the server shell securely.
A couple seconds after the instance goes into a running state and passes the status checks, you should be able to connect like so:

Setup Mirror Access#
Use curl to download a few resources and your credentials for the mirror.squirro.net repository.
In order to do this safely, create the following file:
/root/.netrc
With the following content:
machine mirror.squirro.net login <mirror username> password <mirror password>
Set restrictive file permissions
chmod 600 /root/.netrc
Both nvim and nano are installed in the EC2 instance.
Now, we can simply access mirror.squirro.net using the curl -n command. This approach eliminates the need to include the username and password directly in the command, ensuring they do not appear in the bash history or process table.
Install Ansible#
Now that you can access the instance and the software mirror you can install Squirro using Ansible.
For more details on Squirro Ansible installation, see Install and Manage Squirro with Ansible.
dnf install ansible
Install the Squirro Ansible Role#
Identify the latest version of Squirro Ansible by using this command:
curl -ns https://mirror.squirro.net/ansible/ | w3m -dump -T text/html | sort -Vr
Sample output:
squirro-ansible-3.12.2.zip                         18-Mar-2025 09:13              101933
squirro-ansible-3.12.1.zip                         03-Mar-2025 11:39              101933
squirro-ansible-3.11.6.zip                         11-Dec-2024 19:16              120435
squirro-ansible-3.11.4.zip                         19-Mar-2025 11:01              117614
squirro-ansible-3.11.1.zip                         13-Nov-2024 14:25              115918
squirro-ansible-3.10.6.zip                         11-Sep-2024 15:21              113714
squirro-ansible-3.10.4.zip                         26-Jun-2024 11:21               98803
...
Typically, it is best to use the very latest version of Squirro. However, if you are installing an older version of Squirro, selecting a matching version may be advisable for compatibility.
Install squirro-ansible into /root/squirro-ansible using
the following command:
curl -n https://mirror.squirro.net/ansible/squirro-ansible-<version>.zip -o /tmp/squirro-ansible.zip; unzip /tmp/squirro-ansible.zip -d /root/squirro-ansible
Alternatively, clone the role from here:
cd /root/
git clone git@github.com:squirro/squirro-ansible.git
Configure the Ansible Playbook#
Enter the /root/squirro-ansible directory and modify the playbook-quickstart.yml file.
Set the variables as follows:
- name: Quickstart Install Squirro
   hosts: all
   become: true
   vars:
      squirro_clusternode: true
      squirro_storagenode: true
      yum_user: <mirror user>
      yum_password: <mirror password>
      squirro_channel: stable
      squirro_version: latest
      elasticsearch_discovery_type: single-node
      elasticsearch_ssl_mode: single-node
      nutrient_pdf_viewer_license_key: <license key>
   roles:
      - role: squirro-ansible
On Squirro 3.15.4 and later, set the nutrient_pdf_viewer_license_key variable to the license key for the built-in PDF viewer. Without a valid key, PDF documents render with a watermark. For instructions on obtaining the key, see the PDF Viewer page.
The squirro_version can be pinned to a desired
version. For production deployments, it is usually
recommended to pick an LTS version. You can look for the
releases with the -lts suffix, using the following command:
curl -ns https://mirror.squirro.net/el/9/stable/x86_64/ | w3m -dump -T text/html | sort -Vr
Install Squirro#
Use the following command:
ansible-playbook --connection=local --inventory 127.0.0.1, playbook-quickstart.yml
This executes hundreds of automated tasks to prepare the system for Squirro and download and install all required packages. The process usually takes around 15 minutes.

At times, you may encounter outputs similar to the following:
msg": "This can take a while. To monitor the progress, run 'tail -f /var/log/squirro/install-storage-node.log on the instance"
If the task takes longer than expected, you can open another terminal and monitor the content of these logs or use the tail command to track the progress of the installation.
A successful installation typically ends like this:

Validate the Installation#
The primary method to verify that all Squirro services are up and running is to use the built-in squirro_status command.
[root@war-test squirro-ansible]# squirro_status
Squirro Version: 3.13.6 Build 55
Squirro Cluster Service: service not installed
GET https://localhost:9200/_cluster/health [status:200 duration:0.022s]

ES Status        : green
ES Active Shards : 100%
System Uptime  : 1:08:18.420000

Local Service Health:
|---------------||---------------------------------------------------------------------------------|
| Service       || Status                                                                          |
|---------------||---------------------------------------------------------------------------------|
| frontend      || OK                                                                              |
| configuration || OK                                                                              |
| content       || OK                                                                              |
| datasource    || OK                                                                              |
| digestmailer  || OK                                                                              |
| emailsender   || OK                                                                              |
| filtering     || OK                                                                              |
| indexmanager  || OK                                                                              |
| ingester      || OK                                                                              |
| machinelearni || OK                                                                              |
| notes         || OK                                                                              |
| pdfconversion || OK                                                                              |
| plumber       || OK                                                                              |
| relatedstory  || OK                                                                              |
| scheduler     || OK                                                                              |
| search        || OK                                                                              |
| studio        || OK                                                                              |
| thumbler      || OK                                                                              |
| topicproxy    || OK                                                                              |
| userproxy     || OK                                                                              |
| webshot       || OK                                                                              |
| provider      || OK                                                                              |
| topic         || OK                                                                              |
| user          || OK                                                                              |
|---------------||---------------------------------------------------------------------------------|
If all services display an OK status and Elasticsearch indicates a green status, you may proceed.
Next, you can access the installation in a browser using the EC2 instance public IP address.
By default, Squirro is installed with a self-signed certificate. As a result, accessing the site via the IPv4 address generates a TLS error, such as the following:
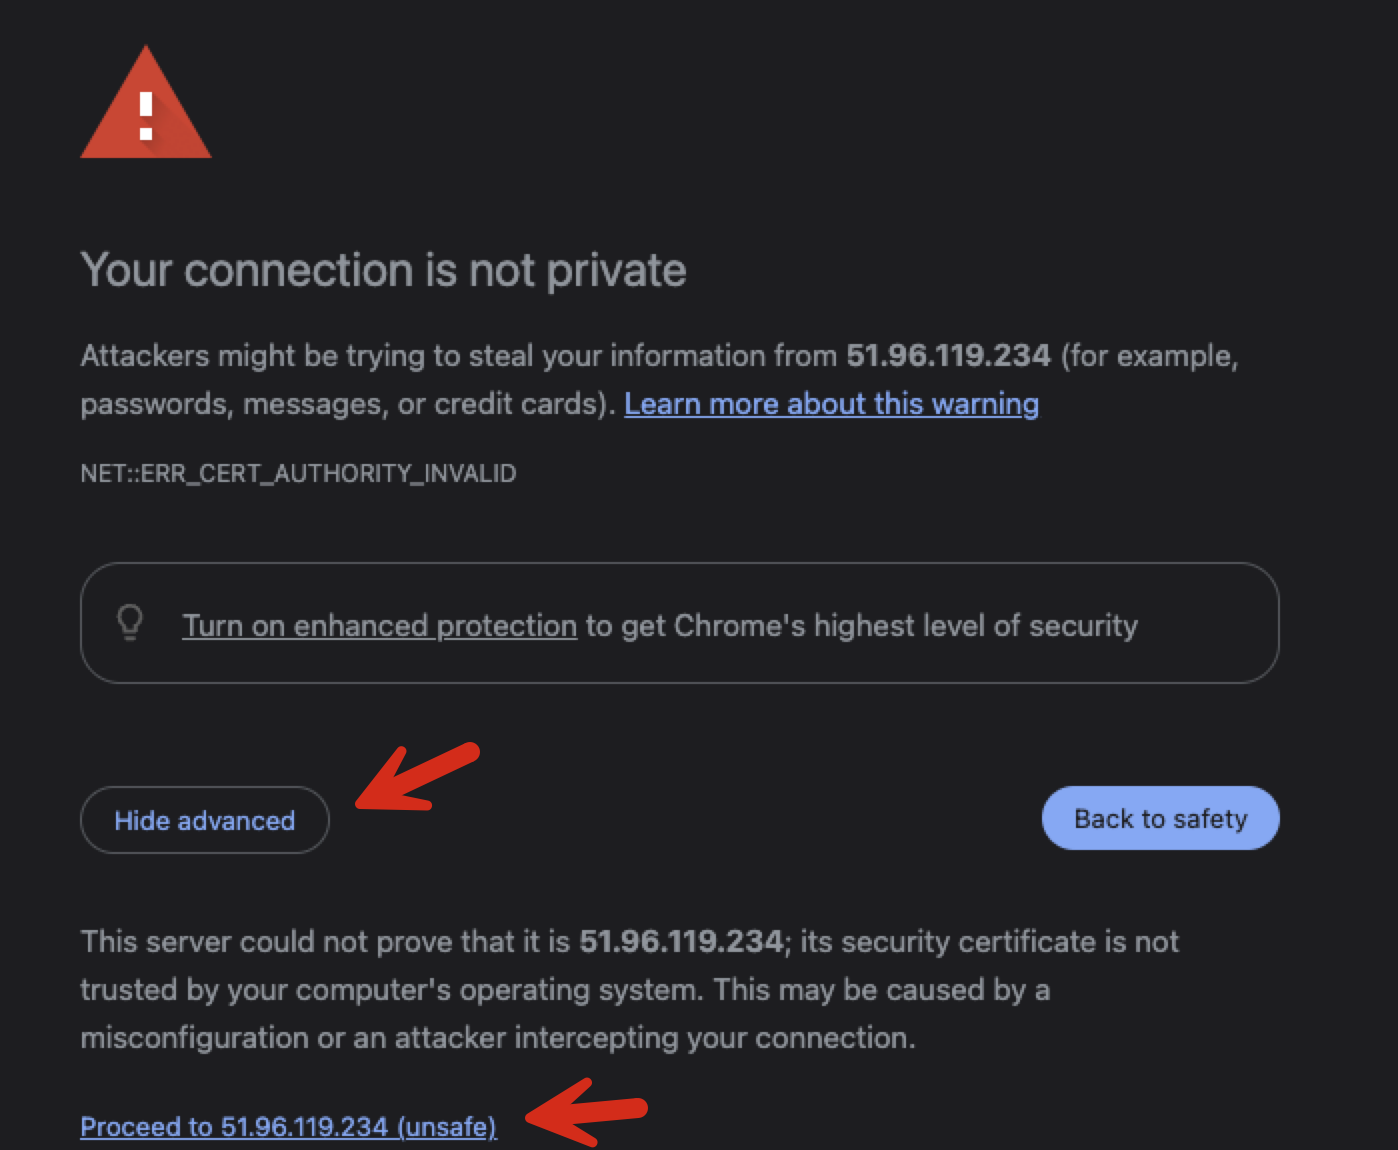
Most browsers provide an option to bypass this warning, and it is safe to do so at this stage.
After bypassing the warning, the Squirro instance should display a welcome screen similar to this:

Setup the initial Server Administrator User#
In this initial state, Squirro allows new signups. It is essential to immediately set up an initial user and secure the system.
Click the Sign up button.
The user you are about to create serves as a fallback account. That account is intended for use only in cases where Single Sign-On fails and requires maintenance.
For example:
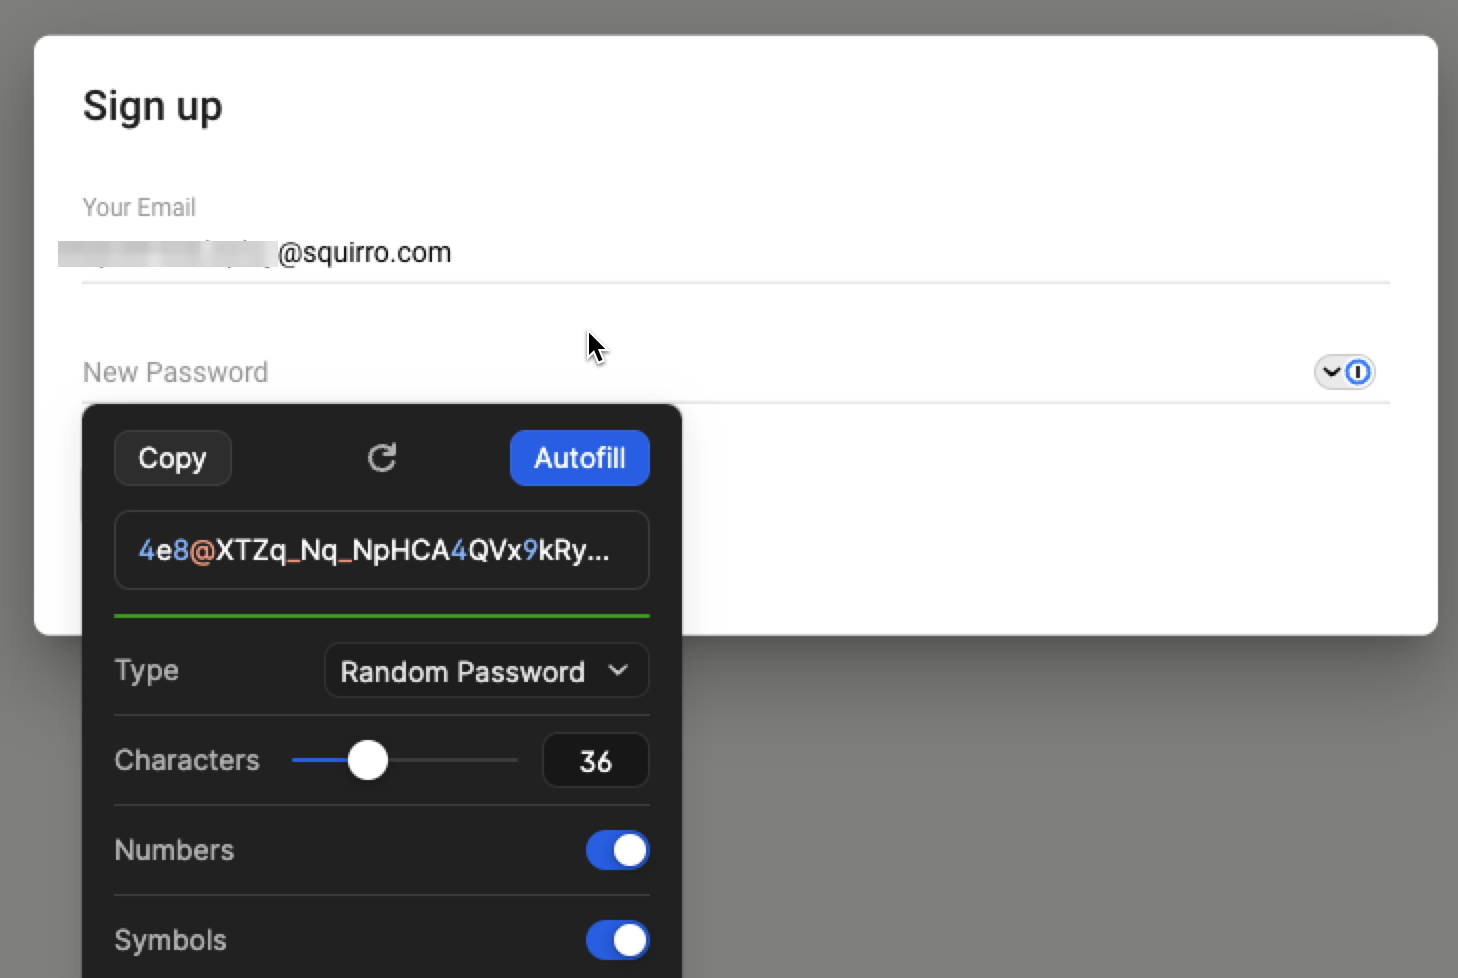
As shown here, always use 1Password to generate a long and secure password. Allow 1Password to capture the password, and consult with IT department to determine the appropriate vault for storing the account credentials.
Click the Autofill button, and then the Sign up button.
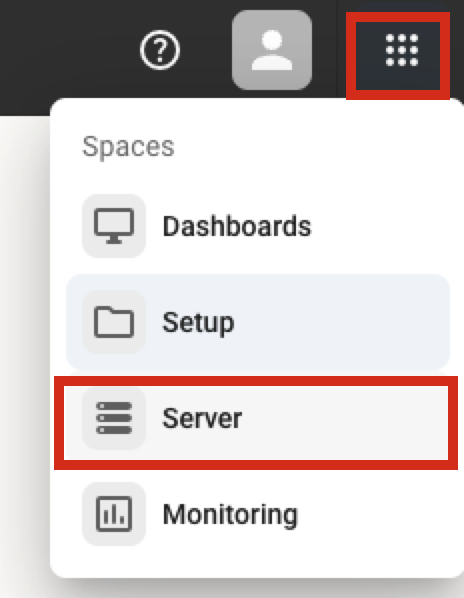
Once logged in, you must disable further signups immediately. To do this, navigate to the Server section.
Navigate to Configuration, Search for signup, locate frontend.userapp.signup
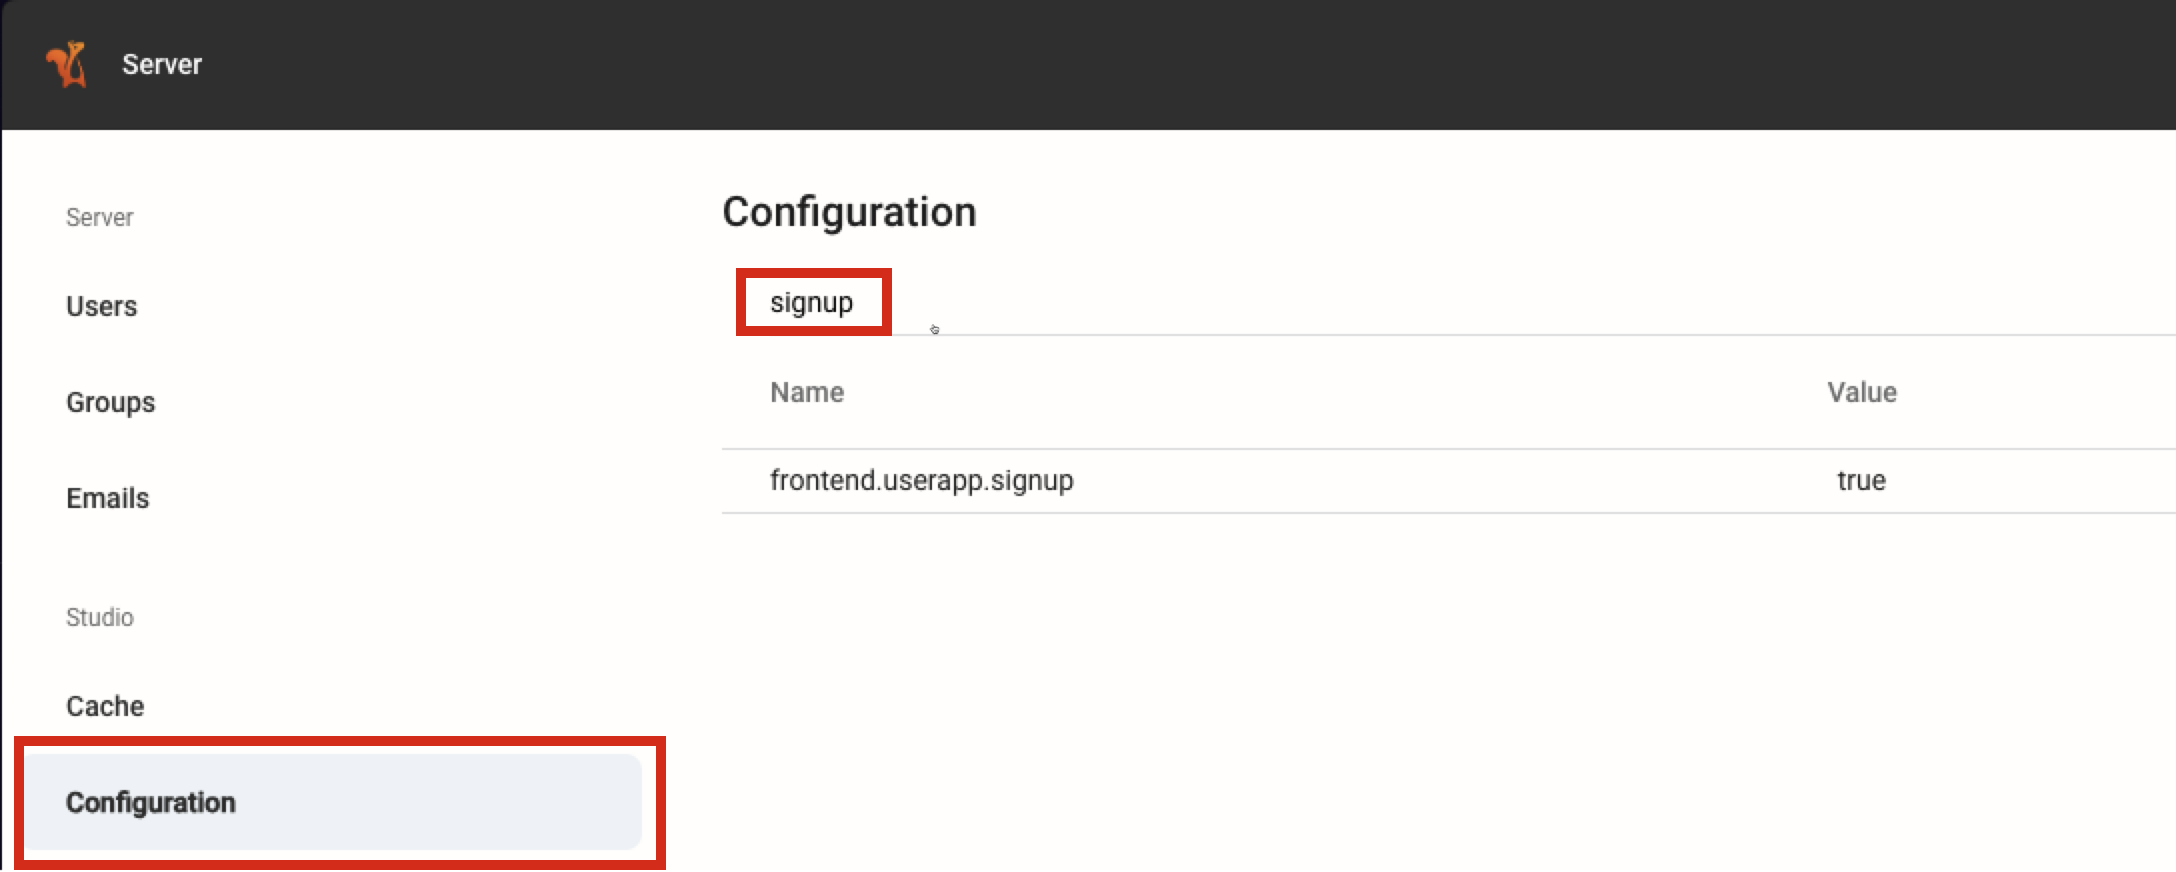
Click Edit and uncheck the checkbox and save.

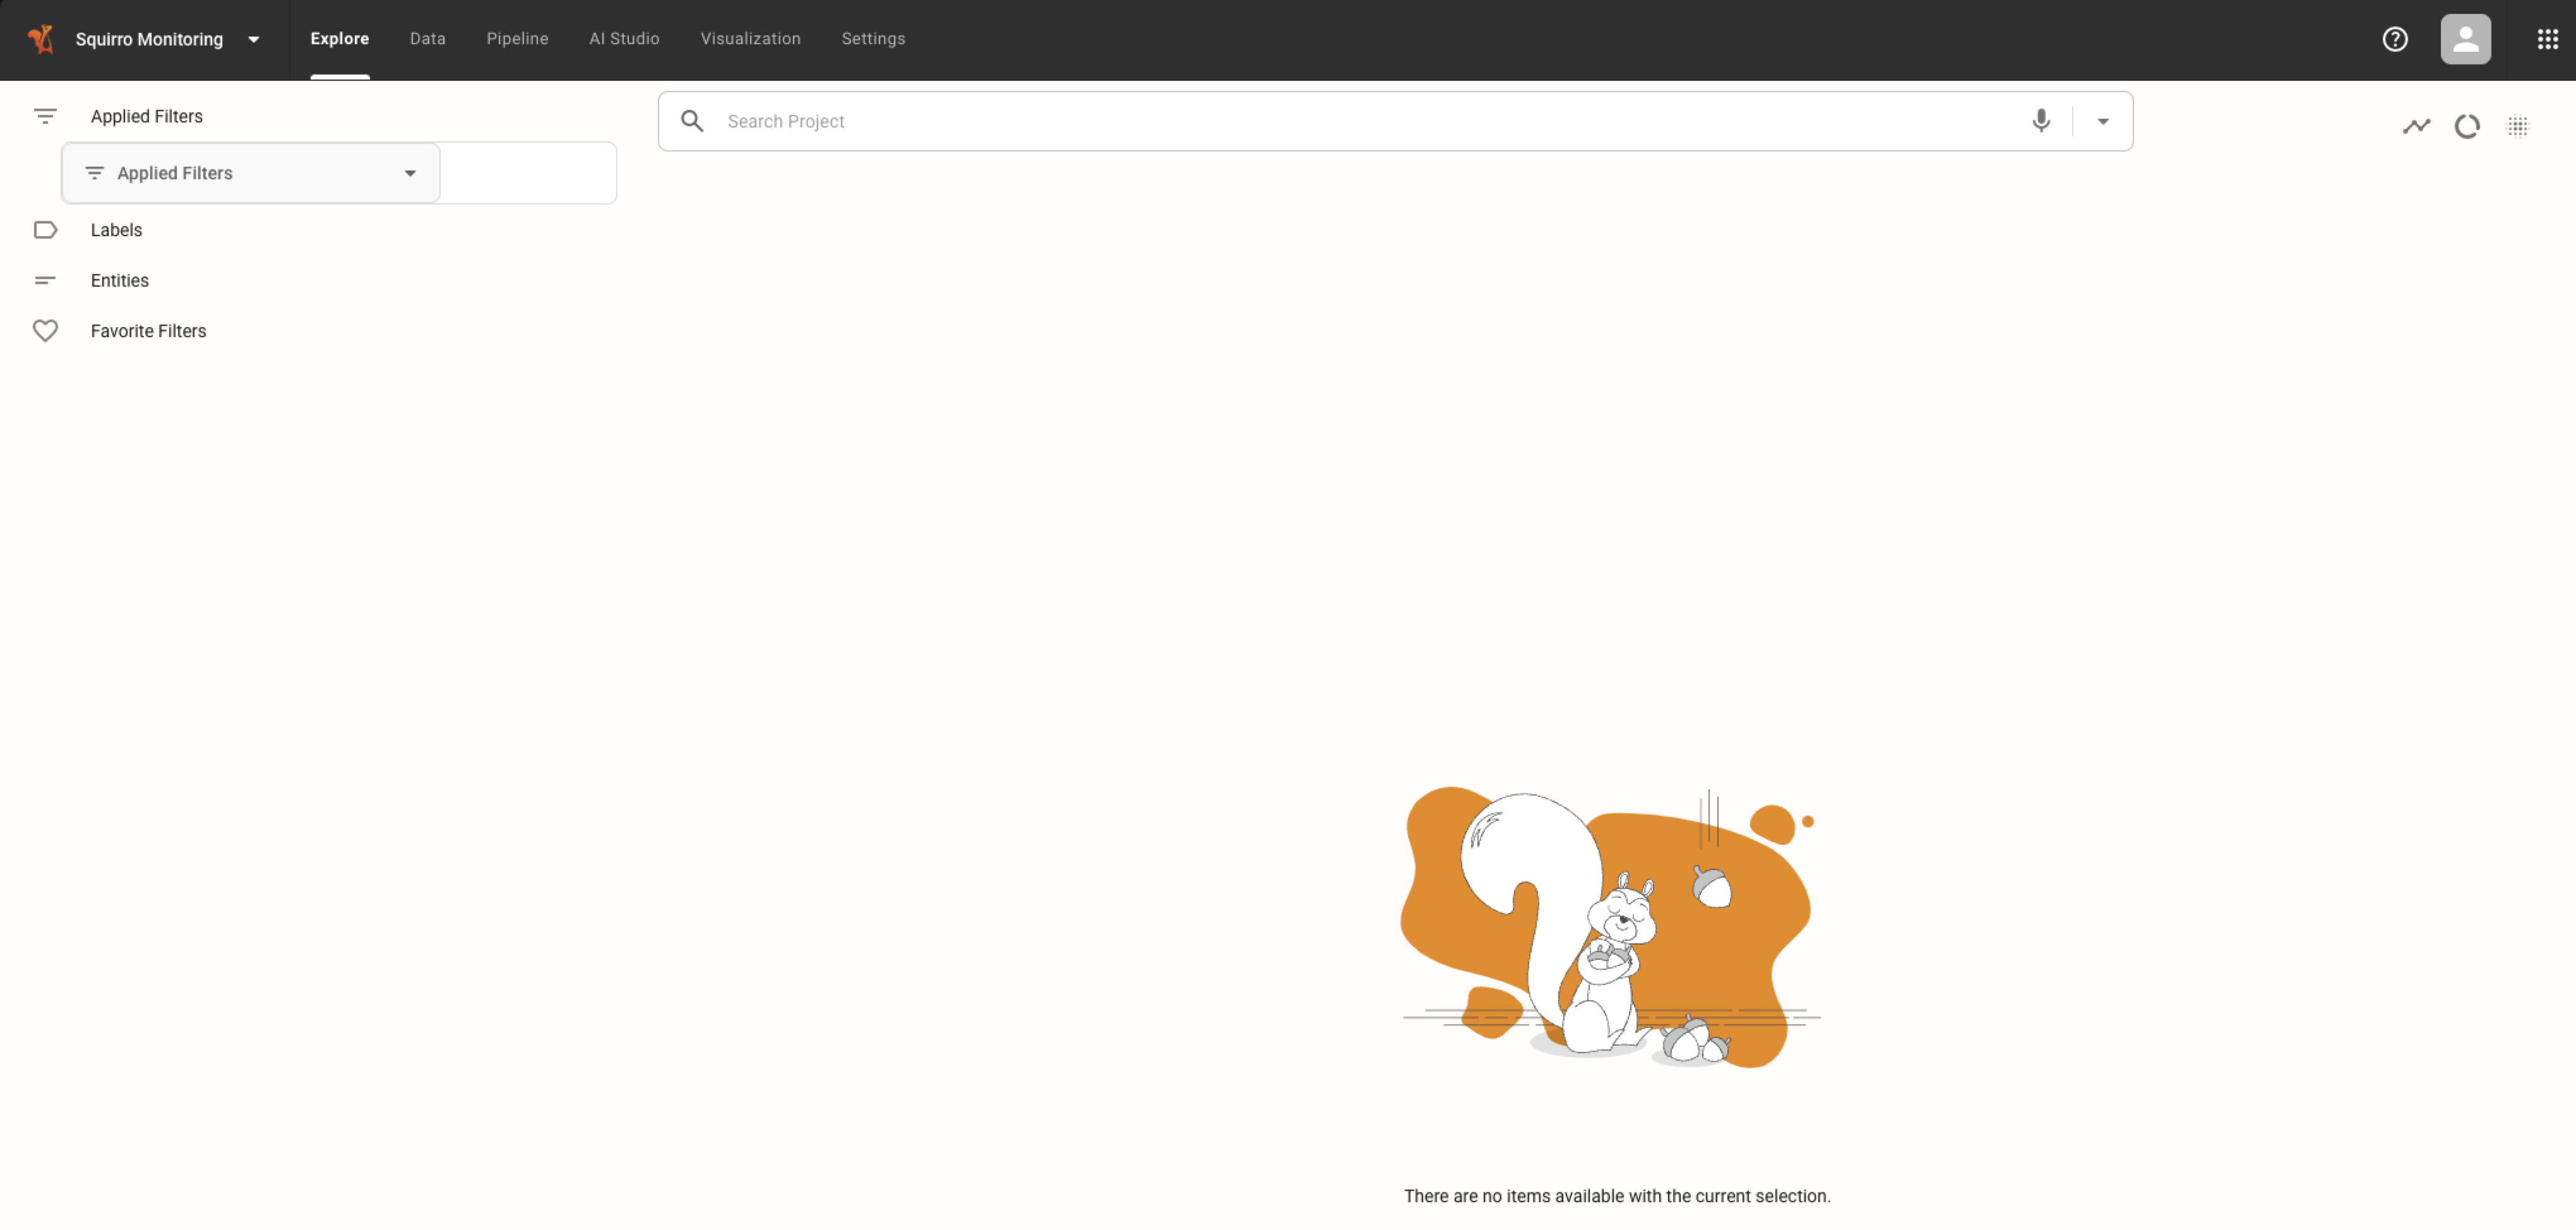
Log out to validate the settings is effective:
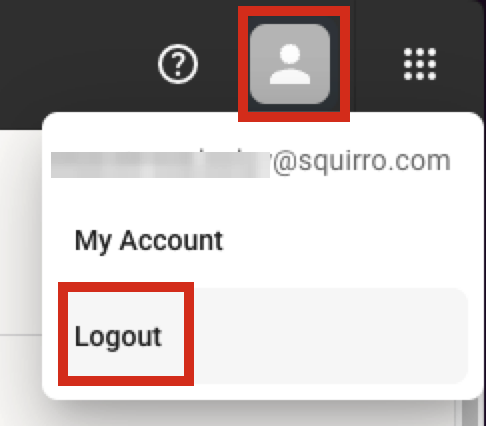
Observe that the Sign up option is no longer visible:

Setup DNS#
The next step is to set up a DNS record for the instance, such as myinstance.example.com. This process is outside the scope of this document. Please contact the IT department for assistance with this task.
Setup SSL/TLS#
Create your own SSL certificate and key, then overwrite the following files on the instance:
/etc/nginx/ssl/localhost.crt
/etc/nginx/ssl/localhost.key
Destroy / Start Over#
If this is a test deployment, or if any issues arise or plans change, you can use Terraform to quickly shut down and destroy the entire deployment.
The following command permanently deletes all data in the deployment. Use it with caution.
./destroy.sh
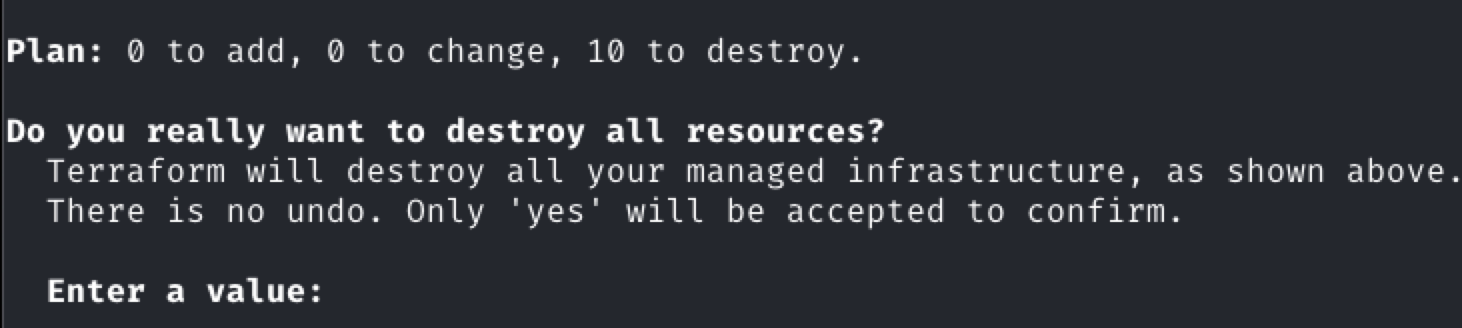
Type yes to proceed.