Squirro Azure Installation Manual#
Introduction#
This document walks you through a step-by-step installation of the latest Squirro LTS release on Microsoft Azure.
This manual covers a straightforward, simple to maintain, single VM instance deployment of Squirro using Terraform.
For system requirements, see System Requirements.
Note
This guide covers installation procedures for current Squirro releases. Always refer to the latest release notes at Release Notes for version-specific information and requirements.
Core assumptions#
You can administer your Azure tenant.
You can reach and download the Terraform module and Squirro Ansible.
You can install and run the latest version of Terraform to manage the Azure infrastructure.
The Vnet/VM instance can access the internet, either freely or using an approved list of sites.
You can add a DNS record to your company’s public or internal DNS zone.
You can create or request a SAML2 client to enable SSO for the Squirro Site.
You have access to a supported LLM API endpoint (if applicable).
This deployment is suitable for uptime SLAs up to 99.9%. For higher SLAs more advanced techniques, such as Auto Scaling Groups and managed services need to be introduced
Planning#
Access to the target Azure tenant
As a Global Administrator of the tenant.
Or as an Owner/Contributor User role for the subscription where the instance is deployed.
Ensure the instance has internet access and can reach all required domains. For the complete list, see the System Requirements page.
Select the right OS image base for you:
Rocky Linux 9
Red Hat Enterprise Linux 9
Select the correct region of Azure for your deployment.
Select the right VM instance type for your deployment.
Understand the monthly cost of the planned deployment.
Define the target hostname
Plan with your IT team to add a DNS record that will point at the VM public IP address or Azure Load Balancer, if used.
Plan with your IT team how to create an SSL key and certificate for the above record. This manual assumes you can leverage Azure Key Vault or obtain certificates from your certificate authority.
Plan with the Squirro IT team the integration into your target Identity Provider to enable single sign-on.
Plan with the Squirro IT team the backup requirements. The daily DLM snapshot provides a good baseline protection, but more advanced backup requirements like using Azure Backup vault, Snapshots or other backup agents might be mandatory.
If you already have credentials for accessing the mirror, you may proceed. Should you need credentials, contact Squirro Support and submit a technical support request.
Install Terraform#
Use Terraform to manage the cloud infrastructure in a repeatable fashion.
The preferred way to install Terraform is to use the Terraform Version Manager (tfenv). Learn more
Use homebrew to install it:
brew install tfenv
Or, install on Debian/Ubuntu:
# Install dependencies
sudo apt update && sudo apt install -y git curl unzip
# Clone tfenv to /usr/local
sudo git clone https://github.com/tfutils/tfenv.git /usr/local/tfenv
# Add tfenv to PATH (permanently)
echo 'export PATH="/usr/local/tfenv/bin:$PATH"' >> ~/.bashrc
source ~/.bashrc
# Verify installation
tfenv --version
Install the latest version of Terraform:
tfenv install latest
❯ tfenv install latest
Installing Terraform v1.12.2
Downloading release tarball from https://releases.hashicorp.com/terraform/1.12.2/terraform_1.12.2_darwin_arm64.zip
#################################################################################################################################################################### 100.0%
Downloading SHA hash file from https://releases.hashicorp.com/terraform/1.12.2/terraform_1.12.2_SHA256SUMS
Not instructed to use Local PGP (/opt/homebrew/Cellar/tfenv/3.0.0/use-{gpgv,gnupg}) & No keybase install found, skipping OpenPGP signature verification
Archive:  /var/folders/g9/3qmqwhqd2d3d8x5dx5d1tkn40000gn/T/tfenv_download.XXXXXX.1837cVPPvV/terraform_1.12.2_darwin_arm64.zip
   inflating: /opt/homebrew/Cellar/tfenv/3.0.0/versions/1.12.2/LICENSE.txt
   inflating: /opt/homebrew/Cellar/tfenv/3.0.0/versions/1.12.2/terraform
Installation of terraform v1.12.2 successful. To make this your default version, run 'tfenv use 1.12.2'
Then enable it as shown in the output above:
tfenv use 1.12.2
That Terraform module may not always support the latest version. For the most up-to-date information, refer to the README.md file in the module, available at https://mirror.squirro.net/terraform/azure.
Alternatively, you can use Terraform Cloud instead of the CLI version of Terraform. While step-by-step instructions for Terraform Cloud are not currently provided, the underlying logic remains the same.
Install the 1Password Browser Extension#
To manage your Azure credentials securely, Squirro recommends using a password manager and suggests using the 1Password app and browser extensions. If you do not have a password manager or other credential management tool in place, please reach out to your IT department for guidance on how to securely handle your credentials.
Authenticate Terraform with Azure#
The best way to authenticate Terraform with Azure is to use an Azure Active Directory App Registration (Service Principal). It gives Terraform its own identity in Azure, which can be scoped with least privilege. The credentials (Client ID, Client Secret, Tenant ID) should be securely stored in 1Password rather than plain text.
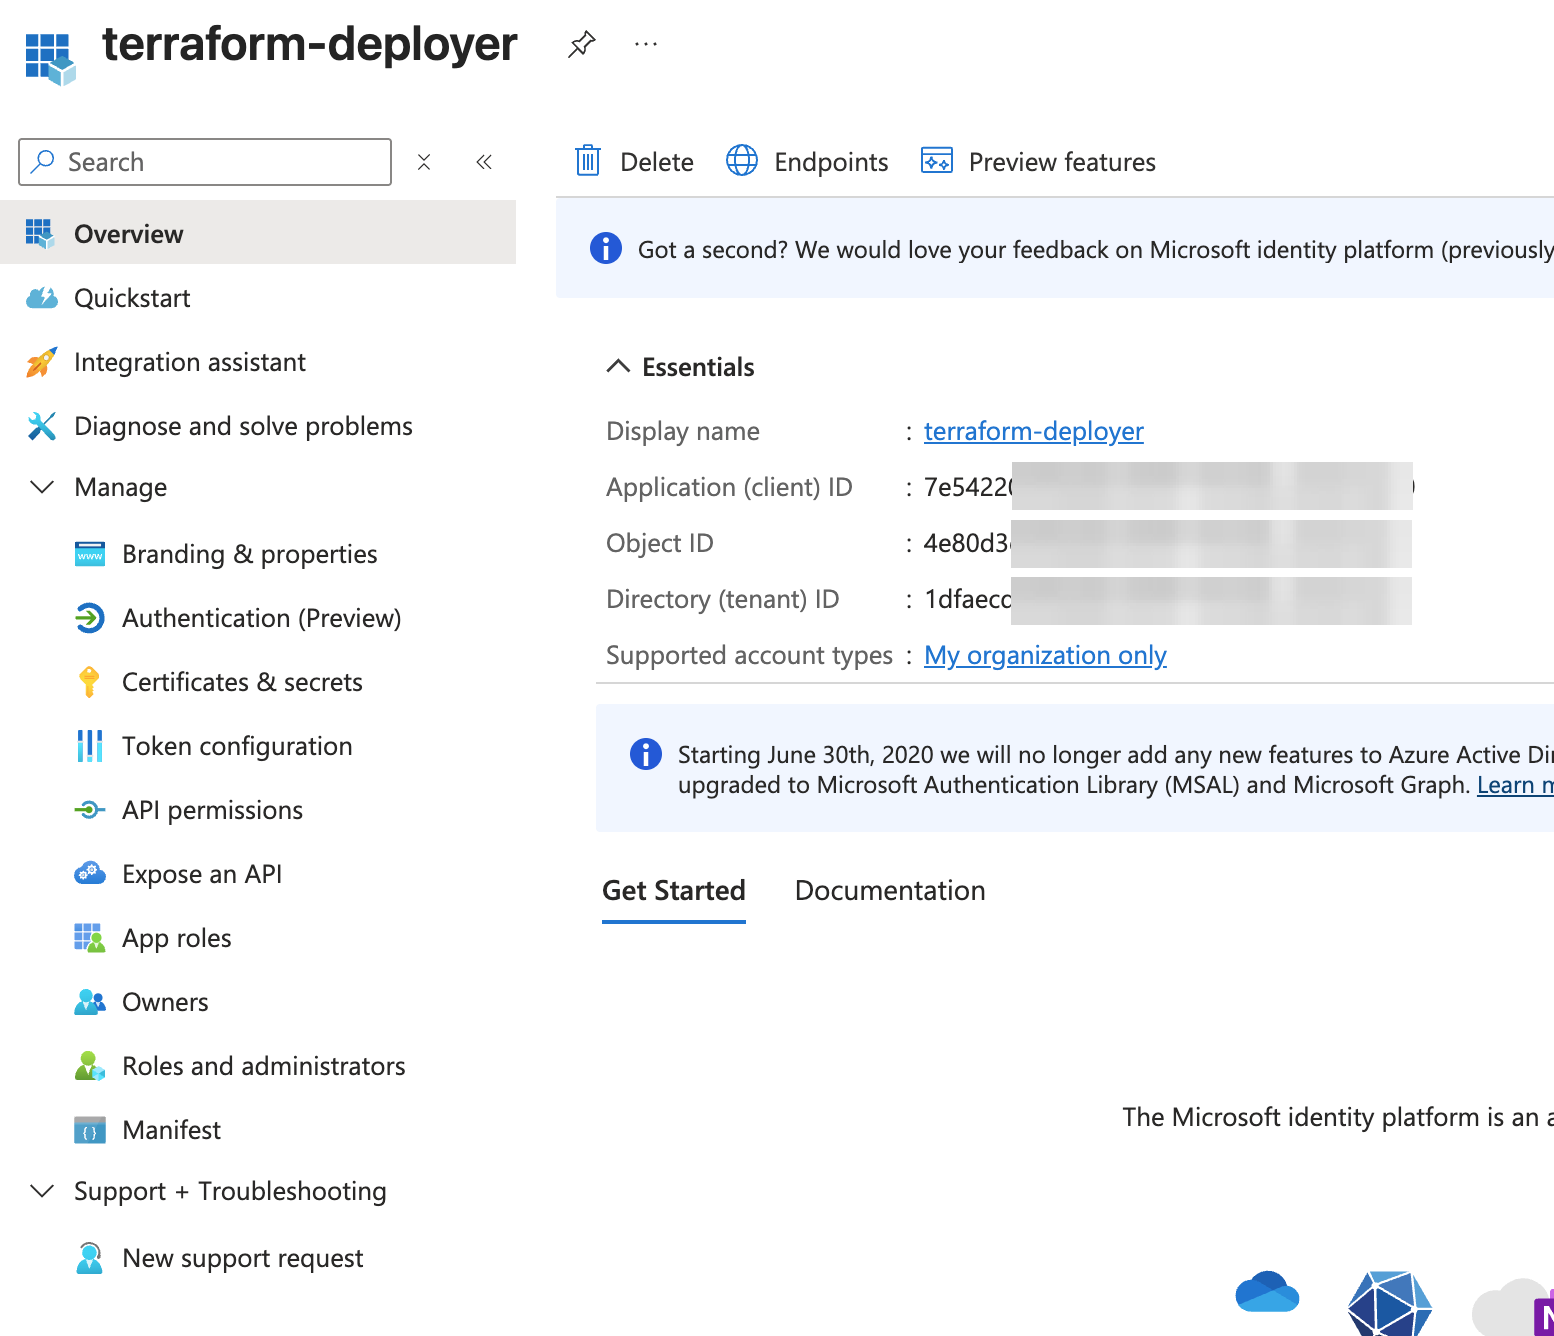
Step 1: Create an Azure App Registration
Log in to the Azure Portal.
Go to Azure Active Directory → App registrations → New registration.
Enter:
Name:
terraform-deployerSupported account types: Single tenant
Leave
Redirect URIempty.
Click Register.
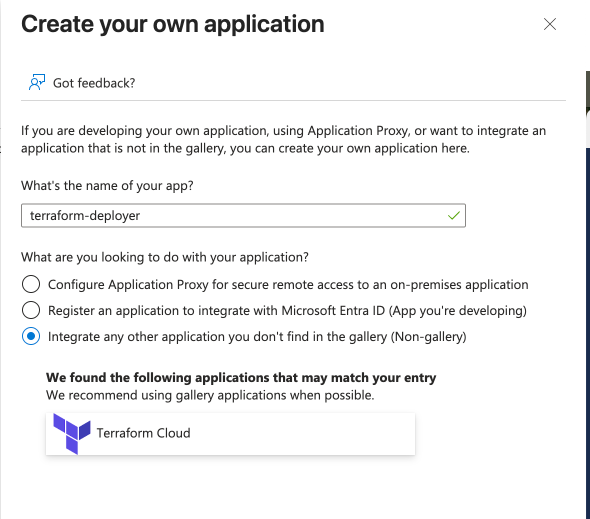
You now see the Application (client) ID and Directory (tenant) ID — store them in 1Password.
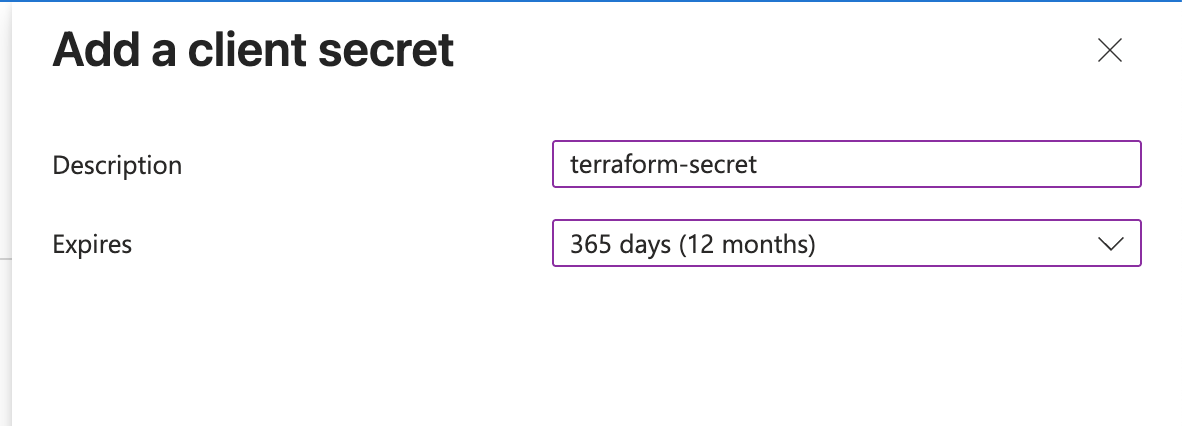
Step 2: Create a Client Secret
Under the App Registration, go to Certificates & secrets.
Click New client secret.
Add a description like
terraform-secretand set an expiration (for example, 1 year or 2 years).Click Add.
Copy the secret value immediately — it will not be visible later.
Do not store this secret in plaintext — save it securely in 1Password.
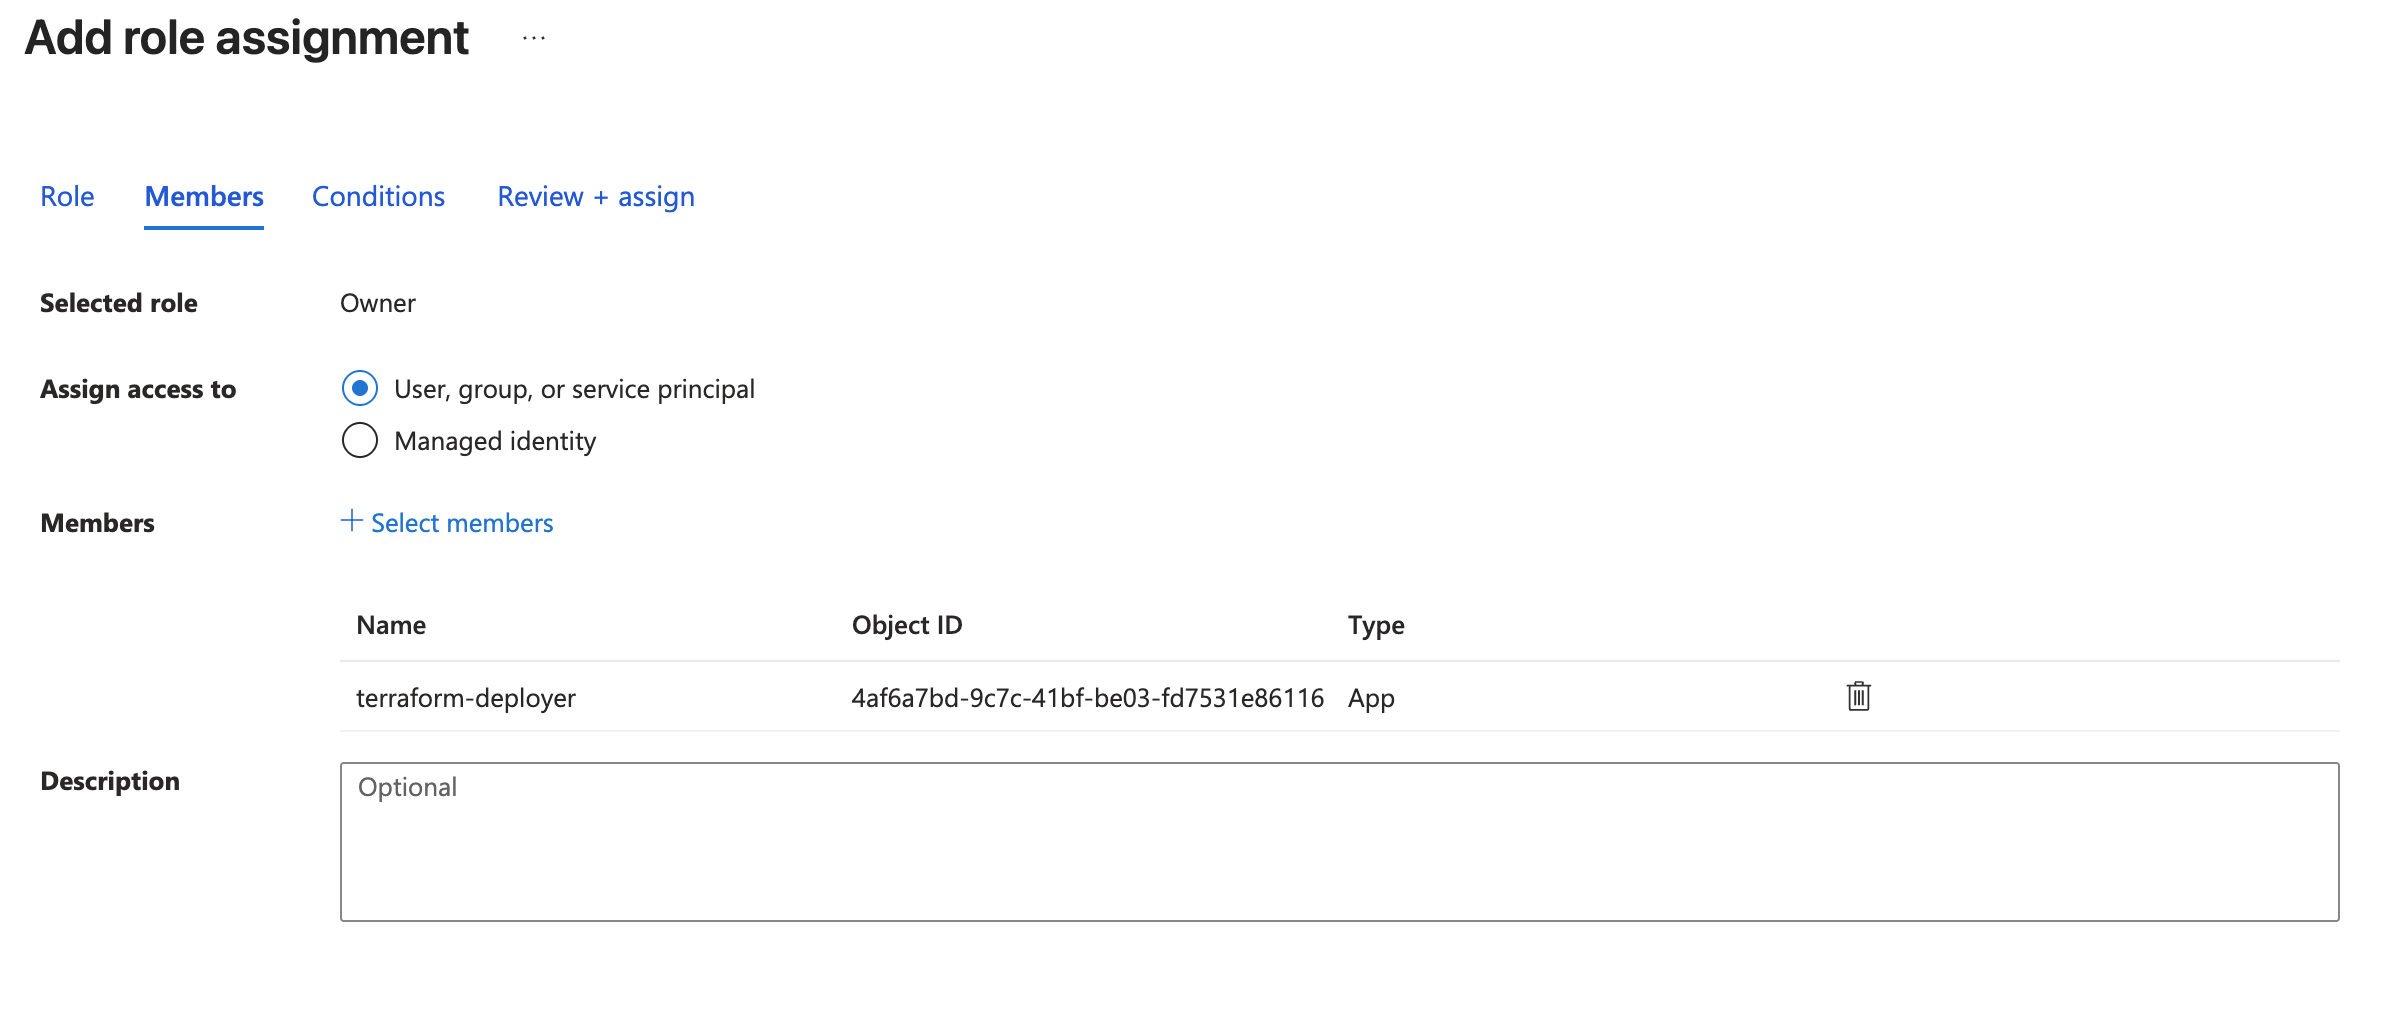
Step 3: Assign Permissions to the App Registration
Terraform needs rights to manage resources. Assign it at subscription or resource group level.
Go to your Subscription (or Resource Group) in the Azure Portal.
Click Access control (IAM) → Add role assignment.
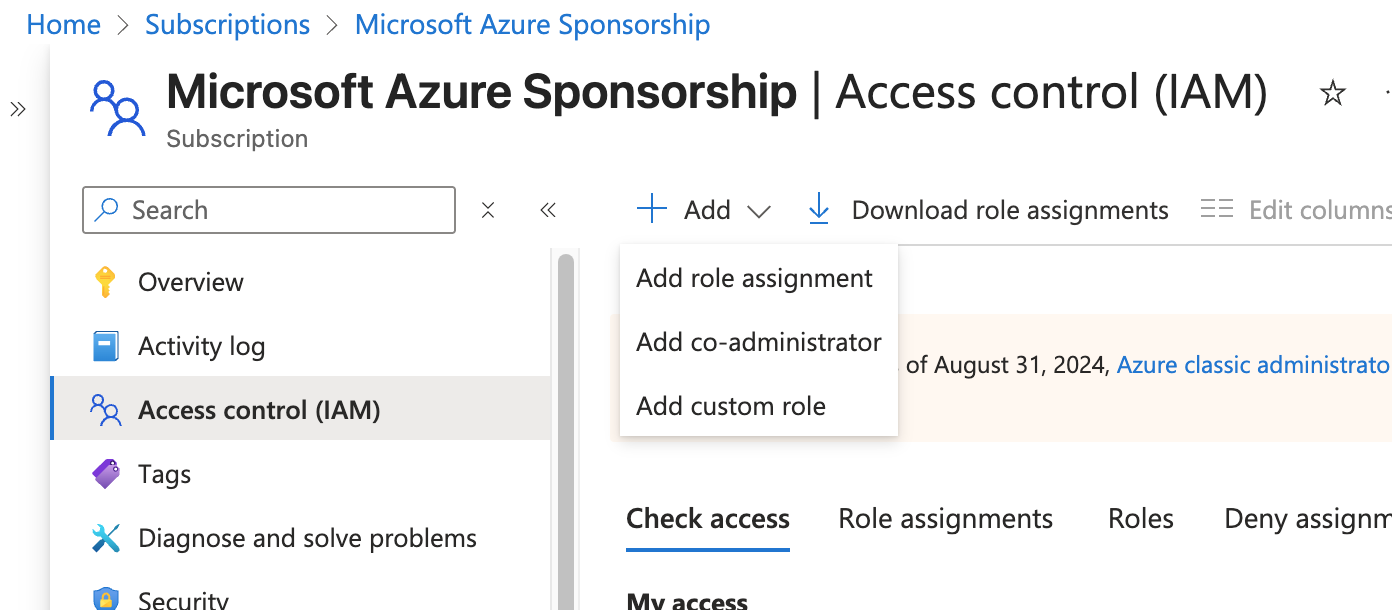
Choose:
Role: Owner (or Contributor + User Access Administrator since Terraform adds RBAC roles to Key Vault)
Assign access to: User, group, or service principal
Select: your App Registration (
terraform-deployer)Allow user to assign all roles except privileged administrator roles Owner, UAA, RBAC (Recommended)
Click Save.
Step 4: Store the Credentials Securely in 1Password
You should now have all the values. Save them for later use in the config file:
Application (client) ID
Client secret value
Directory (tenant) ID
Azure Subscription ID
Using 1Password to store them:
Open the 1Password browser extension.
Create a new item called Terraform Azure Credentials.
Add the four key/value pairs above.
Save it to your vault.
Never share it with others. It is your personal deployment identity.
If not yet done, enable the 1Password command-line interface:
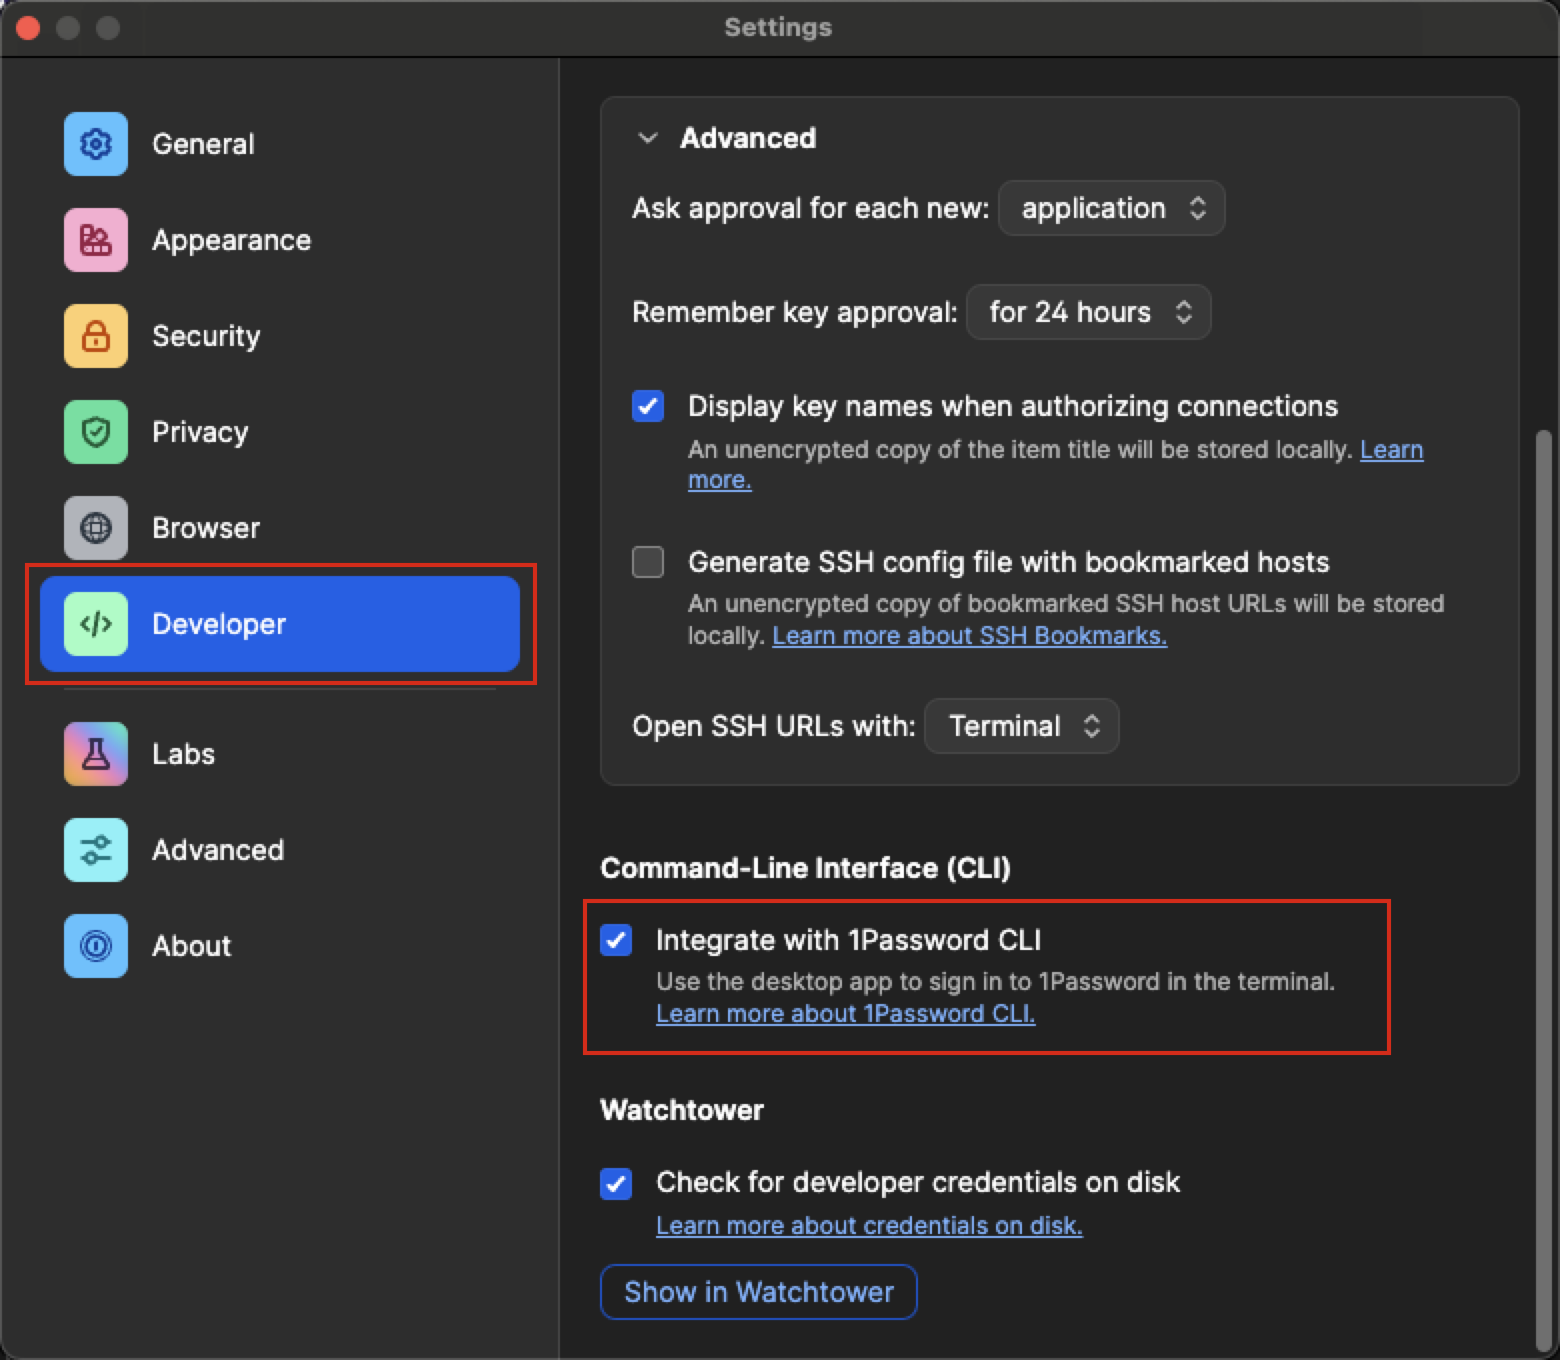
Follow the instructions here to make the op command work
with 1Password.
The recommended way to use 1Password CLI is to use its capability to tie credentials to a working directory. It means you can tie the above Azure credentials to only be used when you are inside your Terraform project folder.
Setup the project folder#
Create a new folder for this project using the following command:
mkdir -p ~/dev/azure-squirro-deployment
Download#
Download and unzip the latest version from https://mirror.squirro.net/terraform/azure
The downloaded module includes the following wrapper scripts that handle 1Password authentication automatically:
plan.sh— runsterraform planwith credentials injected by 1Password CLI.apply.sh— runsterraform applywith credentials injected by 1Password CLI.destroy.sh— runsterraform destroywith credentials injected by 1Password CLI.
These scripts use op run --env-file=.env -- internally, so you do not need to prefix Terraform commands manually when using them.
Install 1password-cli (op)#
Install 1password-cli if you do not have it already
brew install 1password-cli
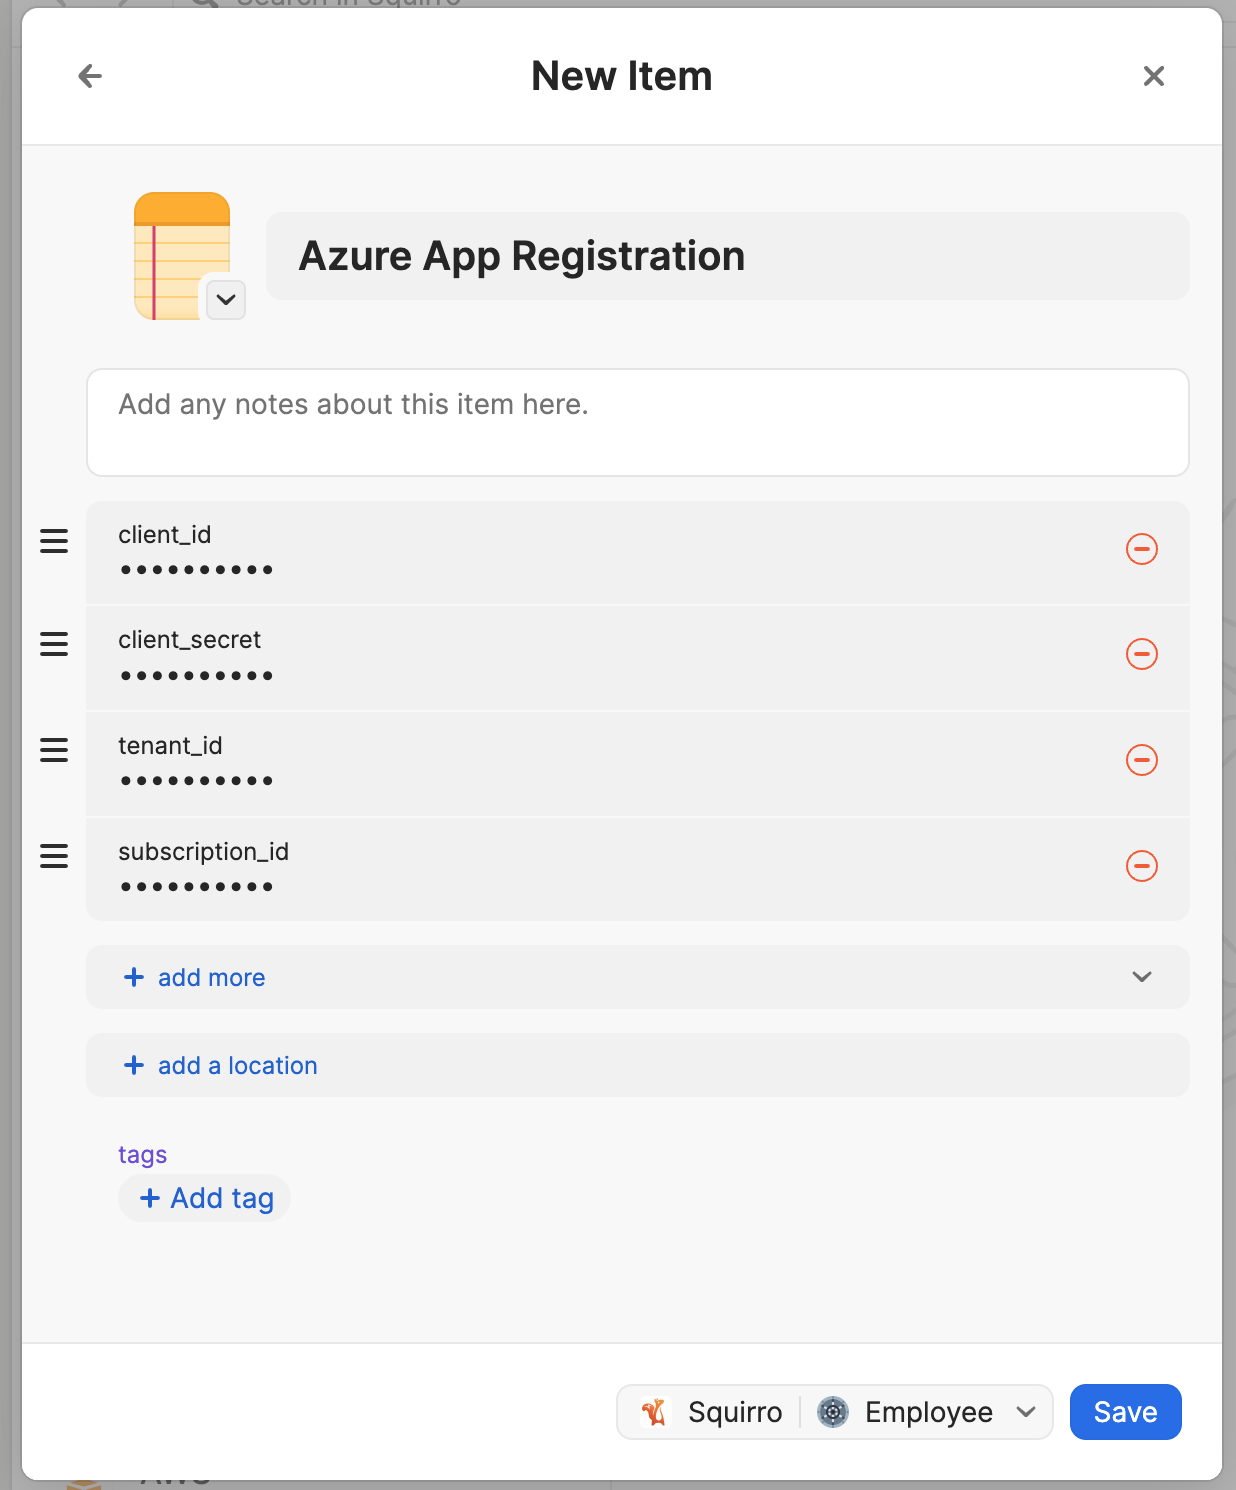
1Password Setup#
Store Azure Credentials in 1Password:
Create new item: Password or Secure Note
Title: Azure App Registration
Add these fields:
Field name: client_id → Value: Your Application (client) ID
Field name: client_secret → Value: Your client secret VALUE
Field name: tenant_id → Value: Your Directory (tenant) ID
Field name: subscription_id → Value: Your subscription ID
Save in your preferred vault (for example, “Employee”)
Configure 1Password CLI
Sign in to 1Password CLI:
op signinList your vaults to verify:
op vault list
List items to find your Azure credentials:
op item list --vault "Employee"
View your item to verify field names:
op item get "Azure App Registration" --vault "Employee"
If your vault name differs from “Employee,” be sure to use your specific vault name.
Project Configuration#
Navigate to your project directory and create the
.envfile with your 1Password references:cat > .env << 'EOF' # For Azure Provider ARM_CLIENT_ID="op://Employee/Azure App Registration/client_id" ARM_CLIENT_SECRET="op://Employee/Azure App Registration/client_secret" ARM_TENANT_ID="op://Employee/Azure App Registration/tenant_id" ARM_SUBSCRIPTION_ID="op://Employee/Azure App Registration/subscription_id" # For Terraform Variables TF_VAR_client_id="op://Employee/Azure App Registration/client_id" TF_VAR_client_secret="op://Employee/Azure App Registration/client_secret" TF_VAR_tenant_id="op://Employee/Azure App Registration/tenant_id" TF_VAR_subscription_id="op://Employee/Azure App Registration/subscription_id" EOF
If your vault name differs from “Employee,” be sure to use your specific vault name.
Use the following command to display the ARM_ variables, with values masked:
op run --env-file=.env -- env | grep ARM_
Use the following command to confirm the ARM_ variables are not present in your shell:
env | grep ARM_
Install the Azure CLI using the following command:
brew install azure-cli
Setup storage account to store the Terraform state file#
How to Set Up in Azure Portal:
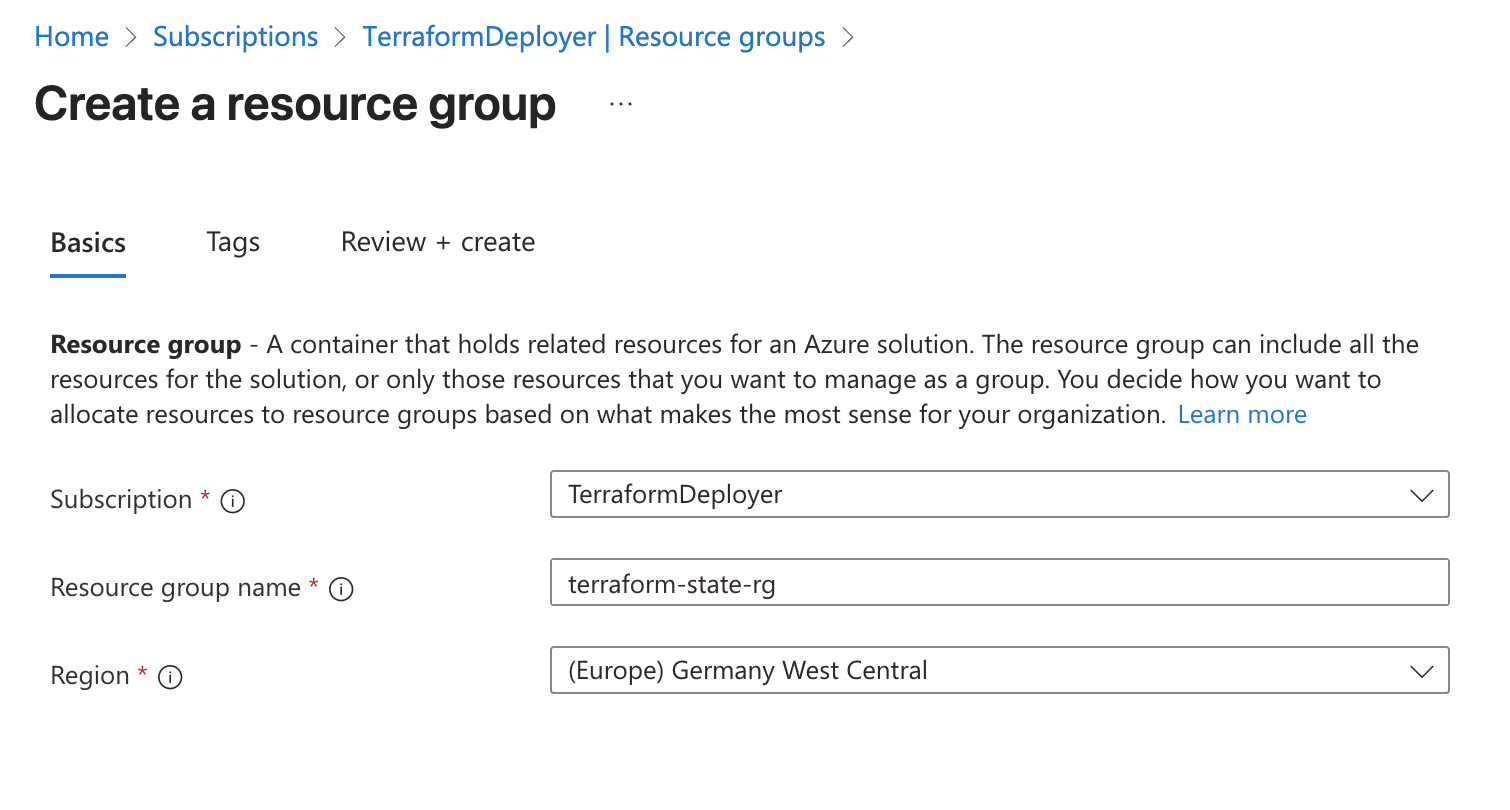
Step 1: Create Resource Group
Go to Azure Portal → Resource Groups
Click + Create
Fill in:
Resource group name: terraform-state-rg
Region: Germany West Central (or same as your main resources)
Click Review + Create → Create
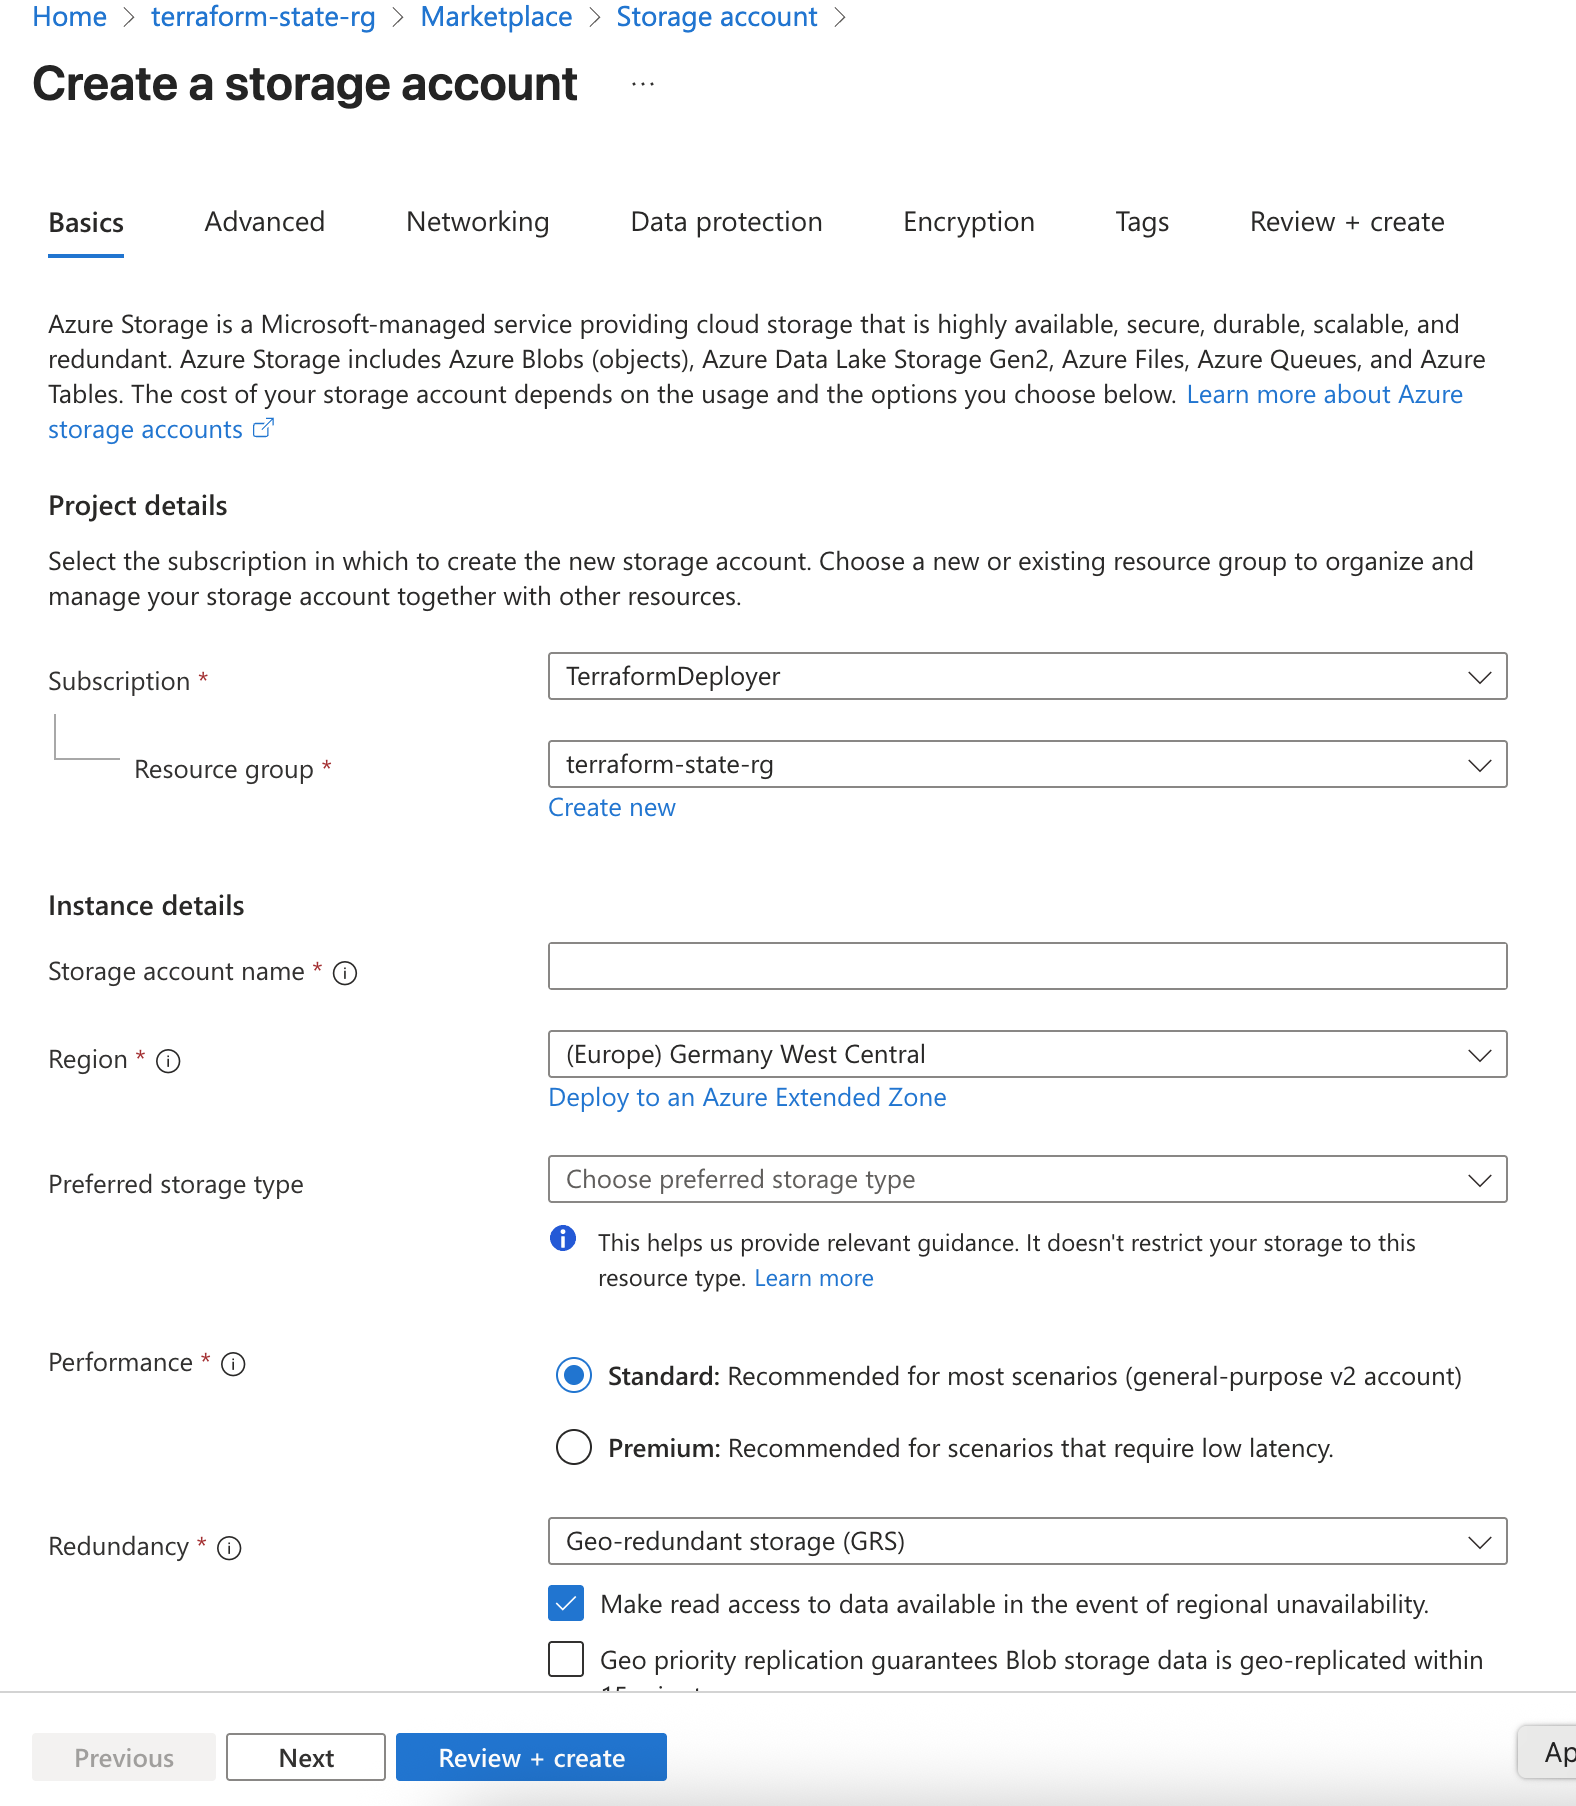
Step 2: Create Storage Account
Go to Storage Accounts → + Create
Fill in the Basics tab:
Resource group: Select terraform-state-rg
Storage account name: azuretfstate001 (must be globally unique, 3-24 lowercase letters/numbers)
Region: Germany West Central
Performance: Standard
Redundancy: LRS (Locally-redundant storage)
Go to Advanced tab:
Enable Require secure transfer for REST API operations
Disable Allow Blob public access (keep state private)
Go to Networking tab (optional but recommended):
Network access: Enable public access from all networks (or restrict to specific IPs)
Click Review + Create → Create
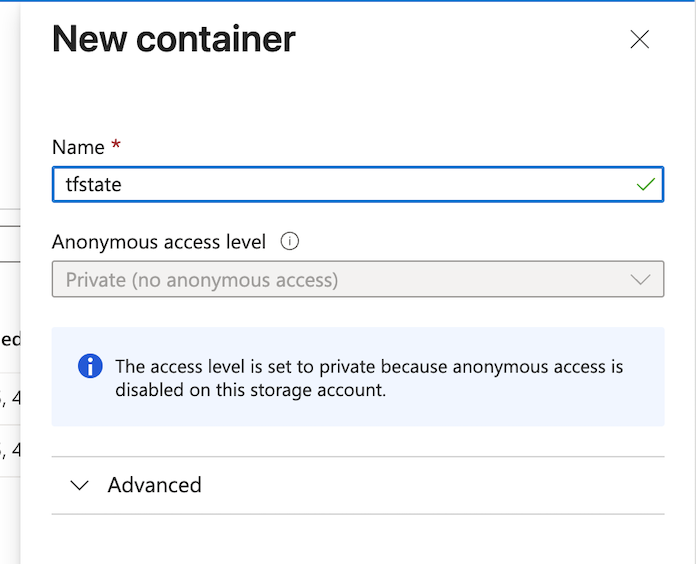
Step 3: Create Blob Container
Go to your new storage account → Data storage → Containers
Click + Container
Fill in:
Name: tfstate
Public access level: Private (no anonymous access)
Click Create
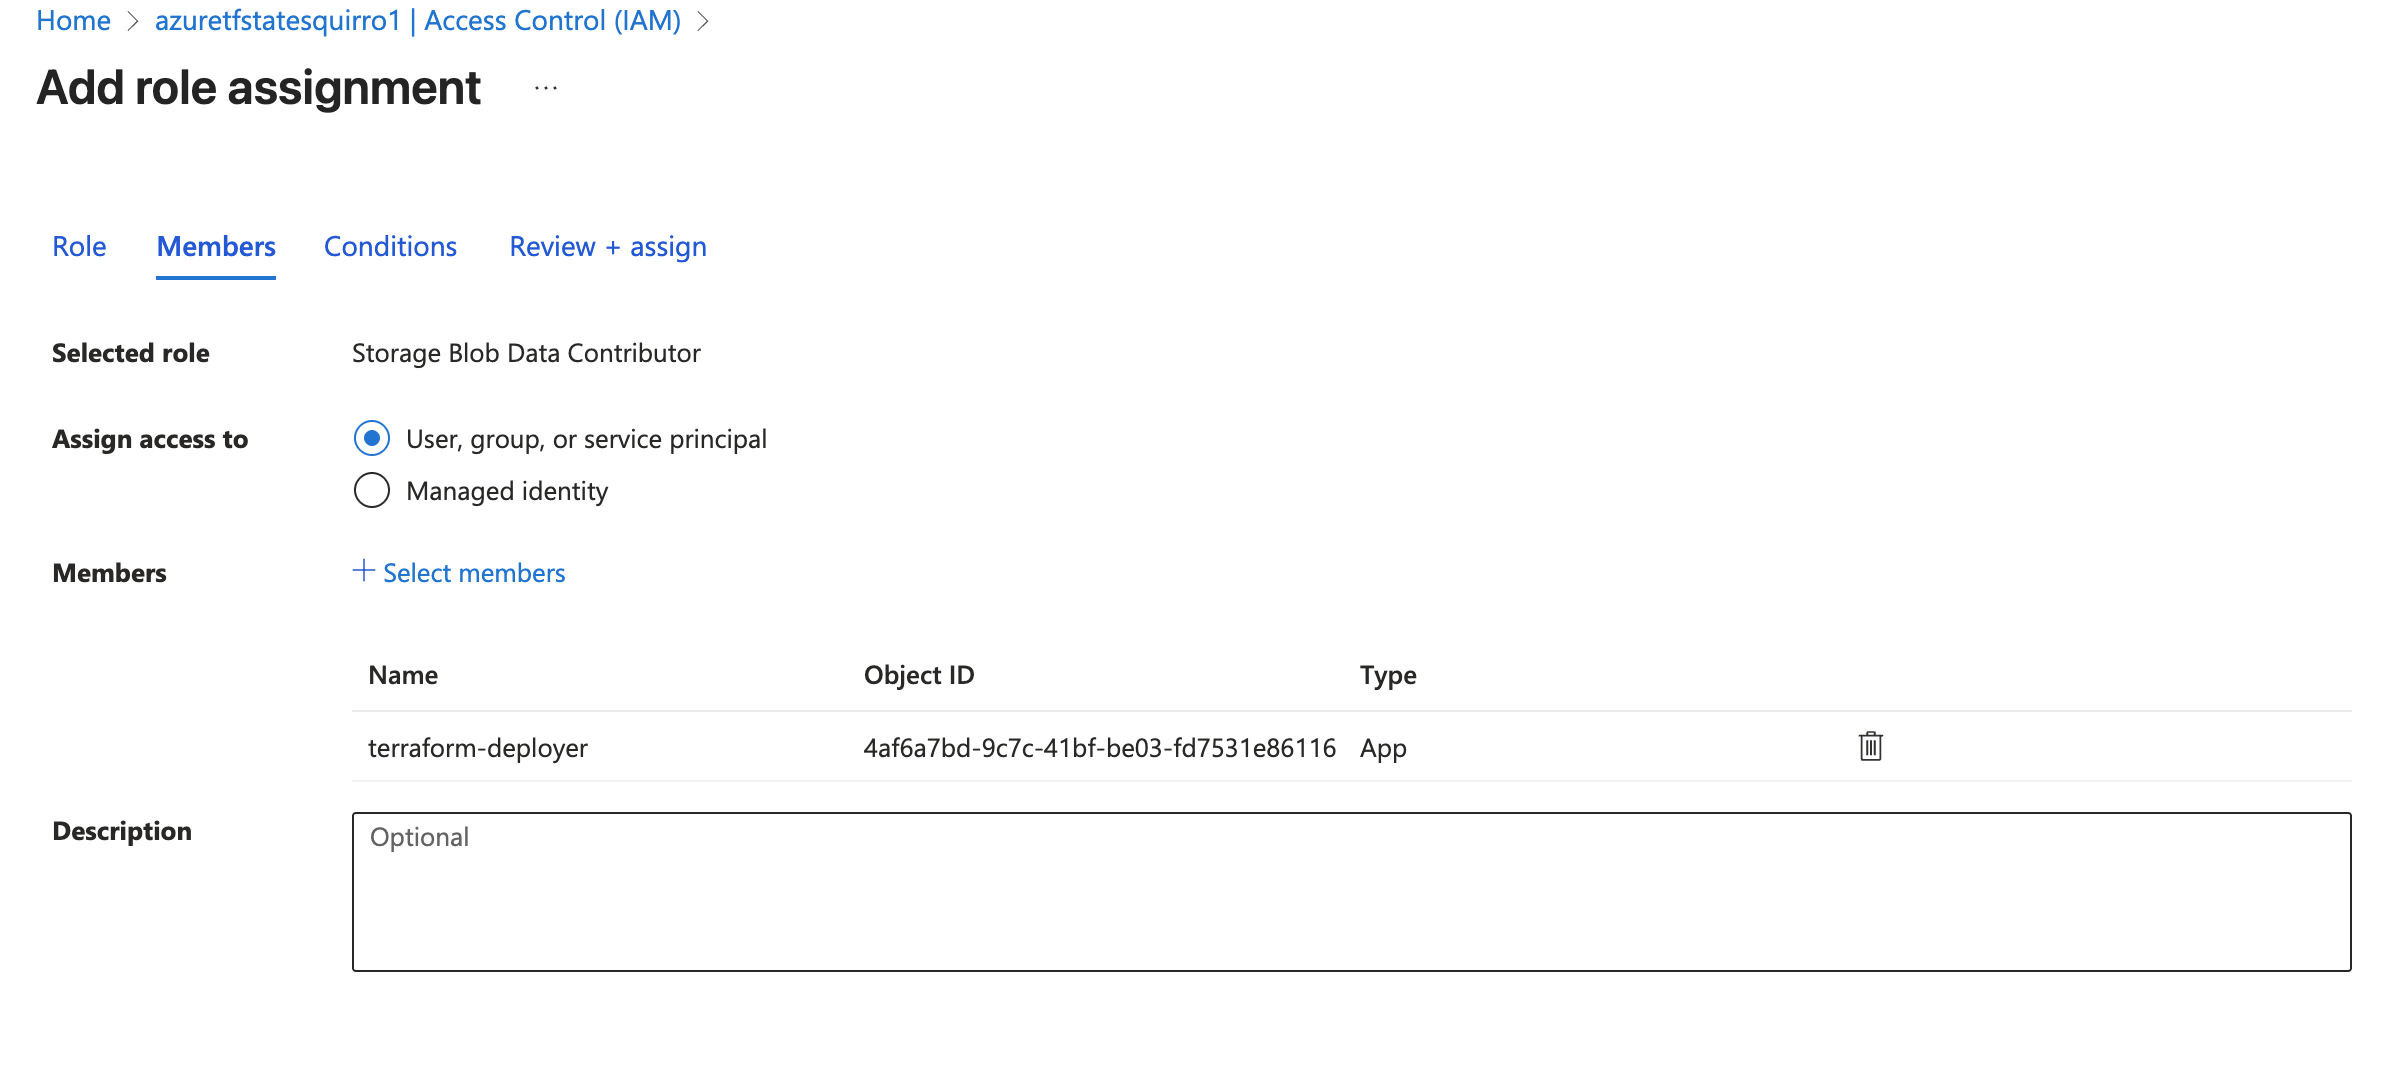
Step 4: Configure Permissions for App Registration
Your app registration (service principal) needs permissions to access the storage account:
Go to Storage Account → Access Control (IAM)
Click + Add → Add role assignment
Select role: Storage Blob Data Contributor
Click Next
Click + Select members
Search for your app registration name
Click Select → Review + assign
Make sure to modify it to match the above choices in the
providers.tffile.terraform { required_providers { azurerm = { source = "hashicorp/azurerm" version = "~> 3.73.0" } } backend "azurerm" { resource_group_name = "terraform-state-rg" storage_account_name = "azuretfstate001" # this has to be globally unique container_name = "tfstate" key = "azuretf-test.tfstate" } } provider "azurerm" { features {} subscription_id = var.subscription_id client_id = var.client_id client_secret = var.client_secret tenant_id = var.tenant_id }
Azure CLI login to your service principal
op run --env-file=.env -- az login --service-principal \
   --username "$ARM_CLIENT_ID" \
   --password "$ARM_CLIENT_SECRET" \
   --tenant "$ARM_TENANT_ID"
Important:
That login is ONLY for az commands.
Terraform does not use that login. Terraform authenticates
itself using environment variables.
Learn how to run Azure CLI plugin and the Terraform commands via 1Password
# For Azure CLI commands:
op run --env-file=.env -- az <command>

# For Terraform commands:
op run --env-file=.env -- terraform <command>
Add to shell config:
For zsh (macOS default)
echo "source ~/.config/op/plugins.sh" >> ~/.zshrc && source ~/.zshrc
For bash
echo "source ~/.config/op/plugins.sh" >> ~/.bashrc && source ~/.bashrc
Terraform Configuration#
You can edit terraform.tfvars with your own values or keep
the example:
cat > terraform.tfvars << 'EOF'
project          = "AzureTF"
env              = "test"
region           = "Germany West Central"
admin_username   = "tf_admin"
admin_ssh_key    = "ssh-rsa AAAAB3NzaC1yc2E..."
vm_instance_type = "Standard_E4as_v5"
vm_disk_size     = "200"
EOF
If you do not have SSH key, generate one (RSA preferred):
ssh-keygen -t rsa -b 4096 -C "your_email@example.com"
Display your public key:
cat ~/.ssh/id_rsa.pub
Copy the output and paste it as admin_ssh_key value in the terraform.tfvars file.
admin_ssh_key = "ssh-rsa AAAAAAAAAAAAAAA... your_email@example.com"
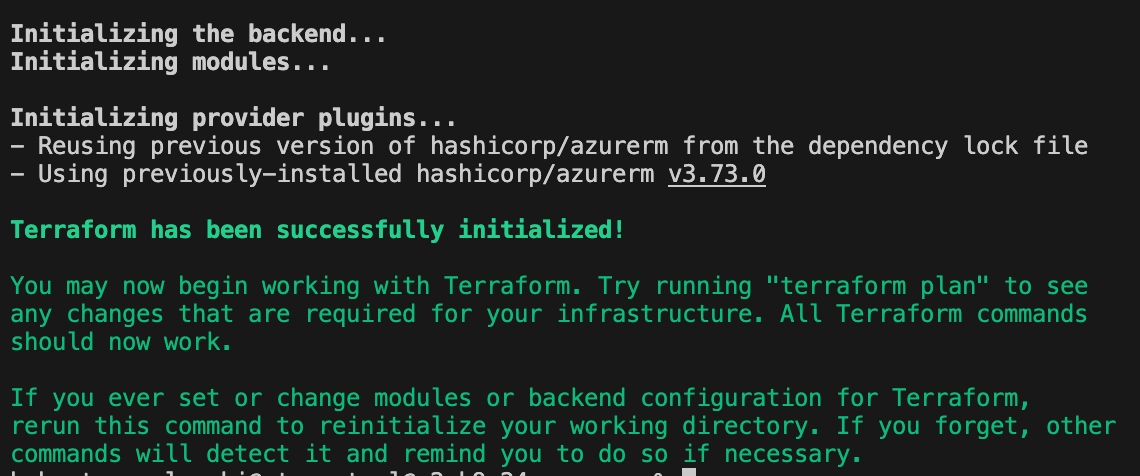
Initialize Terraform#
op run --env-file=.env -- terraform init
Before you run Terraform Plan/Apply you need to register those Resource Providers:
Register Microsoft.Network
op run --env-file=.env -- az provider register --namespace Microsoft.Network
Register Microsoft.DataProtection
op run --env-file=.env -- az provider register --namespace Microsoft.DataProtection
Register Microsoft.KeyVault
op run --env-file=.env -- az provider register --namespace Microsoft.KeyVault
Register Microsoft.Compute
op run --env-file=.env -- az provider register --namespace Microsoft.Compute
Register EncryptionAtHost feature status
op run --env-file=.env -- az feature register --namespace Microsoft.Compute --name EncryptionAtHost
Accept Rocky Linux marketplace terms using the following command:
op run --env-file=.env -- az vm image terms accept --publisher resf --offer rockylinux-x86_64 --plan 9-base
Optionally, check the registration status. Note that registration may take a few minutes to complete. Use the following commands:
Check Microsoft.Network status
op run --env-file=.env -- az provider show --namespace Microsoft.Network --query "registrationState" -o tsv
Check Microsoft.DataProtection status
op run --env-file=.env -- az provider show --namespace Microsoft.DataProtection --query "registrationState" -o tsv
Check Microsoft.KeyVault status
op run --env-file=.env -- az provider show --namespace Microsoft.KeyVault --query "registrationState" -o tsv
Check Microsoft.Compute status
op run --env-file=.env -- az provider show --namespace Microsoft.Compute --query "registrationState" -o tsv
Check EncryptionAtHost feature status
op run --env-file=.env -- az feature show --namespace Microsoft.Compute --name EncryptionAtHost --query "properties.state" -o tsv
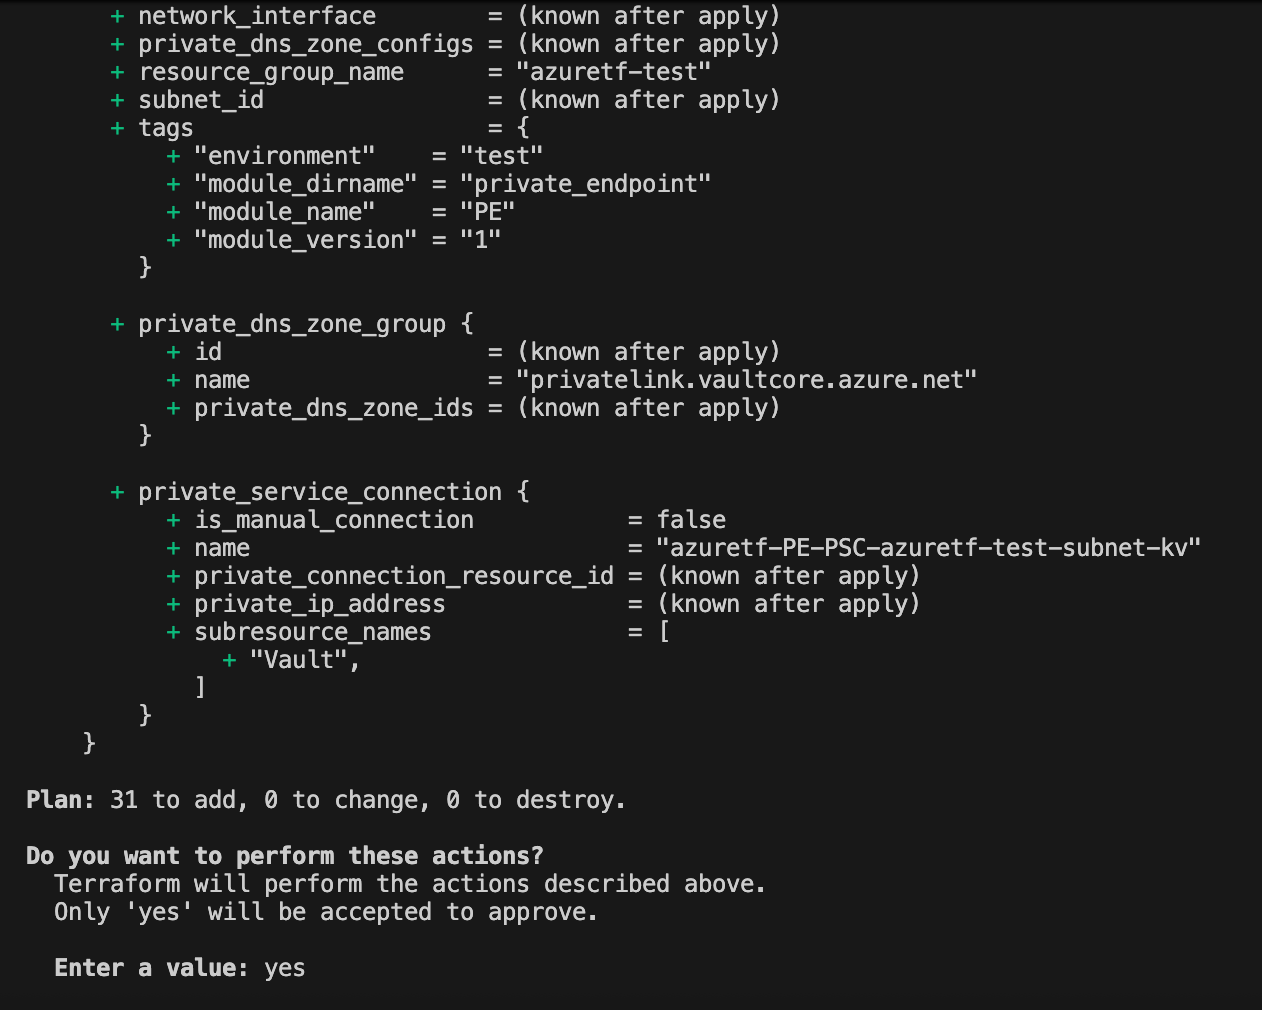
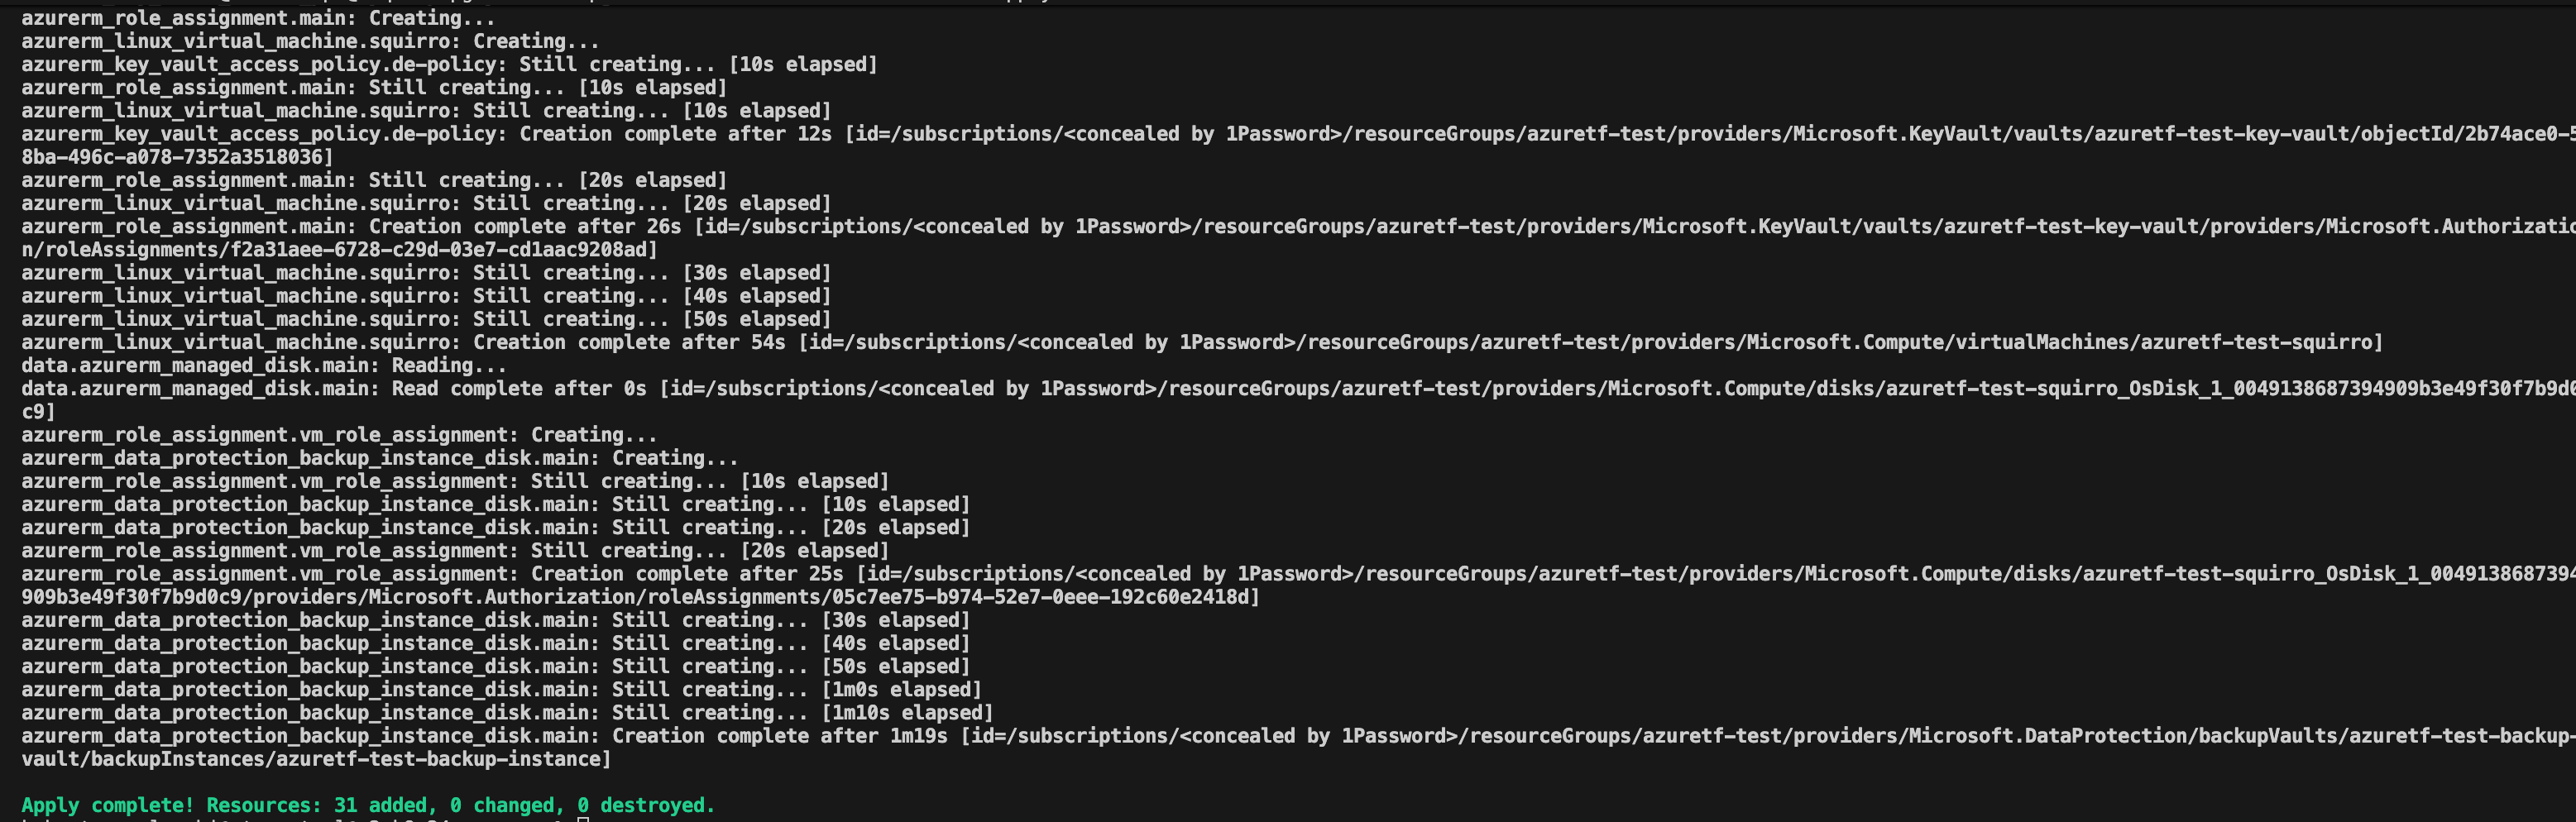
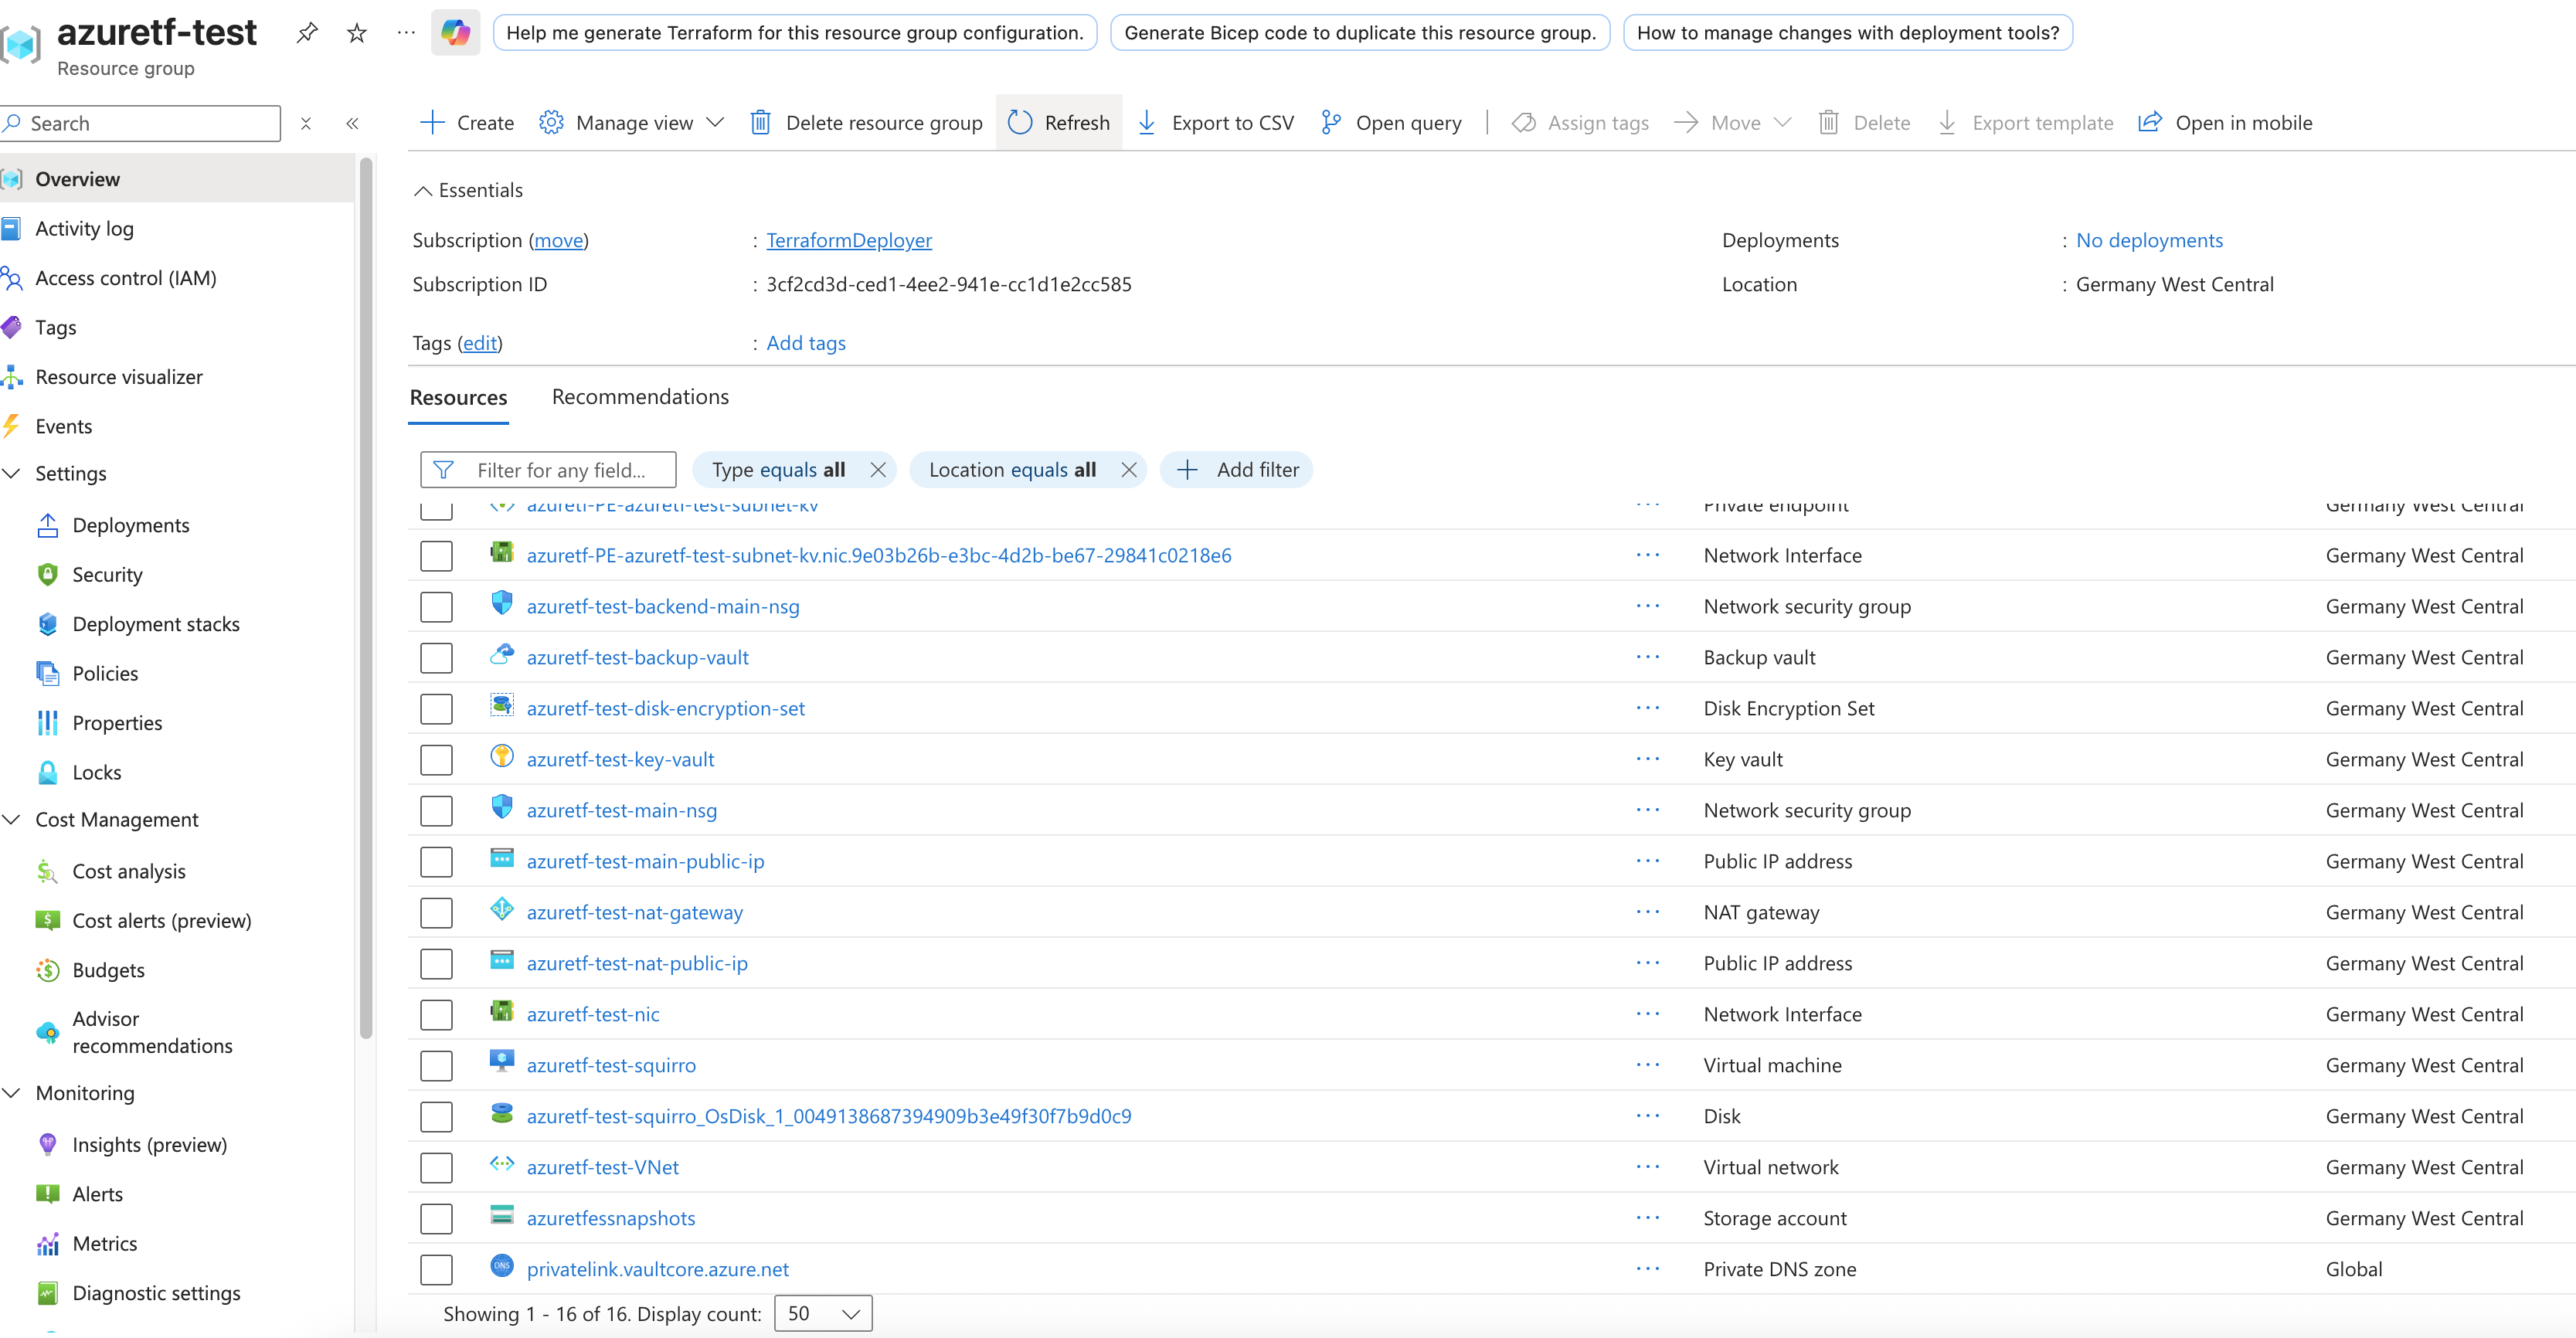
Terraform Apply#
op run --env-file=.env -- terraform apply
Connect to the VM#
Connect to your VM using the private key:
ssh -i ~/.ssh/id_rsa tf_admin@vm-ip
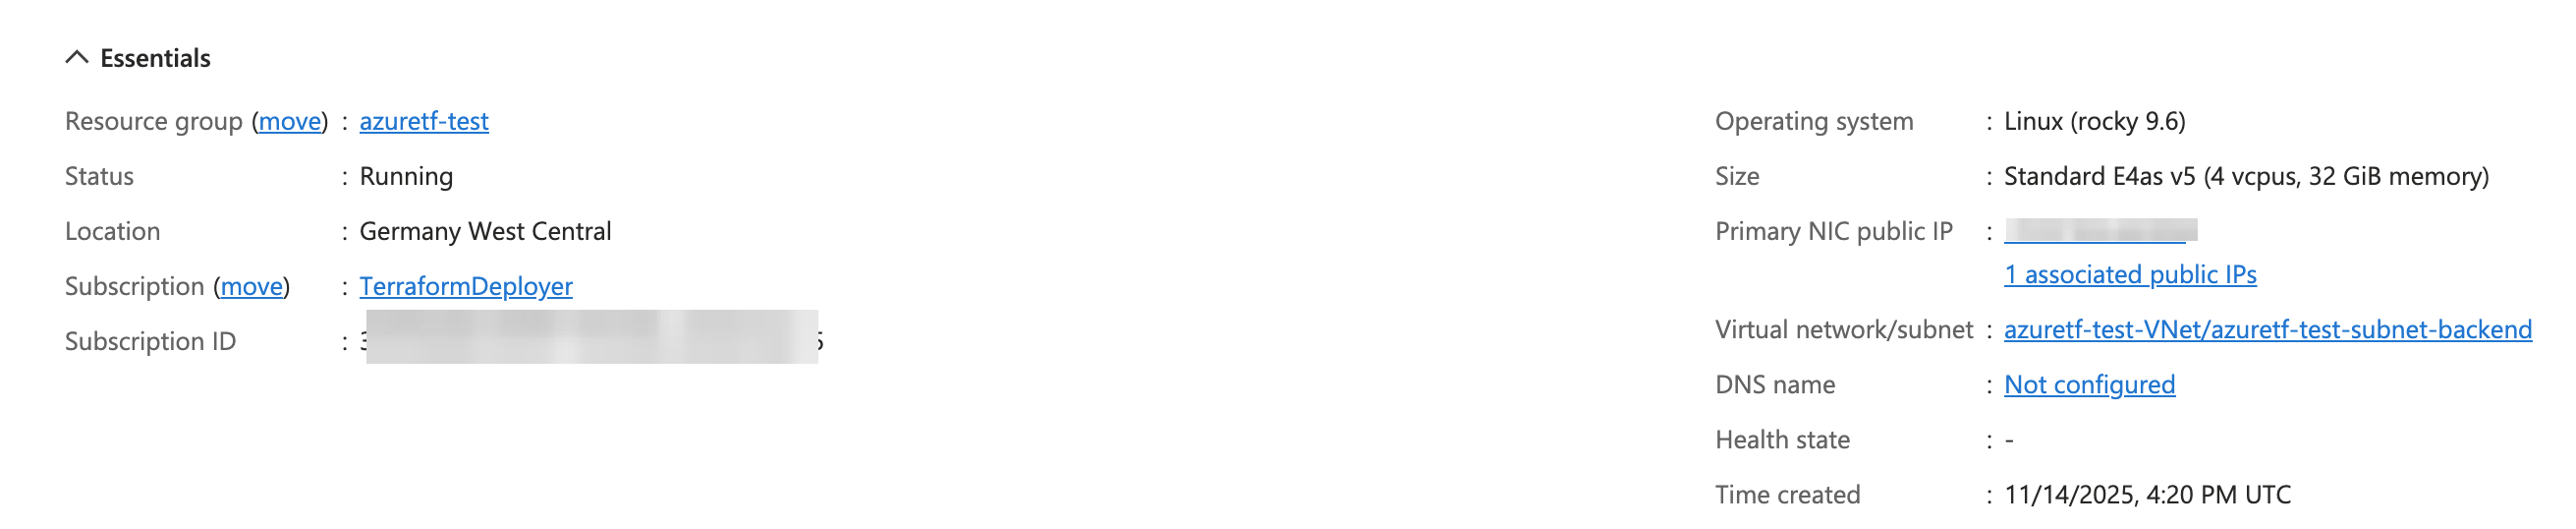
The VM IP address must be replaced with the correct value, which can be verified in the Azure portal. In this specific case, the vm-ip value is:
135.220.198.132
If a different username or SSH path is chosen, ensure those values are updated accordingly.
Setup Mirror Access#
Use curl to download a few resources. Now it is time to use the mirror.squirro.net credentials.
In order to do this safely, create the following file:
/root/.netrc
Insert the following content:
machine mirror.squirro.net login <mirror username> password <mirror password>
Set restrictive file permissions:
chmod 600 /root/.netrc
Now, we can simply access mirror.squirro.net using the curl -n command. This approach eliminates the need to include the username and password directly in the command, ensuring they do not appear in the bash history or process table.
Install Ansible#
Now that you can access the instance and the software mirror you can install Squirro using Ansible.
For more details on Squirro Ansible installation, see Install and Manage Squirro with Ansible.
dnf install ansible
Install the Squirro Ansible Role#
Identify the latest version of Squirro Ansible by using the following command:
curl -ns https://mirror.squirro.net/ansible/ | w3m -dump -T text/html | sort -Vr
Sample output:
squirro-ansible-3.12.2.zip                         18-Mar-2025 09:13              101933
squirro-ansible-3.12.1.zip                         03-Mar-2025 11:39              101933
squirro-ansible-3.11.6.zip                         11-Dec-2024 19:16              120435
squirro-ansible-3.11.4.zip                         19-Mar-2025 11:01              117614
squirro-ansible-3.11.1.zip                         13-Nov-2024 14:25              115918
squirro-ansible-3.10.6.zip                         11-Sep-2024 15:21              113714
squirro-ansible-3.10.4.zip                         26-Jun-2024 11:21               98803
...
Typically, it is best to use the very latest version of Squirro. However, if you are installing an older version of Squirro, selecting a matching version may be advisable for compatibility.
Install squirro-ansible into /root/squirro-ansible using
the following command:
curl -ns https://mirror.squirro.net/ansible/squirro-ansible-<version>.zip -o /tmp/squirro-ansible.zip; unzip /tmp/squirro-ansible.zip -d /root/squirro-ansible
Alternatively, clone the role from here:
cd /root/
git clone git@github.com:squirro/squirro-ansible.git
Configure the Ansible Playbook#
Enter the /root/squirro-ansible directory and modify the playbook-quickstart.yml file.
Set the variables as follows:
- name: Quickstart Install Squirro
   hosts: all
   become: true
   vars:
      squirro_clusternode: true
      squirro_storagenode: true
      yum_user: <mirror user>
      yum_password: <mirror password>
      squirro_channel: stable
      squirro_version: latest
      elasticsearch_discovery_type: single-node
      elasticsearch_ssl_mode: single-node
      nutrient_pdf_viewer_license_key: <license key>
   roles:
      - role: squirro-ansible
On Squirro 3.15.4 and later, set the nutrient_pdf_viewer_license_key variable to the license key for the built-in PDF viewer. Without a valid key, PDF documents render with a watermark. For instructions on obtaining the key, see the PDF Viewer page.
The squirro_version can be pinned to a desired
version. For production deployments, it is usually
recommended to pick an LTS version. You can look for
releases with the -lts suffix using this command:
curl -ns https://mirror.squirro.net/el/9/stable/x86_64/ | w3m -dump -T text/html | sort -Vr
Install Squirro#
Install Squirro:
ansible-playbook --connection=local --inventory 127.0.0.1, playbook-quickstart.yml
This executes hundreds of automated tasks to prepare the system for Squirro and download and install all required packages. The process should take ~ 15 minutes.
At times, you may encounter outputs similar to the following:
msg": "This can take a while. To monitor the progress, run 'tail -f /var/log/squirro/install-storage-node.log on the instance"
If the task takes longer than expected, you can open another terminal and monitor the content of these logs or use the tail command to track the progress of the installation.
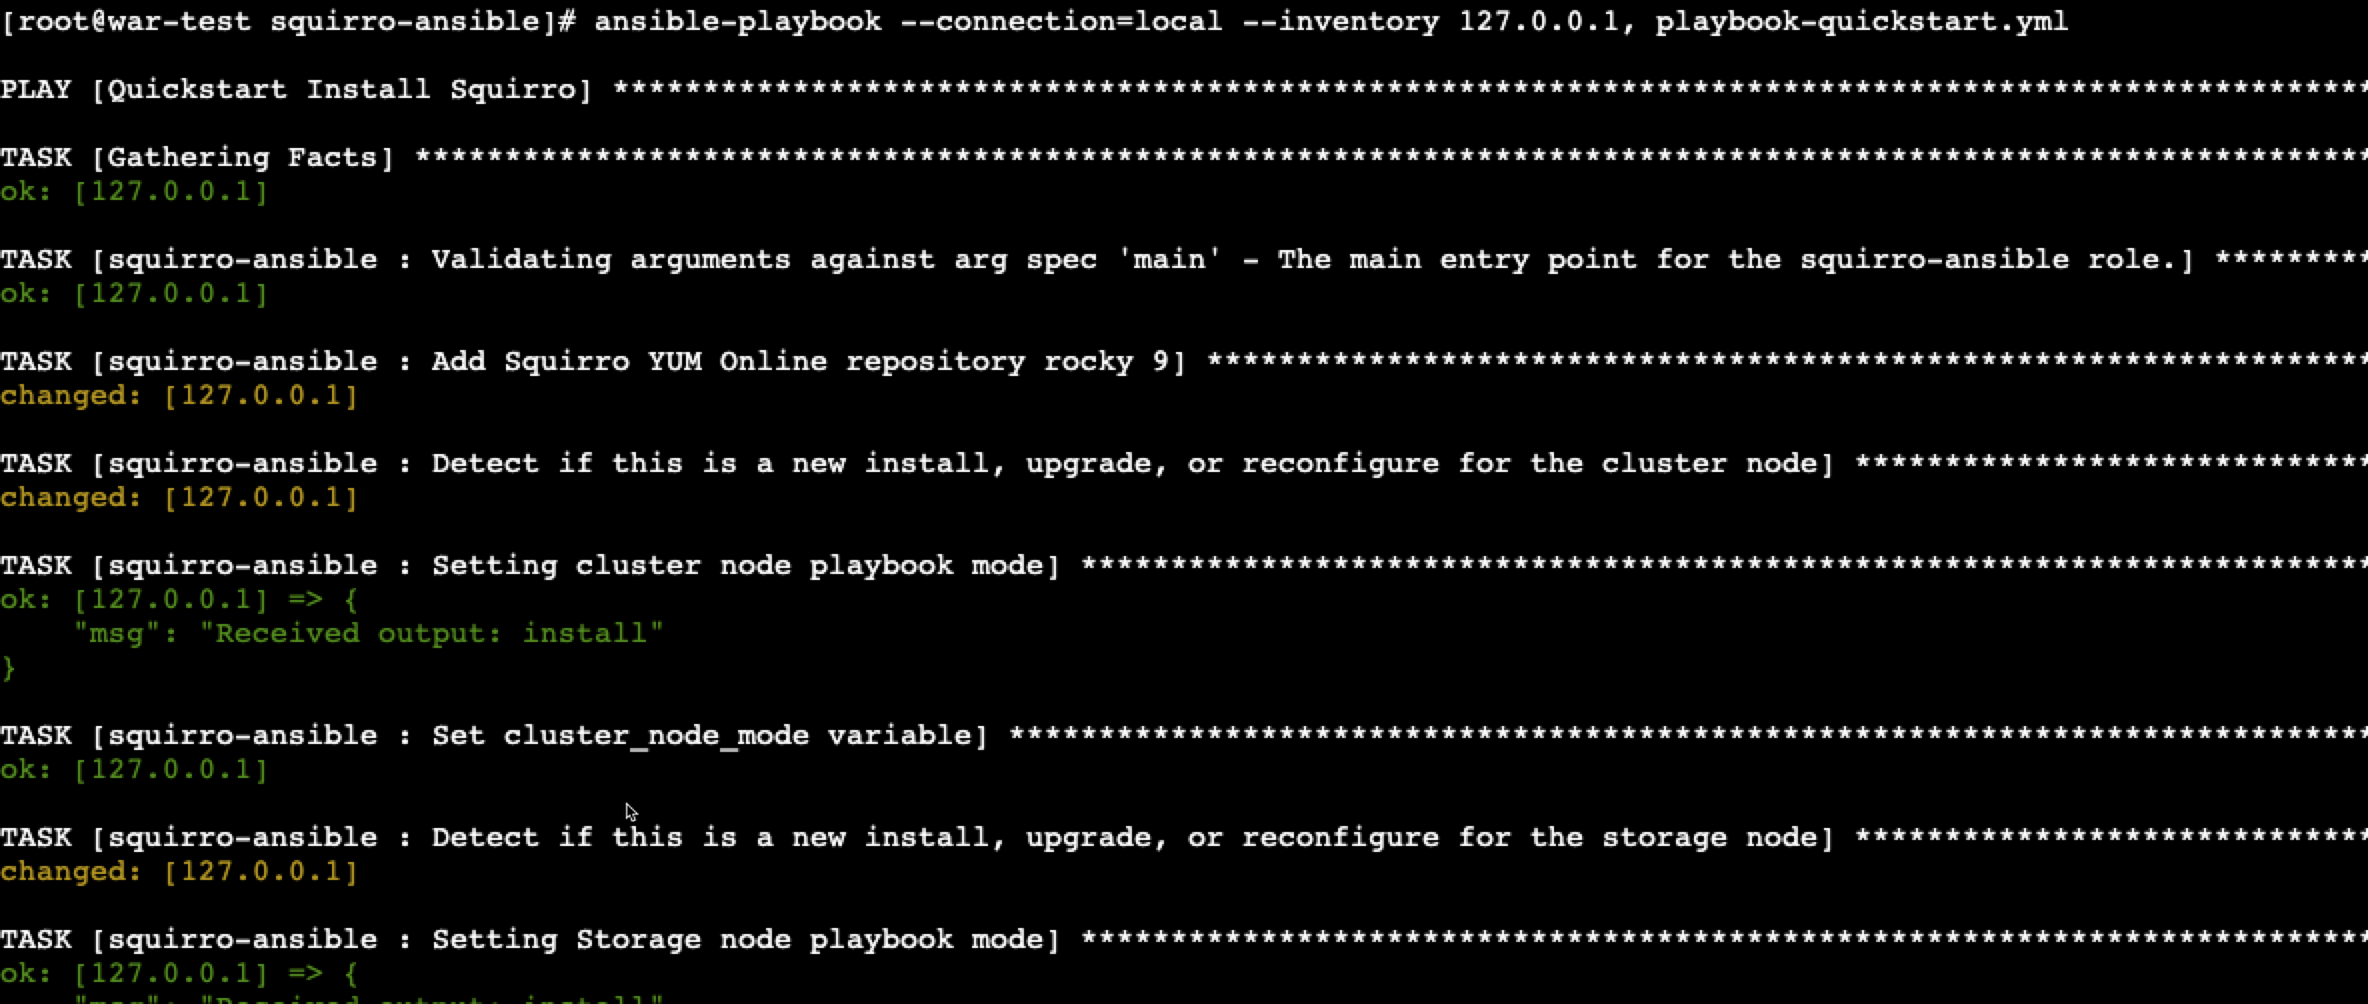
A successful installation typically ends like this:

Validate the Installation#
The primary method to verify that all Squirro services are up and running is to use the built-in squirro_status command.
[root@war-test squirro-ansible]# squirro_status
Squirro Version: 3.13.6 Build 55
Squirro Cluster Service: service not installed
GET https://localhost:9200/_cluster/health [status:200 duration:0.022s]
ES Status        : green
ES Active Shards : 100%
System Uptime  : 1:08:18.420000
Local Service Health:
|---------------||---------------------------------------------------------------------------------|
| Service       || Status                                                                          |
|---------------||---------------------------------------------------------------------------------|
| frontend      || OK                                                                              |
| configuration || OK                                                                              |
| content       || OK                                                                              |
| datasource    || OK                                                                              |
| digestmailer  || OK                                                                              |
| emailsender   || OK                                                                              |
| filtering     || OK                                                                              |
| indexmanager  || OK                                                                              |
| ingester      || OK                                                                              |
| machinelearni || OK                                                                              |
| notes         || OK                                                                              |
| pdfconversion || OK                                                                              |
| plumber       || OK                                                                              |
| relatedstory  || OK                                                                              |
| scheduler     || OK                                                                              |
| search        || OK                                                                              |
| studio        || OK                                                                              |
| thumbler      || OK                                                                              |
| topicproxy    || OK                                                                              |
| userproxy     || OK                                                                              |
| webshot       || OK                                                                              |
| provider      || OK                                                                              |
| topic         || OK                                                                              |
| user          || OK                                                                              |
|---------------||---------------------------------------------------------------------------------|
If all services show OK and Elasticsearch is green, then
you can proceed.
Next, you can access the installation in a browser using the VM public IP address.
By default, Squirro is installed with a self-signed certificate. As a result, accessing the site via the IPv4 address generates a TLS error, such as the following:
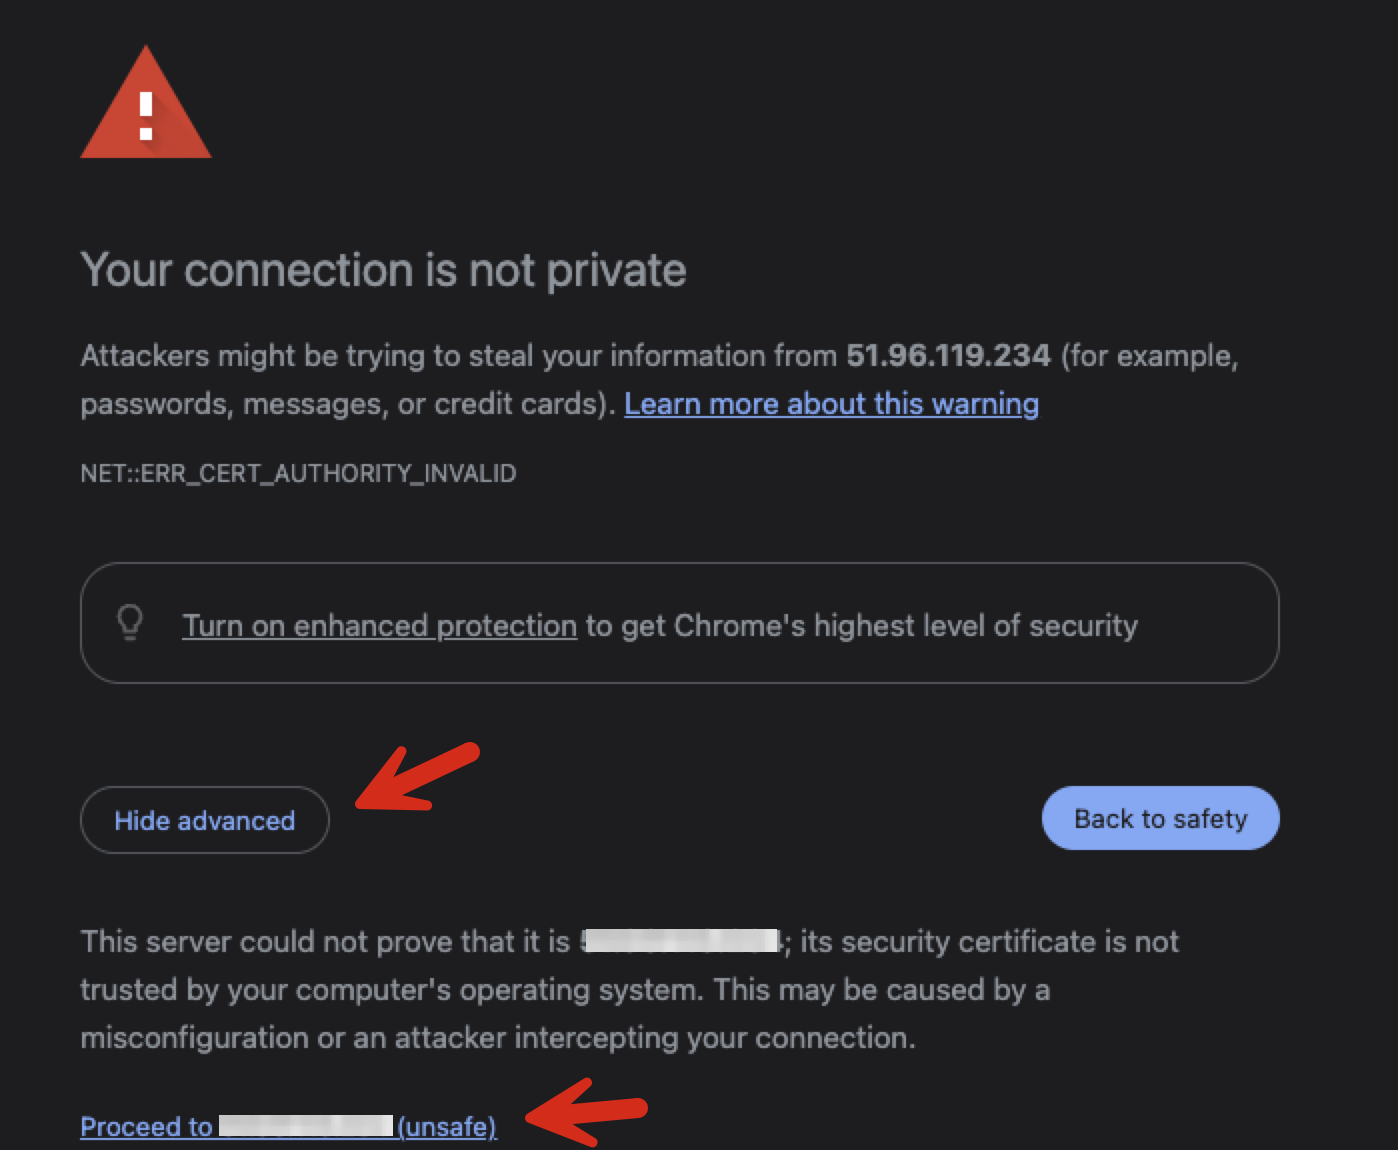
Most browsers provide an option to bypass this warning, and it is safe to do so at this stage.
After bypassing the warning, the Squirro instance should display a welcome screen similar to this:

Set up the initial Server Administrator User#
In this initial state, Squirro allows new signups. It is essential to immediately set up an initial user and secure the system.
Click the Sign up button.
The user you are about to create serves as a fallback account. That account is intended for use only in cases where Single Sign-On fails and requires maintenance.
For example:
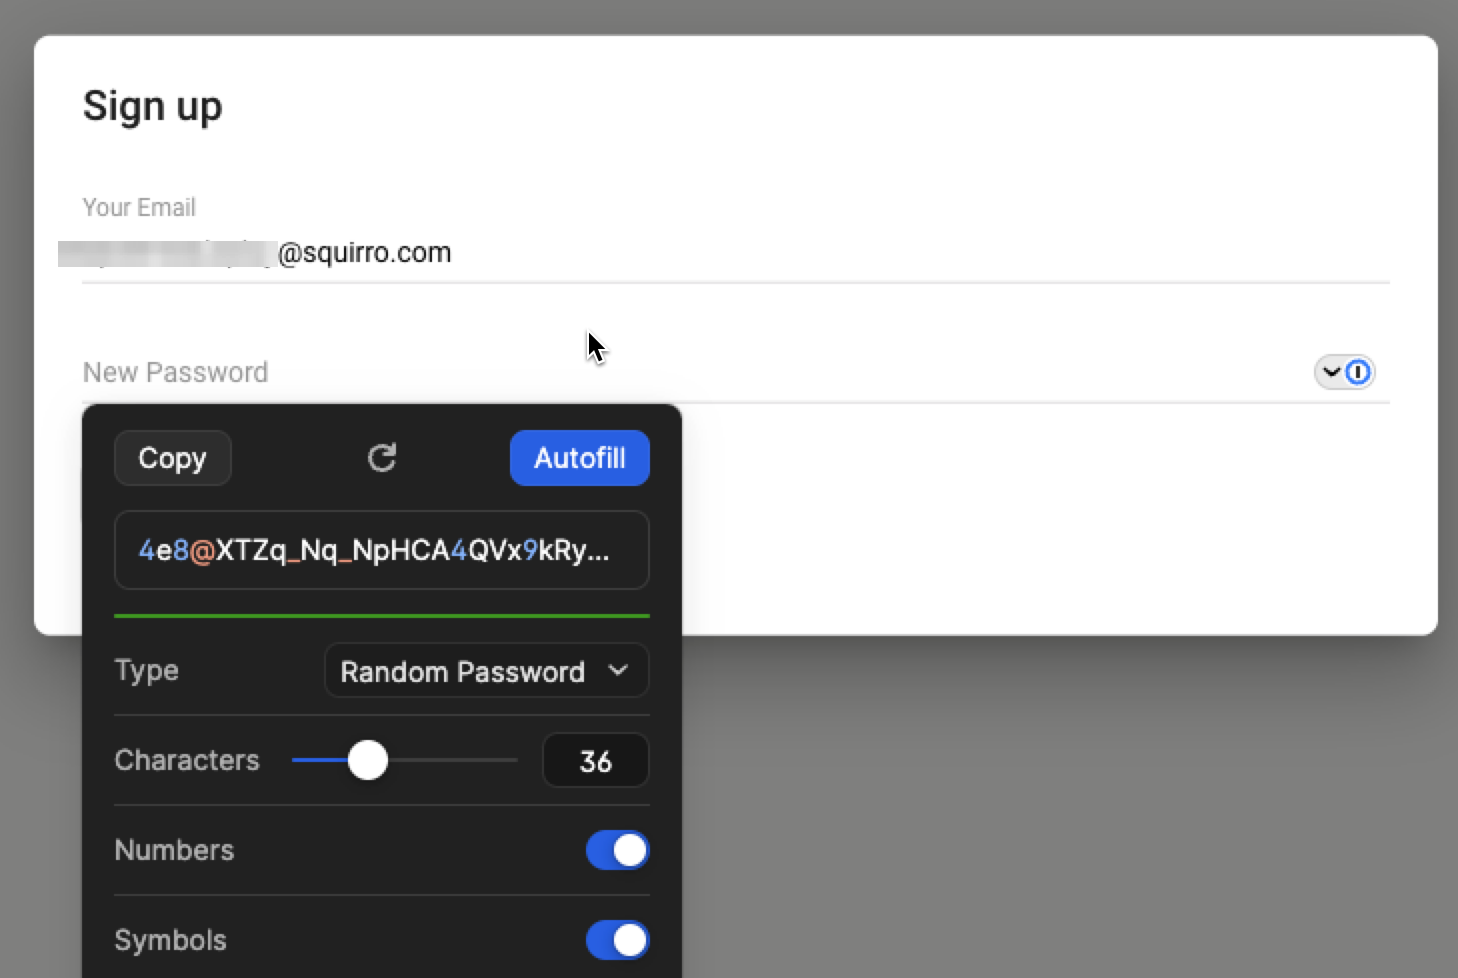
As shown here, always use 1Password to generate a long and secure password. Allow 1Password to capture the password, and consult with your IT department to determine the appropriate vault for storing the account credentials.
Click the Autofill button, and then the Sign up button.
Once logged in, you must disable further signups immediately. To do this, navigate to the Server section.
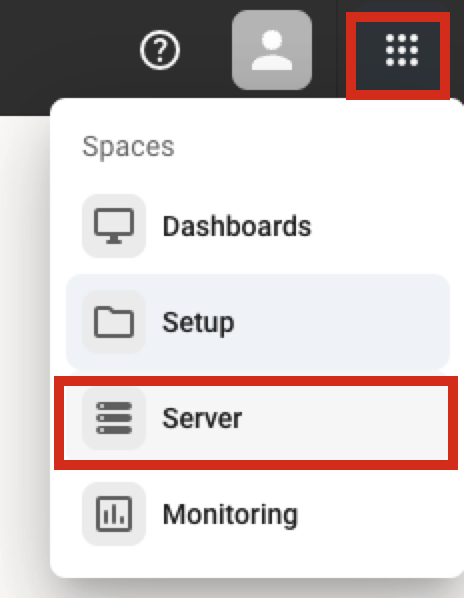
Navigate to Configuration, Search for signup, locate frontend.userapp.signup
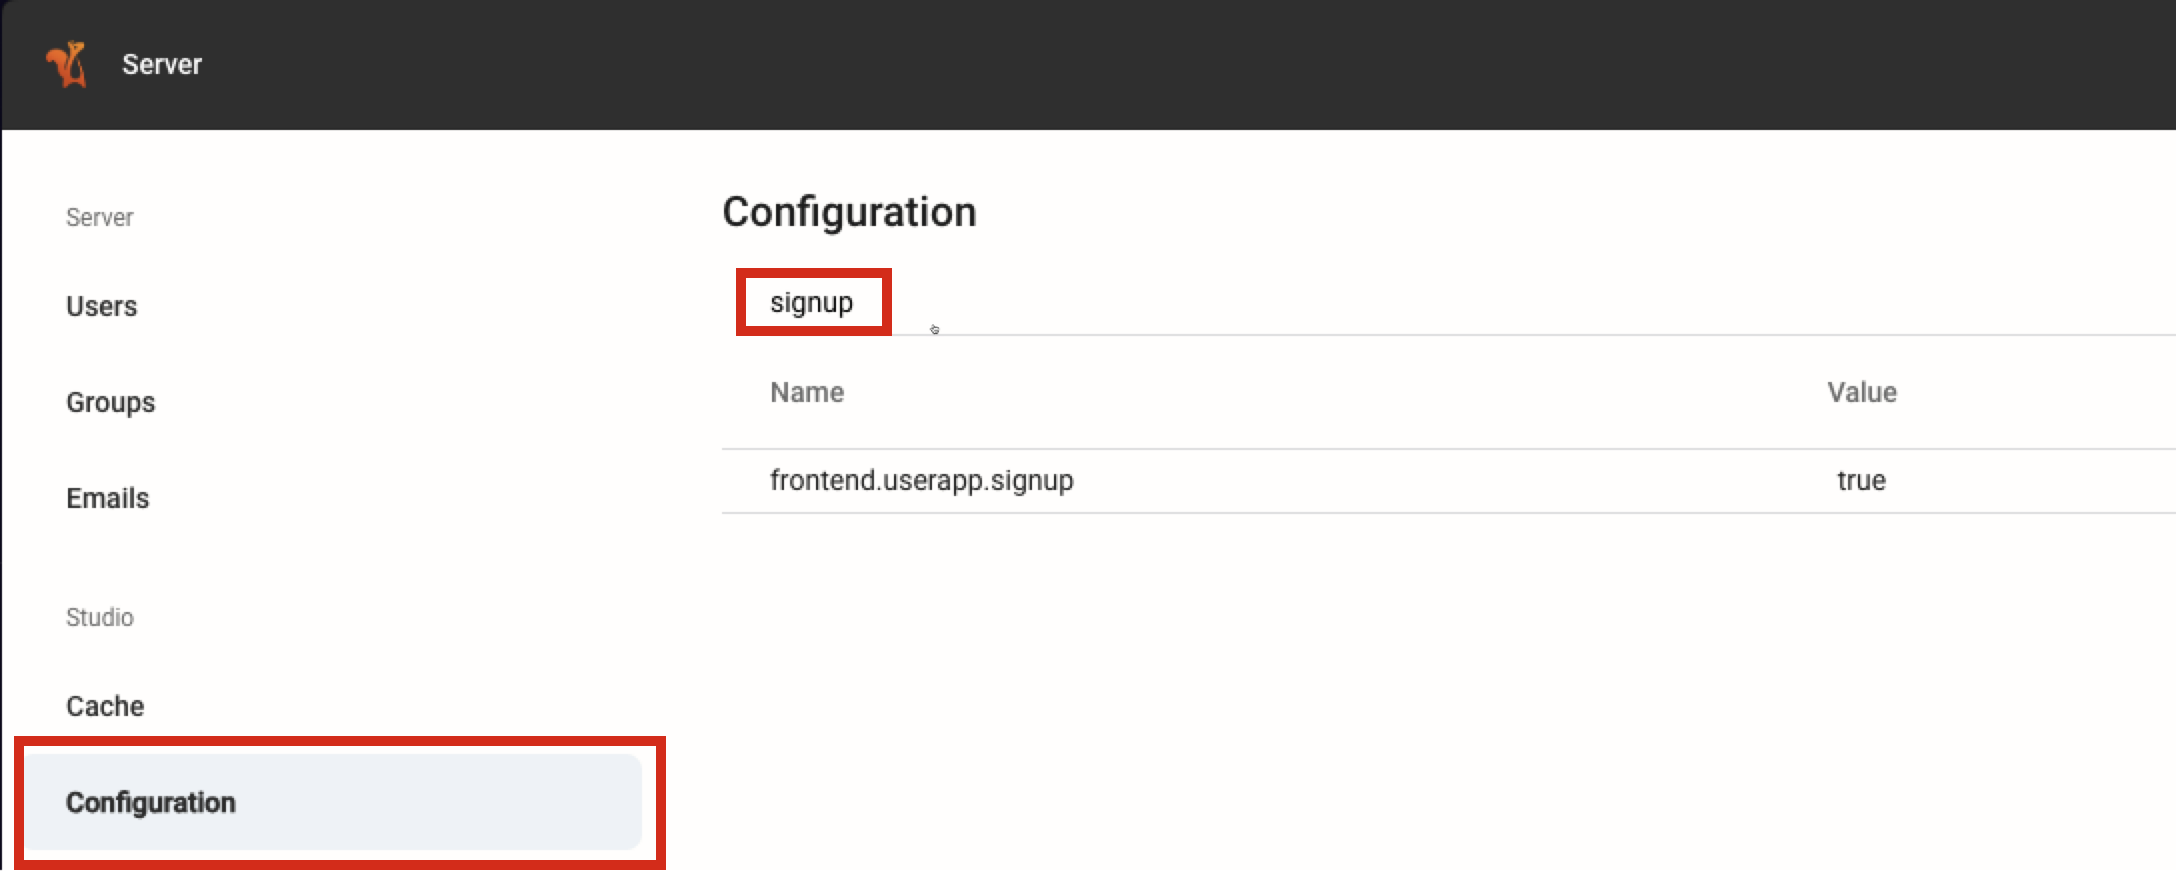
Click Edit and uncheck the checkbox and save.

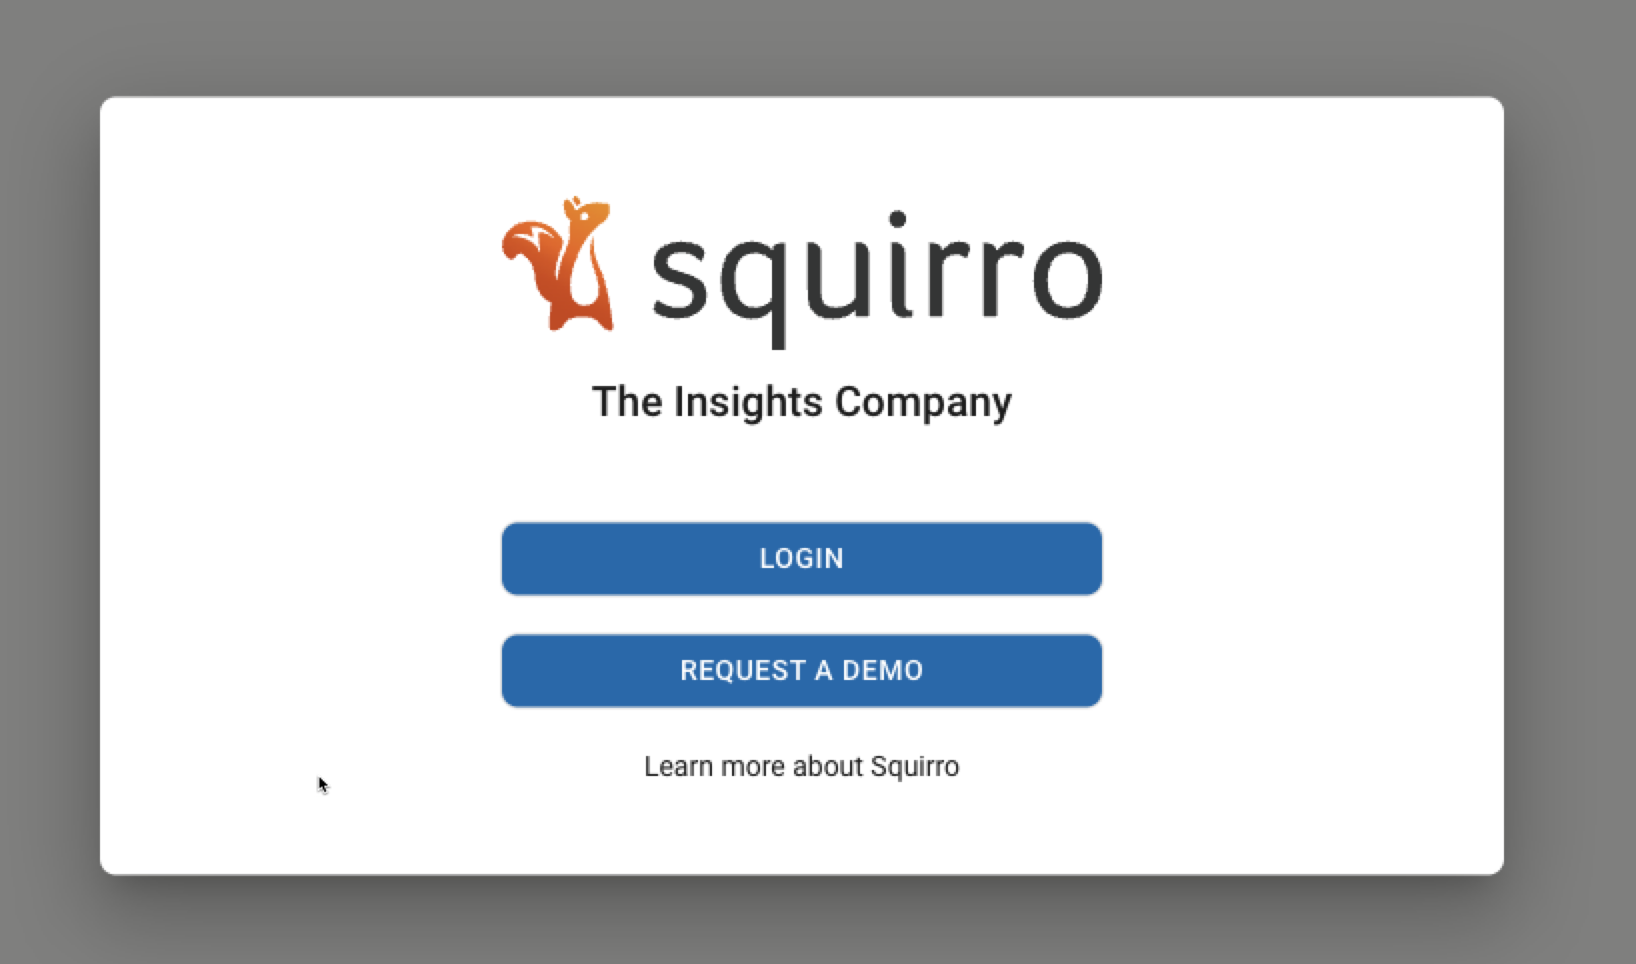
Log out to validate the settings is effective:

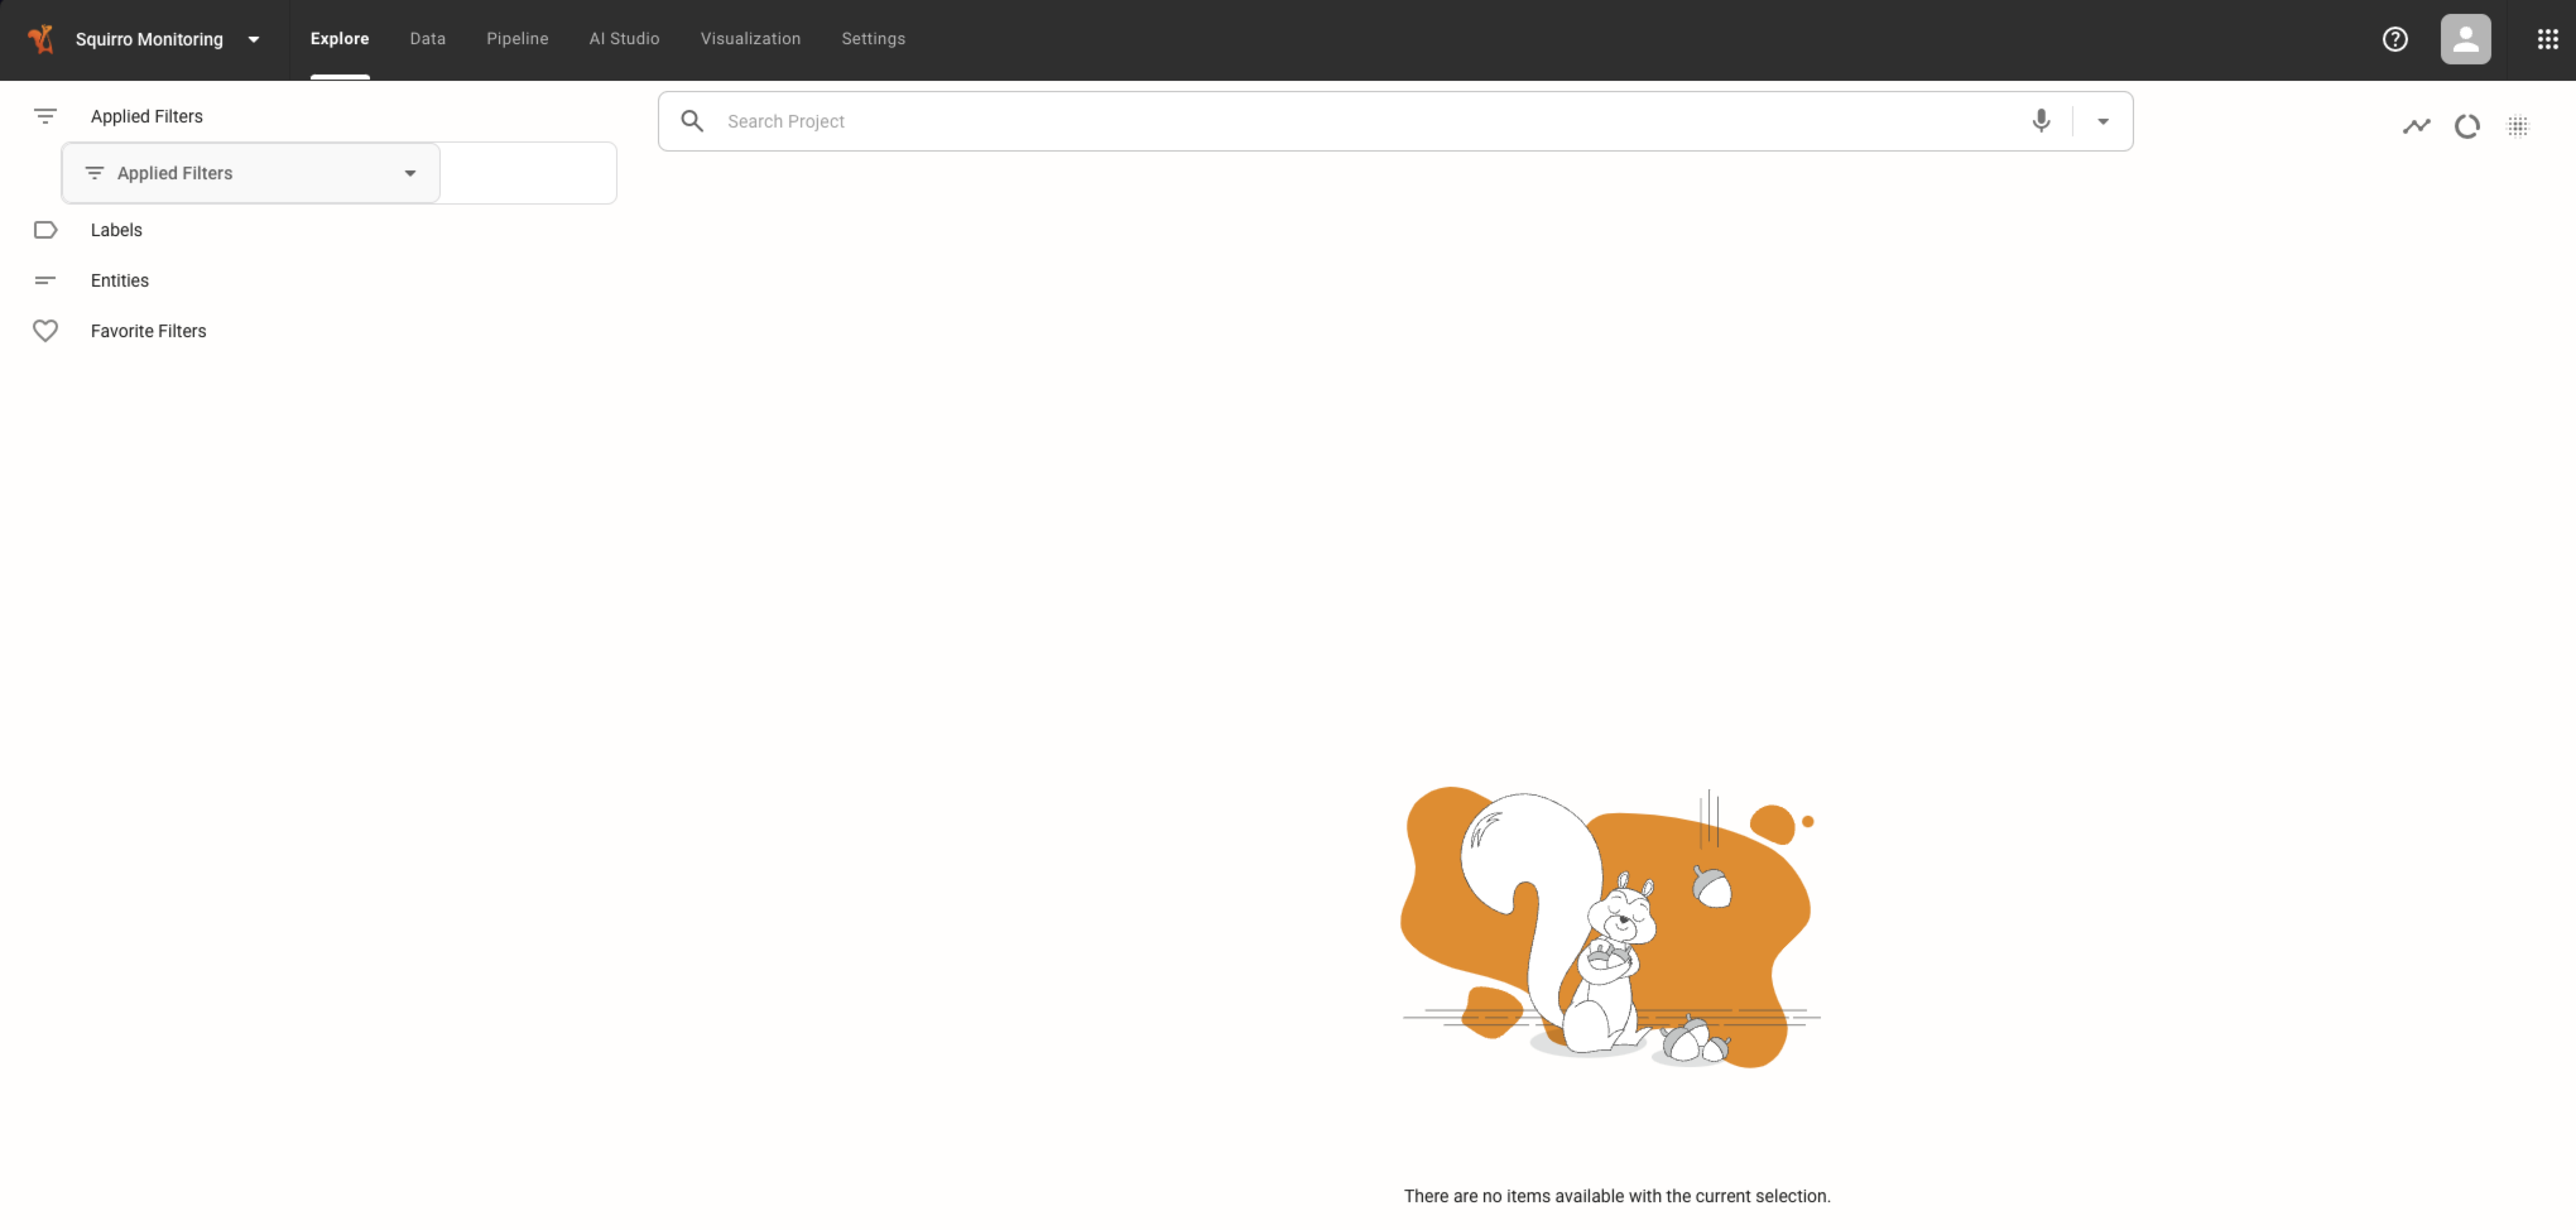
Observe that the Sign up option is no longer visible:
Setup DNS#
The next step is to set up a DNS record for the instance, such as myinstance.example.com. This process is outside the scope of this document. Please contact the IT department for assistance with this task.
Setup SSL/TLS#
Create your own SSL certificate and key, then overwrite the following files on the instance:
/etc/nginx/ssl/localhost.crt
/etc/nginx/ssl/localhost.key
Deployment Teardown#
If this is a test deployment, or if anything goes wrong or plans change, then you can leverage Terraform to quickly shut down and destroy the entire deployment.
Warning
The following command destroys all data in the deployment. That operation is irreversible.
./destroy.sh
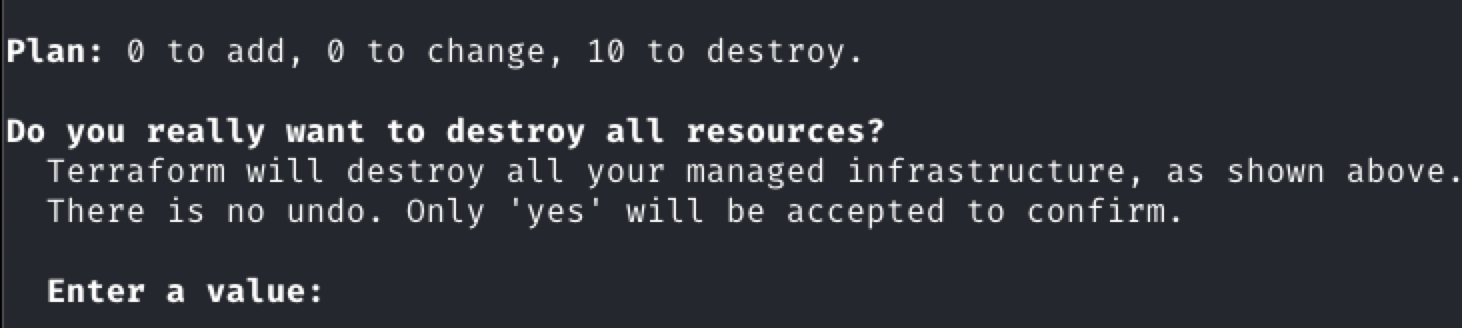
Type yes to proceed.